
Flat polish is lovely, but 3D Christmas nails are the designs people actually stop you to ask about. Tiny sculpted trees, raised snowflakes, candy canes that curl off the nail, and miniature gift bows you can feel under your fingertip — these are the sets that turn a manicure into a conversation piece. This guide collects 15 of them, each with a nail shape, a skill level, an honest wear time, and one mistake to avoid, so you know exactly what you are asking for before you sit in the salon chair.
Every design here uses real dimension: builder gel, sculpting gel, acrylic, charms, rhinestones, and caviar beads, layered over a festive base colour.
This guide is written for advanced nail-art fans who already know their way around gel, and who want a Christmas set that photographs beautifully and feels like jewellery on the nails. Each section tells you the shape, the skill level, the wear time, and the cost, so you can pick the set that fits your December.
Quick Answer: For your first 3D Christmas set, start with the 3D Ornament Baubles (#7) or the Raised Gift Bows (#10). For the most dramatic look, book the Sculpted Christmas Tree (#1) or the 3D Snowman (#9). For a party set that photographs beautifully, ask for the Raised Snowflakes with Crystal Centres (#2) or the 3D Star Topper (#11). Salon sets run $75-130, and DIY 3D charm kits cost about $20-40.
Why 3D Christmas Nails Are Worth Your Time
Three-dimensional nail art earns its place at Christmas because the season is already tactile. Wool jumpers, pine needles, wrapping paper, frost on a window — December is a month you feel as much as you see, and 3D nails fit that mood perfectly.
There is a practical win too. Dimension hides small imperfections. A slightly uneven base colour disappears under a sculpted wreath, and a charm placed with intention draws the eye away from a cuticle that is not quite perfect.
Here is the part most people learn too late: 3D nails need a different kind of care. Sculpted gel and charms catch on knitwear, hair, and tights, so you need to be gentle with them, and you need a tech who seals the edges properly. A charm glued on top of a top coat will pop off in a day. A charm embedded in builder gel and sealed with a thick top coat will last two to three weeks.
This guide suits anyone looking for 3D Christmas nail art, sculpted holiday nails, or a salon reference photo for an advanced Christmas set.
At a Glance
- All 15 designs use real dimension — sculpting gel, acrylic, charms, rhinestones, or caviar beads — layered over a festive base.
- Wear times run 2-3 weeks for a gel set, with sculpted elements lasting longest when they are embedded in builder gel and sealed.
- Salon prices run $75-130 for a full 3D gel set, while DIY 3D charm kits cost about $20-40.
- Finishes include glossy sculpted gel, matte velvet, chrome, glitter, and crystal, so you can match your outfit and mood.
- Every design lists a nail shape, a skill level, a wear time, and an occasion, so you can pick in minutes.
| # | Design | Nail Shape | Skill Level | Wear Time | Occasion |
|---|---|---|---|---|---|
| 1 | Sculpted Christmas Tree | Long almond | Advanced | 2-3 weeks | Christmas Day |
| 2 | Raised Snowflakes with Crystal Centres | Almond | Advanced | 2-3 weeks | Holiday party |
| 3 | 3D Candy Cane Swirls | Coffin | Intermediate | 2-3 weeks | Christmas party |
| 4 | Sculpted Gingerbread Man | Short square | Advanced | 2 weeks | Family gathering |
| 5 | 3D Santa Hat with Fur Trim | Almond | Intermediate | 2-3 weeks | Christmas Day |
| 6 | Raised Reindeer Antlers | Coffin | Advanced | 2-3 weeks | Holiday party |
| 7 | 3D Ornament Baubles | Oval | Intermediate | 2-3 weeks | Dinner |
| 8 | Sculpted Holly Berries and Leaves | Short almond | Advanced | 2-3 weeks | Christmas Eve |
| 9 | 3D Snowman | Long coffin | Advanced | 2 weeks | Christmas Day |
| 10 | Raised Gift Bows | Squoval | Intermediate | 2-3 weeks | Gift exchange |
| 11 | 3D Star Topper | Almond | Intermediate | 2-3 weeks | New Year |
| 12 | Sculpted Christmas Wreath | Oval | Advanced | 2-3 weeks | Christmas Eve |
| 13 | 3D Icicles and Frozen Crystals | Stiletto | Advanced | 2 weeks | Winter ball |
| 14 | Raised Poinsettia Flower | Almond | Advanced | 2-3 weeks | Holiday dinner |
| 15 | 3D Christmas Stocking with Fur Cuff | Short square | Intermediate | 2-3 weeks | Cozy day |
1. Sculpted Christmas Tree on Deep Green

The sculpted Christmas tree is the queen of 3D Christmas nail art, and it is the design every advanced nail fan should try at least once. Instead of painting a tree, your tech builds one: layers of green sculpting gel, stacked from the widest branch at the base to the narrowest at the tip, each cured separately so the tree stands proud of the nail. Tiny gold baubles, no bigger than a pinhead, are pressed into the gel while it is still soft, and a gold star charm crowns the top.
You need a deep green gel base, a sculpting gel in a slightly lighter green, gold caviar beads, and a star charm. The tree is built on a long almond nail, because the shape gives the tech room to work — about 8 to 10 mm of free edge. Each gel layer is cured for 60 seconds under an LED lamp before the next one goes on, which is what keeps the layers distinct instead of melting into one green blob. I once watched a tech rush the curing and the whole tree slumped sideways; patience is the whole technique here.
This is advanced work, so allow two to two and a half hours for a full set, and book a tech who sculpts regularly. Gel lasts 2-3 weeks, though the tree is the first thing to catch on knitwear, so wear gloves when you pull on a jumper.
Pro Tip: Ask your tech to seal the tree with a thick no-wipe top coat and to cap the free edge. An unsealed sculpted tree snags on everything and chips at the tip within days.
See sculpted nail art ideas or how builder gel works.
This one costs about $85-130 in a salon and takes around two hours.
2. Raised Snowflakes with Crystal Centres

Raised snowflakes are the most elegant 3D Christmas design, and the one that photographs best under party lights. The snowflake is drawn in a thick white sculpting gel, built up in two layers so the arms stand proud of the nail, and a single crystal is set into the centre while the gel is still soft. Against an icy blue or deep navy base, the white flake looks like frost that has just settled.
Paint an icy blue or navy gel base and cure it, then use a fine detail brush to draw the snowflake in a thick builder gel. Six arms, each about 4 mm long on a medium almond nail, with tiny branches off each arm. Cure for 60 seconds, then add a second thin layer over the arms to raise them further. Press a small crystal into the centre with a wax pencil, then seal the whole nail with a glossy top coat, taking care not to flood the crystal and dull its sparkle.
This is advanced work, so allow 90 minutes to two hours. Gel lasts 2-3 weeks, and the crystals hold best when they are set into gel rather than glued on top of a finished top coat.
Pro Tip: Keep the snowflake to one or two accent nails per hand. Ten raised snowflakes catch on everything, while two look deliberate and last far longer.
See snowflake nail ideas or how to set crystals on nails.
Salon price runs about $80-120, and the set lasts 2-3 weeks.
3. 3D Candy Cane Swirls

Candy cane swirls are the most playful 3D design in this list, and one of the most forgiving to wear. The swirl is built from two ropes of gel — one red, one white — twisted together and laid across the nail in a curve, then cured so the twist holds its shape. A tiny peppermint charm on the ring finger finishes the set, and the whole look reads like a sweet shop in December.
Paint a white or soft pink base, then roll two thin ropes of sculpting gel, one red and one white, and twist them together gently. Lay the twisted rope in a diagonal swirl across the nail and press the ends down firmly so they bond to the base. Cure for 60 seconds, then seal with a glossy top coat. Coffin nails of 6 to 8 mm give the swirl room to curve without crowding the cuticle. I made the mistake once of twisting the ropes too tightly, and the swirl looked like a barber pole instead of a candy cane — a loose twist is prettier.
This is intermediate work, so a confident DIY fan can try it with a sculpting gel kit. Allow 60 to 90 minutes for a full set. Gel lasts 2-3 weeks, and the swirls are smooth enough that they rarely snag.
Pro Tip: Roll the gel ropes on a silicone mat dusted with a little clear powder, so they do not stick to your fingers or the table while you twist them.
Browse candy cane nail ideas or sculpting gel basics.
It costs about $70-100 in a salon, or $20-30 for a DIY kit.
4. Sculpted Gingerbread Man

A sculpted gingerbread man is the cutest 3D Christmas design, and the one most likely to make someone smile. The little man is built from brown sculpting gel: a round head, an oval body, and four stubby limbs, each cured separately so the shape holds. White gel icing is piped on top in dots and squiggles, and two tiny black beads become the eyes.
This is a design that works beautifully on short square nails, because the gingerbread man only needs about 6 mm of height. Start with a warm caramel or nude base, then build the body first, cure for 60 seconds, then add the head and limbs one at a time, curing between each. The icing goes on last, with the finest detail brush you own, and two tiny black caviar beads pressed in for eyes. Keep the icing lines thin — thick icing looks like a snowman that has melted.
This is advanced work and can take two hours for a full set, so a salon is worth it. Gel lasts about 2 weeks, and the little arms are the first thing to catch, so be gentle with zips and pockets.
Pro Tip: Build the gingerbread man on the ring finger only, and keep the other nails in a matching caramel with white icing dots. One sculpted figure per hand looks charming; ten look crowded.
See gingerbread nail ideas or how to sculpt with gel.
Salon price runs about $80-115.
5. 3D Santa Hat with Fur Trim

The Santa hat is the most instantly recognisable 3D Christmas design, and the fur trim is what makes it feel real. The hat itself is sculpted from red gel in a soft triangle that flops to one side, the brim is a band of white velvet-effect powder or tiny white beads, and the pom-pom is a single white caviar bead cluster or a tiny fluffy charm pressed into the gel at the tip.
Paint a red gel base, then sculpt the hat on the ring finger using red sculpting gel, shaping the tip so it bends gently to one side. Cure for 60 seconds, then add the fur trim: a band of white acrylic powder pressed into a thin layer of clear gel along the base of the hat, which gives a soft, fuzzy texture. Finish with a white pom-pom charm at the tip. Almond nails of medium length suit the hat best, because the shape echoes the triangle.
This is intermediate work, so a confident DIY fan can manage it with a charm kit. Allow 60 to 90 minutes. Gel lasts 2-3 weeks, and the fur trim holds up well because it is embedded in gel rather than glued on.
Pro Tip: Use a matte top coat over the red hat and a glossy top coat on the rest of the set. The contrast makes the hat look like fabric and the other nails look like patent leather.
Browse Santa nail ideas or velvet powder nail guide.
It costs about $70-105 in a salon.
6. Raised Reindeer Antlers
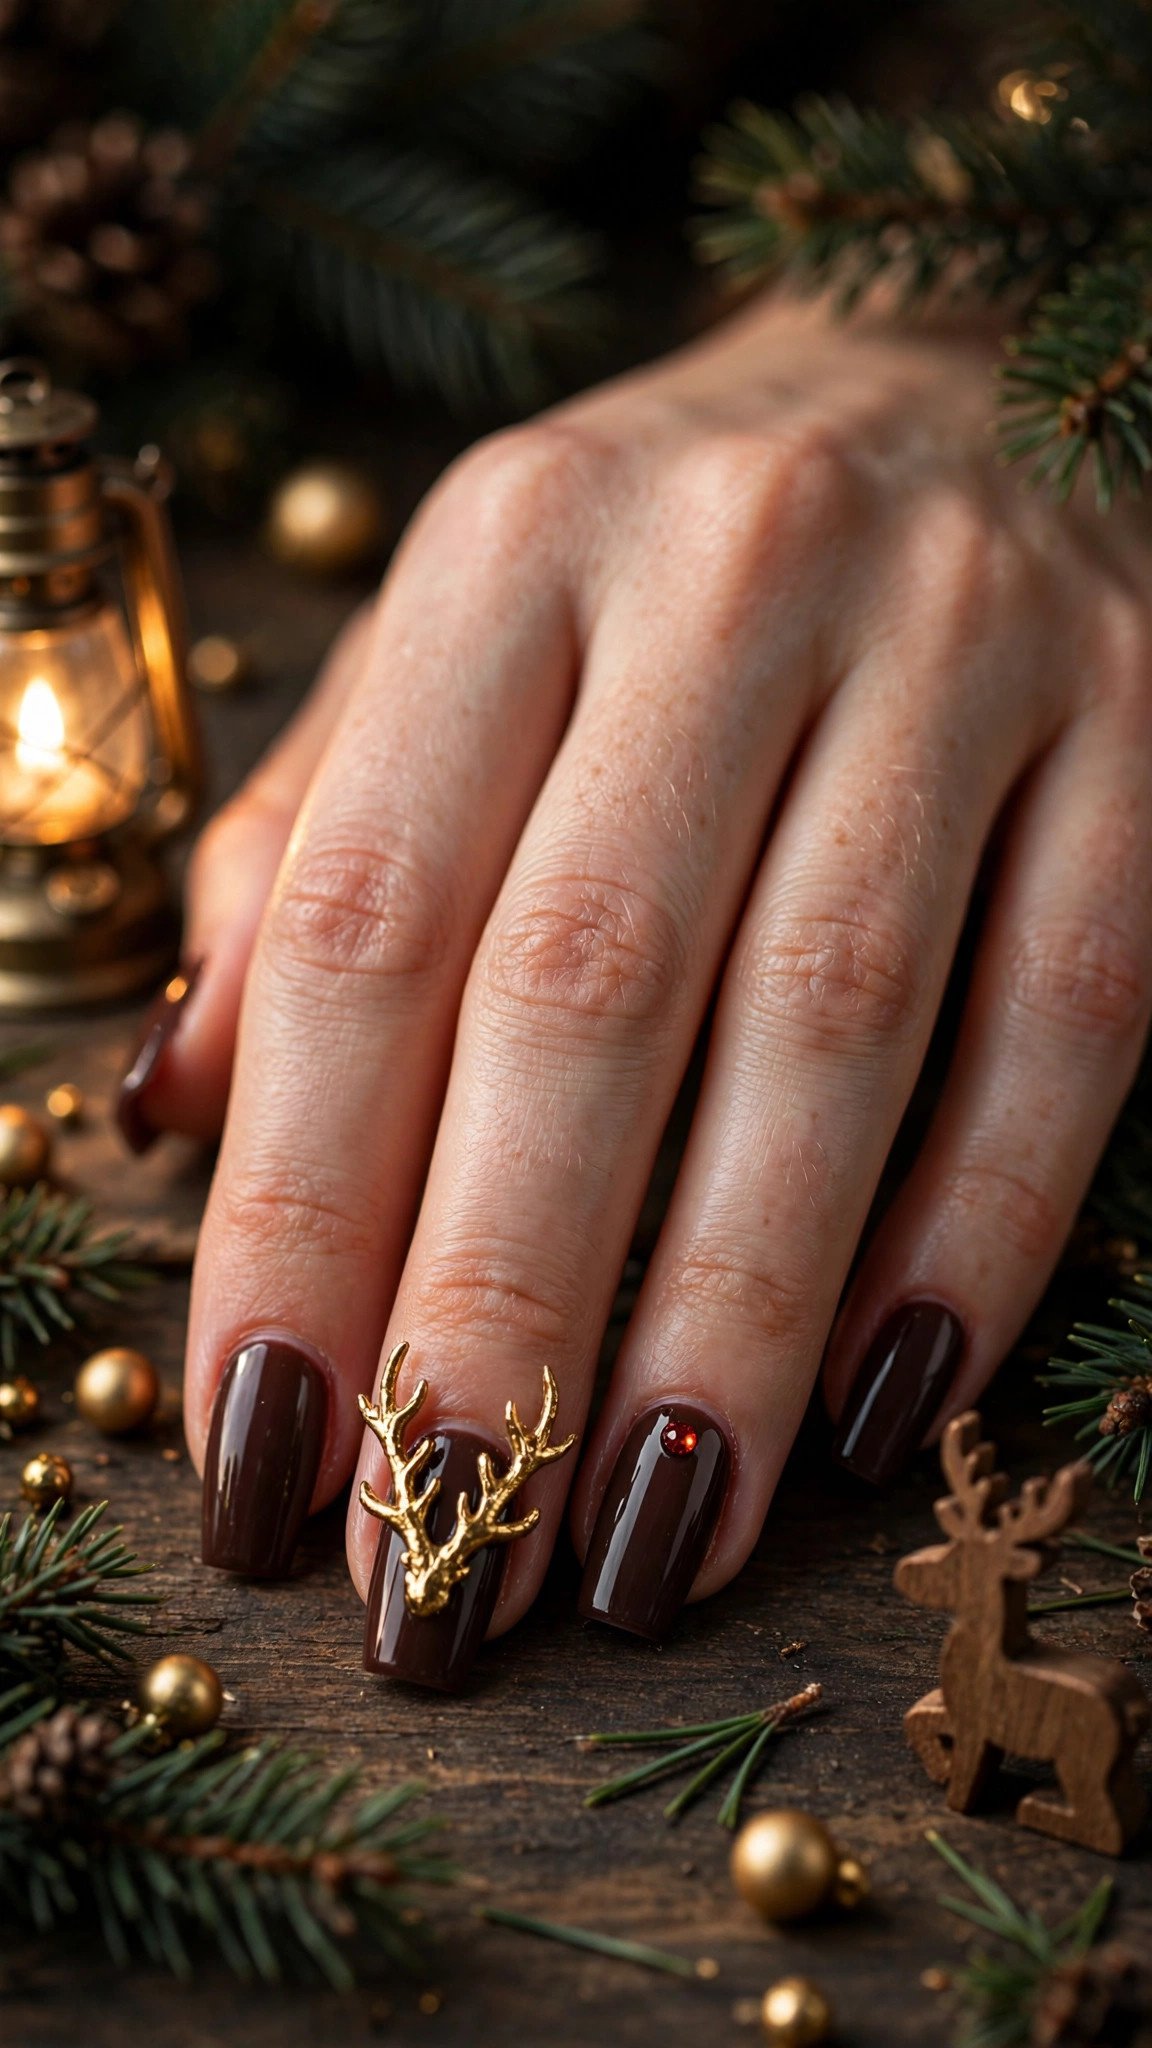
Raised reindeer antlers are the most striking 3D design for a holiday party, because the gold antlers catch the light from across the room. The antlers are drawn in a thick gold sculpting gel, built up in two layers so they stand proud of the nail, with a tiny red rhinestone for Rudolph’s nose on the accent nail. Against a deep brown or dark green base, the gold looks like jewellery.
Paint a deep chocolate brown base, then use a fine detail brush to draw the antlers in gold gel: a main branch curving up from the cuticle, with three smaller branches off each side. Cure for 60 seconds, then add a second layer over the main branch to raise it further. Press a small red crystal at the tip of the ring finger nail for the nose, and seal with a glossy top coat. Coffin nails of 6 to 8 mm give the antlers room to spread without touching the cuticle.
This is advanced work, so allow two hours and book a tech who is confident with fine line work. Gel lasts 2-3 weeks, though the raised antlers can catch on hair, so run your fingers through your hair gently for the first few days.
Pro Tip: Keep the antlers to one accent nail per hand and use a plain gold or brown on the rest. The contrast is what makes the antlers look expensive instead of busy.
See reindeer nail ideas or gold gel nail art.
Salon price runs about $85-120.
7. 3D Ornament Baubles
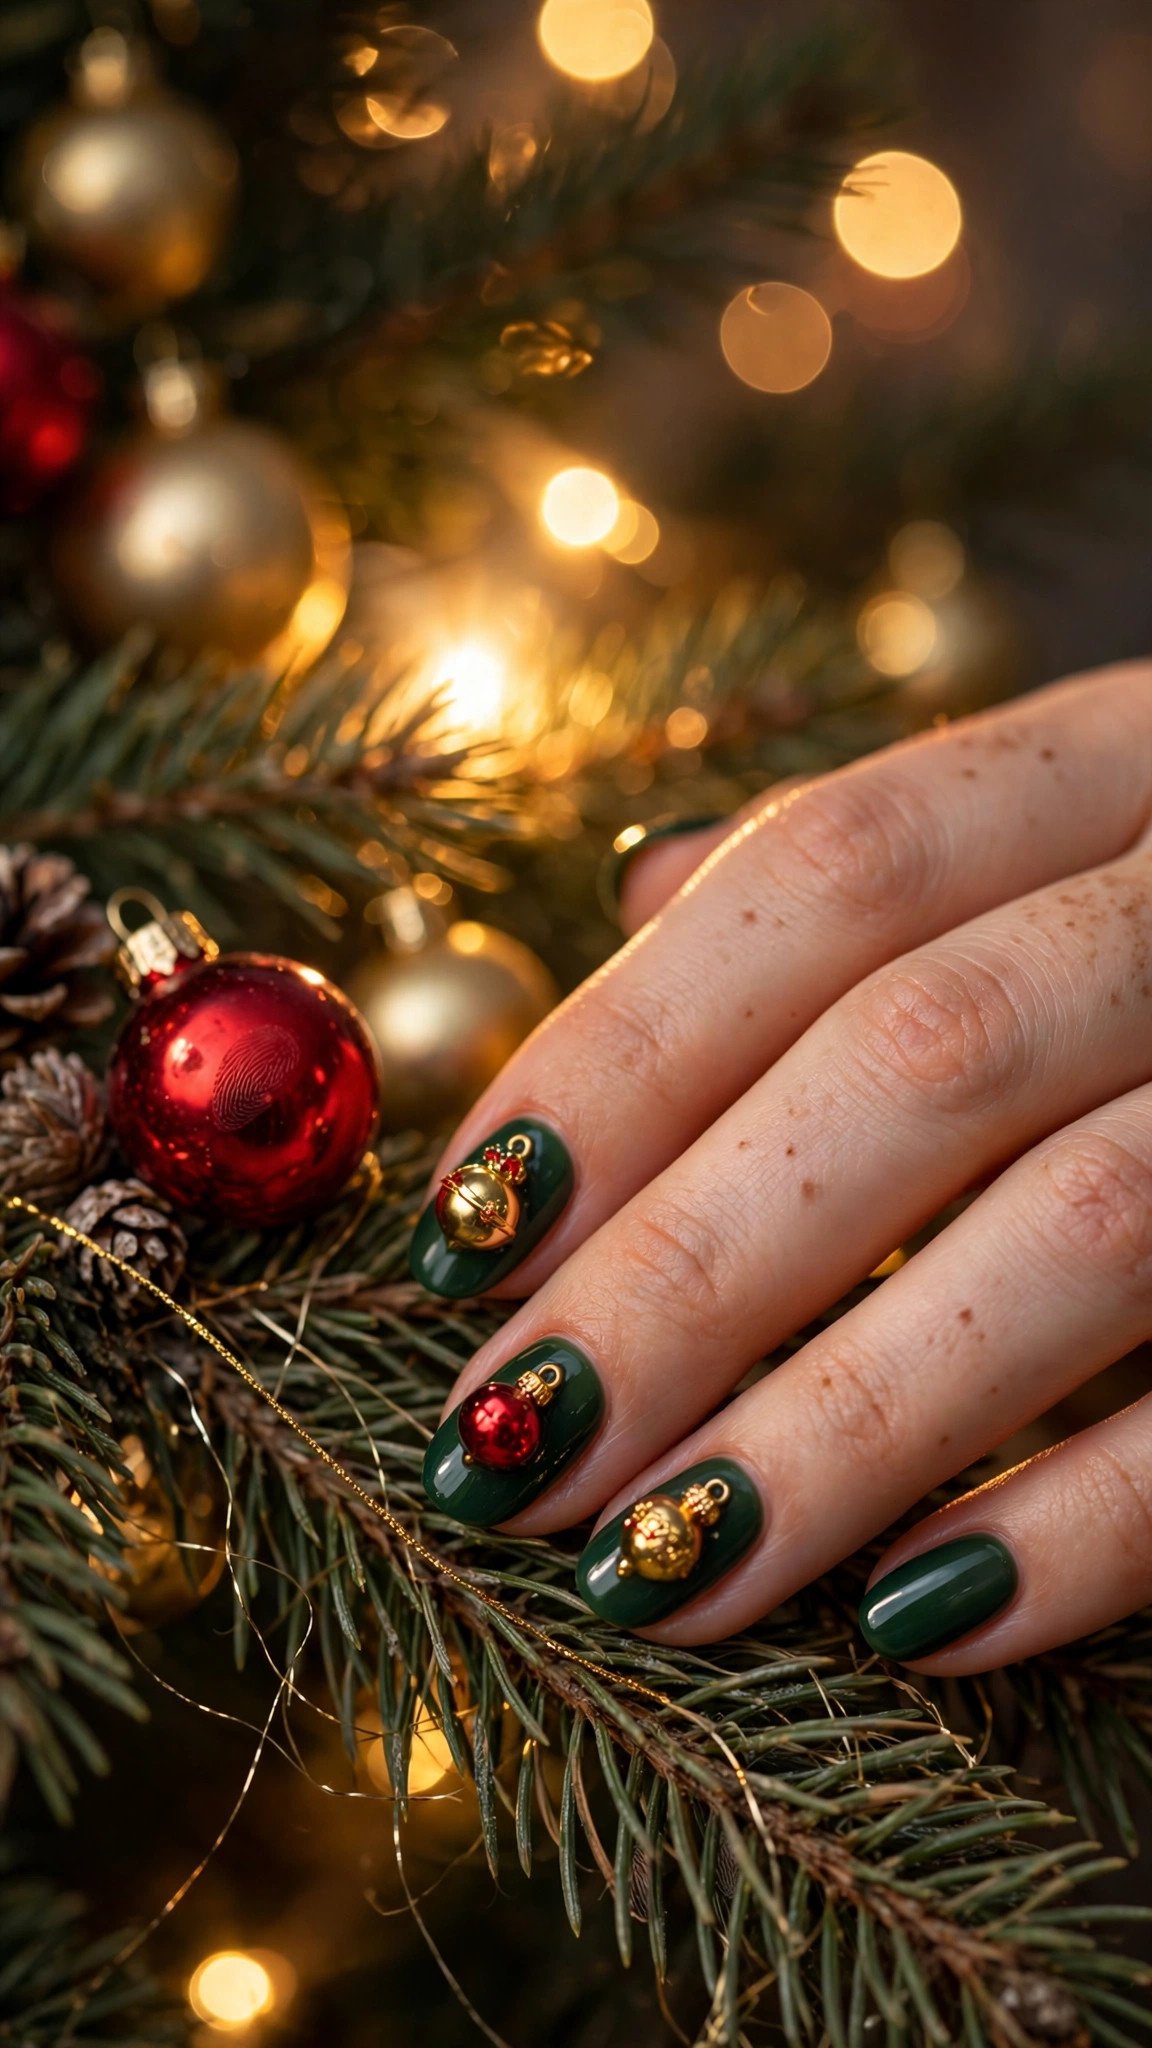
Ornament baubles are the easiest 3D Christmas design to wear, and the best first step into dimensional nail art. The baubles are ready-made charms — tiny gold, red, and green spheres with a little cap on top — set into a layer of builder gel and sealed with a thick top coat. They look like miniature tree decorations, and they catch the light every time you move.
Choose bauble charms no bigger than 3 mm across, and pick two or three per hand at most. Paint a deep green or burgundy base, apply a layer of builder gel, press the baubles in while the gel is still wet, and cure for 60 seconds. Seal with two coats of a thick no-wipe top coat, making sure the top coat climbs up the sides of each bauble so it is locked in. I once glued baubles on top of a finished top coat and lost three of them in a single evening; embedding them in gel is the only method that lasts.
This is intermediate work, and it is genuinely doable at home with a charm kit. Allow 45 to 60 minutes. Gel lasts 2-3 weeks, and the baubles hold well because they are half-buried in gel.
Pro Tip: Mix one gold bauble with one red bauble on the same nail, and keep the other nails plain. Two colours on one nail look like a real tree; five colours look like a craft box.
Browse ornament nail ideas or how to apply nail charms.
It costs about $65-95 in a salon, or $15-25 for a DIY charm kit.
8. Sculpted Holly Berries and Leaves

Sculpted holly is the most classic 3D Christmas design, and the one that suits a quiet Christmas Eve dinner best. The leaves are built from green sculpting gel, shaped with a silicone tool so the edges are pointed and the centre vein is pressed in, and the berries are three tiny red gel spheres, cured until they are glossy and round like real fruit.
Paint a soft cream or sheer nude base, then sculpt two leaves on the ring finger: a small teardrop of green gel, flattened and pinched at the tip, with a vein pressed down the middle using a thin tool. Cure for 60 seconds, then add three red berries — small balls of red gel, about 2 mm across, placed in a triangle where the leaves meet. Cure again, then seal with a glossy top coat, taking care not to flood the leaves and lose their shape. Short almond nails suit holly best, because the leaves have room without overwhelming the nail.
This is advanced work, so allow 90 minutes to two hours. Gel lasts 2-3 weeks, and the berries are surprisingly tough because they are solid gel rather than charms.
Pro Tip: Add a single gold caviar bead beside the berries. One bead looks like a drop of dew; five beads look like glitter that escaped.
See holly nail ideas or sculpting gel leaf techniques.
Salon price runs about $75-110.
9. 3D Snowman

A 3D snowman is the most joyful design in this list, and the one children will ask about first. The snowman is built from white sculpting gel: two stacked spheres for the body, a tiny orange cone for the carrot nose, two black beads for eyes, and a miniature black top hat made from a flat disc of black gel with a smaller cylinder on top. Against a soft sky-blue base, he looks like he has just stepped out of a snow globe.
You need a long coffin nail for this one, because the snowman needs height — about 10 mm from base to hat. Build the bottom sphere first and cure for 60 seconds, then add the head, then the nose and hat, curing between each step so nothing slides. The scarf is a thin strip of red gel wrapped around the neck, pressed in while it is soft. I once built the whole snowman in one go without curing between layers, and he slumped into a white blob before I could save him; curing between layers is not optional here.
This is advanced work, so allow two to two and a half hours, and book a tech who sculpts figures regularly. Gel lasts about 2 weeks, and the hat is the most fragile part, so avoid tight pockets and zips.
Pro Tip: Build the snowman on the ring finger only, and paint the other nails in the same sky blue with white snow dots. One snowman per hand is charming; a whole snowman family is a lot to maintain.
See snowman nail ideas or figure sculpting with gel.
Salon price runs about $90-130.
10. Raised Gift Bows

Raised gift bows are the most wearable 3D Christmas design, and the best choice for a gift exchange or a work party. The bows are ready-made gold or red charms, set into builder gel on the ring finger, with the rest of the set in a matching red or green with a thin gold ribbon line painted across each nail. They look like tiny presents, and they are flat enough that they rarely catch on anything.
Paint a red or deep green base, then paint a thin gold ribbon line down the centre of each nail with a striping brush. On the ring finger, apply a layer of builder gel, press a gold bow charm into it, and cure for 60 seconds. Seal with a thick top coat, making sure it climbs the sides of the bow. Squoval nails suit bows best, because the flat top gives the charm a stable base to sit on. This is intermediate work, and it is very doable at home — the bow does the hard work for you.
Allow 45 to 60 minutes for a full set. Gel lasts 2-3 weeks, and the bows hold well because they are low and wide rather than tall and narrow.
Pro Tip: Choose a bow charm no wider than the nail itself. A bow that overhangs the edges will lift within a day, no matter how well it is sealed.
Browse gift bow nail ideas or how to apply nail charms.
It costs about $65-95 in a salon, or $15-25 for a DIY charm kit.
11. 3D Star Topper

The 3D star topper is the most glamorous design in this list, and the one that carries you from Christmas Day straight through to New Year’s Eve. The star is sculpted from gold gel in five points, dusted with gold glitter while it is still soft, and set on a deep navy or black base so it looks like a star against a night sky. It is the tree topper, worn on your hand.
Paint a deep navy base, then sculpt the star on the ring finger: five small triangles of gold gel arranged in a star shape, pressed together at the centre and cured for 60 seconds. Dust gold glitter over the star while the gel is still tacky, then cure again and seal with a glossy top coat. Almond nails suit the star best, because the pointed tip echoes the star’s shape. I recommend building the star in two layers — a flat base layer first, then a smaller raised layer on top — because a single thick layer tends to spread and lose its points.
This is intermediate work, so a confident DIY fan can try it with a sculpting gel kit. Allow 60 to 90 minutes. Gel lasts 2-3 weeks, and the star is low enough that it rarely snags.
Pro Tip: Add a single gold star to each ring finger and keep the other nails in plain navy with a gold glitter tip. The symmetry across both hands is what makes the set look intentional.
See star nail ideas or gold glitter nail guide.
Salon price runs about $70-105.
12. Sculpted Christmas Wreath

A sculpted wreath is the most elegant 3D Christmas design for a formal dinner, because it reads as jewellery rather than novelty. The wreath is a ring of green sculpting gel, textured with a silicone tool so it looks like pine needles, with three red berries and a tiny gold bow at the bottom. Against a cream or sheer nude base, it looks like a miniature decoration you could hang on a tree.
Paint a cream base, then build the wreath on the ring finger: a ring of green gel, about 8 mm across, pressed down and textured with a fine tool to create needle-like strokes. Cure for 60 seconds, then add three red gel berries in a cluster at the bottom of the ring, and a tiny gold bow charm beside them. Cure again and seal with a glossy top coat. Oval nails suit the wreath best, because the rounded shape frames the circle nicely.
This is advanced work, so allow 90 minutes to two hours. Gel lasts 2-3 weeks, and the wreath is one of the toughest 3D designs because it is low and wide, with no tall parts to catch.
Pro Tip: Texture the wreath before you cure it, not after. Once gel is cured it cannot be shaped, and a smooth ring looks like a doughnut instead of a wreath.
Browse wreath nail ideas or textured gel techniques.
Salon price runs about $80-115.
13. 3D Icicles and Frozen Crystals

Icicles and frozen crystals are the most dramatic 3D winter design, and the one that looks best under ballroom lights. Clear icicle charms, some as long as the nail itself, are set into builder gel over an icy blue base, with frozen crystal pieces and silver glitter scattered around them. The effect is a nail that looks like it was dipped in a frozen waterfall.
Paint an icy blue or clear base, then apply a thick layer of builder gel and press the icicle charms in while it is wet, angling them so they point toward the tip. Add two or three small crystal pieces beside each icicle, and dust silver glitter over the wet gel before curing for 60 seconds. Seal with a thick glossy top coat. Stiletto nails suit icicles best, because the pointed shape continues the icicle’s line — but be warned, this is the most fragile design in the list, and long stilettos with tall charms need gentle handling.
This is advanced work, so allow two hours and book a tech who works with charms regularly. Gel lasts about 2 weeks, and the icicles are the first thing to break if you use your nails as tools.
Pro Tip: Ask your tech to keep the icicles on the ring and middle fingers only, and to use flat crystal pieces on the other nails. The set still looks frozen, but it lasts twice as long.
See icicle nail ideas or winter crystal nail art.
Salon price runs about $90-130.
14. Raised Poinsettia Flower

A raised poinsettia is the most sophisticated 3D Christmas flower, and the one that suits a holiday dinner best. The flower is built petal by petal from red sculpting gel: five pointed petals arranged in a star, with a second smaller layer on top, green leaves tucked underneath, and three gold caviar beads at the centre like pollen. Against a deep red or burgundy base, it looks like a flower that has bloomed on your nail.
Paint a deep red base, then sculpt the poinsettia on the ring finger. Start with the green leaves — two small teardrops of green gel at the base — cure for 60 seconds, then add the red petals one at a time, pressing each into place and curing between layers so they hold their shape. Finish with three gold beads at the centre. Almond nails suit the poinsettia best, because the petals have room to spread without crowding the cuticle. I once tried to build all five petals at once and they merged into a red blob; one petal at a time is slower, but it is the only way the flower reads as a flower.
This is advanced work, so allow two hours. Gel lasts 2-3 weeks, and the petals are surprisingly sturdy because they are low and layered rather than tall.
Pro Tip: Use a matte top coat over the petals and a glossy top coat on the base. The matte petals look like real flower petals, and the contrast makes the flower stand out.
Browse poinsettia nail ideas or 3D flower nail art.
Salon price runs about $85-120.
15. 3D Christmas Stocking with Fur Cuff

The Christmas stocking is the cosiest 3D design in this list, and the perfect way to close it. The stocking is sculpted from red gel in a soft L-shape, with a white fur cuff made from velvet-effect powder pressed into clear gel at the top, and a tiny gold bell charm hanging from the toe. Against a red or cream base, it looks like a miniature stocking hung by the fire.
Paint a red or cream base, then sculpt the stocking on the ring finger: a small rectangle of red gel for the leg, with a rounded toe curving to one side, cured for 60 seconds. Add the fur cuff as a band of white acrylic powder pressed into a thin layer of clear gel across the top, and press a tiny gold bell charm at the toe. Short square nails suit the stocking best, because the flat top gives the L-shape a clean canvas. This is intermediate work, so a confident DIY fan can manage it with a sculpting gel kit and a charm set.
Allow 60 to 90 minutes for a full set. Gel lasts 2-3 weeks, and the fur cuff holds up well because it is embedded in gel rather than glued on.
Pro Tip: Keep the stocking small — about 7 mm tall — so it fits comfortably on a short nail. A stocking that reaches the cuticle will lift at the edges within days.
See stocking nail ideas or velvet powder nail guide.
It costs about $70-100 in a salon, or $20-30 for a DIY kit.
Getting Started
Start with the design that matches your comfort level and your calendar. If you have never had a 3D manicure, book the 3D Ornament Baubles (#7) or the Raised Gift Bows (#10) first, since both use ready-made charms and are the most forgiving. Bring a photo of the design you want to your appointment, and ask your tech whether the charms will be embedded in builder gel or glued on top — embedded is the method that lasts, and it is worth paying for.
If you are doing 3D nails at home, you need a gel base colour, a sculpting gel or builder gel, a no-wipe top coat, a detail brush, a silicone shaping tool, and an LED lamp, plus a charm kit with baubles, bows, and crystals. Cure each sculpted layer for 60 seconds before adding the next, and seal every charm with a thick top coat that climbs up its sides.
Before your appointment, push back your cuticles and moisturise your hands, but skip hand cream on the day itself, since oils stop gel from sticking. After your set, wear gloves for cleaning and dishes, avoid using your nails as tools, and be gentle with knitwear, hair, and tights — sculpted gel catches on all three.
Frequently Asked Questions
**What is the difference between 3D nails and regular nail art?**
Regular nail art is painted flat on the nail, while 3D nails use sculpting gel, acrylic, charms, rhinestones, or beads to build shapes that stand proud of the nail surface. You can feel a 3D snowflake or a sculpted tree under your fingertip, and the shapes cast tiny shadows that flat art cannot. 3D designs take longer and cost more, but they photograph beautifully and look like jewellery on the nails.
**How long do 3D Christmas nails last?**
A gel 3D set lasts 2-3 weeks with normal wear, and sculpted elements last longest when they are embedded in builder gel and sealed with a thick top coat. Charms glued on top of a finished top coat can pop off within a day, while charms set into wet gel and sealed properly last the full two to three weeks. Tall or narrow designs like the 3D Snowman (#9) and the icicles (#13) wear a little faster, about 2 weeks, because they catch on things more easily.
**Can I do 3D Christmas nails at home?**
Yes, and the charm-based designs are the best place to start. The 3D Ornament Baubles (#7), Raised Gift Bows (#10), and 3D Star Topper (#11) all use ready-made charms set into builder gel, and a charm kit costs about $20-40. Fully sculpted designs like the Christmas tree (#1) and the snowman (#9) are advanced work and are best left to a nail tech who sculpts every day.
**Do 3D nails work on short nails?**
Yes, and several designs in this list are made for short shapes. The Sculpted Gingerbread Man (#4), the Sculpted Holly Berries (#8), and the 3D Christmas Stocking (#15) are all designed for short square or short almond nails, and low, wide designs like bows and baubles sit more securely on a short nail than tall, narrow ones do. Keep sculpted elements small, around 6-7 mm, and avoid tall figures on short nails.
**Which 3D Christmas design is best for a holiday party?**
The Raised Snowflakes with Crystal Centres (#2) are the safest party choice, since they are elegant with any outfit and catch the light beautifully. For more drama, the Raised Reindeer Antlers (#6) or the 3D Star Topper (#11) both photograph beautifully under party lights. If you want something playful, the 3D Candy Cane Swirls (#3) are the most fun option in the list.
A Few Final Thoughts
The best 3D Christmas nails are not the tallest or the most complicated — they are the ones where the dimension has a purpose. Across these 15 ideas, the pattern is simple: a clear base, one sculpted detail, and a glossy seal make the biggest difference. Whether you choose a ten-minute charm set or a hand-sculpted snowman, your nails will look intentional all December. A small change, like one sculpted accent nail or a new finish, can transform your whole hand. Pick one of the 15, gather your tools or book your tech this week, and enjoy the most festive nails of the year.