
Most people assume special effects makeup needs sculpting skills, silicone, and a film-set budget. For the look you actually need at a Halloween party or a school play, it doesn’t. A sponge, a few cream colors, and a bit of tissue can produce a convincing bruise, a puckered scar, or a nasty-looking cut. Here are 15 special effects looks with exact products, timing, and the mistakes I’ve made so you can skip them. Ready? Let’s explore all 15 of them.
Quick Answer: For a first try, pick the fresh bruise or the scraped knee; both use sponge-dabbed color and take about 10 minutes. Red, purple, and yellow-green look most realistic on fair to medium skin, while deeper skin needs more burgundy, plum, and dark brown to show. Use costume-safe products only, patch-test first, and never use these on broken skin.
Why Special Effects Looks Are Worth Your Time
A good effect makes a costume believable. A pale face and a ripped shirt only go so far, but one realistic bruise tells the whole story in half a second.
The materials are cheap and gentle. A bruise wheel, scar wax, a sponge, and stage blood cost around $15 to $30 together, and most looks reuse the same kit. I built my first full set with one wheel and a $6 tub of wax.
Here’s a lesser-known fact: realism comes from color layers, not detail. Real bruises have red, purple, blue, and yellow-green in patches, and layering those in thin dabs does more than any drawing.
These looks suit Halloween, theater, film students, and kids’ parties (with extra care). They’re less ideal for very sensitive skin, so check with a dermatologist before trying new adhesives, and skip latex if you have any allergy. Plan 10 to 40 minutes for application and 15 minutes for removal. These are for costume use; never use them to imitate real injuries to mislead people.
At a Glance
- Seven of the 15 looks use only cream color and a sponge.
- Scar wax, tissue, and gel create the raised textures in six looks.
- Stage blood is optional in most; the dried versions look more real.
- Looks range from a 10-minute bruise to a 40-minute zombie bite.
- A starter kit costs $15 to $30 and covers every look here.
| Look | Skill Level | Time | Key Product | Budget |
| Fresh Bruise | Easy | 10 min | Bruise wheel | 8-18 |
| Black Eye | Easy | 10 min | Cream shadows | 6-14 |
| Scraped Knee | Easy | 12 min | Sponge, red cream | 8-16 |
| Raised Scar | Medium | 20 min | Scar wax | 8-18 |
| Tissue Cut | Medium | 25 min | Tissue, adhesive | 8-18 |
| Split Lip | Easy | 10 min | Red lip liner | 5-12 |
| Zombie Bite | Medium | 35 min | Wax, stage blood | 10-22 |
| Blister Burn | Medium | 30 min | Gel, tissue | 8-20 |
| Claw Scratches | Easy | 12 min | Red pencil | 5-12 |
| Old Healed Scar | Easy | 15 min | Concealer, pencil | 6-14 |
| Stitched Seam | Medium | 25 min | Black liner, wax | 8-18 |
| Bandaged Wound | Easy | 15 min | Gauze, blood gel | 8-18 |
| Dried Blood Scab | Medium | 20 min | Scab blood | 8-18 |
| Rotted Cheek | Advanced | 40 min | Bruise wheel, sponge | 12-25 |
| Bruised Knuckles | Easy | 12 min | Bruise wheel | 8-18 |
1. Fresh Bruise: The Easiest Special Effects Look

A fresh bruise is red and purple at the center, fading to blue and a hint of yellow at the edge. Dab red first in a rough oval, then layer purple in the middle with a stipple sponge.
Use short taps, never swipes, since swiping smears colors into mud. Add a trace of yellow-green at the outer edge only. I overdid the yellow on my first attempt and it looked like a week-old bruise.
Takes about 10 minutes and holds 5 hours with setting powder.
Pro Tip: Skip the black. Real bruises are layers of red, blue, and purple, and black flattens them into a stain.
Browse easy Halloween makeup ideas. Read Allure’s makeup coverage.
A perfect first effect.
2. Black Eye With Layered Cream Shadow

A black eye is built from soft layers around the socket. Pat burgundy cream shadow along the lower lid and up toward the brow, then blend a deep purple into the center with a sponge.
What works:
- Starting with light red, then purple, then a trace of blue
- Keeping color well away from the lash line and the eyeball
- Dabbing a little brown at the inner corner
What to avoid:
- Any product not labeled for the eye area
- Heavy black, which looks like eyeliner
Takes 10 minutes. Always keep color outside the bone of the socket. See our smoky eye guide. Read Byrdie.
Looks bruised, not painted.
3. Scraped Knee Road Rash

Road rash is a rough, scraped patch with red edges and pink centers. Press a black stipple sponge into red cream paint and tap it on the knee in an irregular patch.
Add pink in the middle and a dab of light brown around the edges for dried scrape marks. Sprinkle a pinch of translucent powder to dull the shine. Real scrapes aren’t glossy, which is the mistake I made at first.
Takes 12 minutes. Keep the patch about 6 to 8 cm wide and wear shorts or a skirt that shows the knee.
Find more ideas in easy costume makeup tricks. Read Vogue’s beauty section.
Gritty, and quick.
4. Raised Scar With Scar Wax

Scar wax gives you a raised, textured line without any prosthetics. Warm a pea-sized amount in your fingers, press it onto clean, dry skin, and smooth the edges outward until it blends with the skin.
Use a thin tool to press a groove down the middle, then cover the surface with skin-tone concealer and a touch of pink. Powder to set. I once skipped powder and the wax slid off in the heat.
Takes 20 minutes and lasts 4 to 5 hours. Don’t use wax near eyes, or on skin that’s irritated.
Pair with classic horror makeup ideas. Read Elle’s beauty hub.
A scar with real dimension.
5. Tissue and Gel Cut

Tissue creates a skin-like texture that wax can’t match. Lay a thin strip of single-ply tissue on the arm, brush on a coat of skin-safe gel adhesive, let it dry, and tear a slit down the middle.
Fold the edges back slightly, color the rim with pink, and fill the center with dark red cream. Keep the tissue thin, since thick pieces peel at the edges. Takes 25 minutes.
Pro Tip: Tear, don’t cut, the tissue. Torn fibers look like skin edges, while cut edges look like paper.
Use costume-safe adhesive, never craft glue. See more costume effects. Check Byrdie.
Detail you can feel.
6. Split Lip

A split lip is a thin line and some swelling, not a mess. Draw a short vertical line on the lower lip with a dark red pencil, then tint the surrounding area slightly darker with a dab of berry.
What works:
- A line only 5 to 8 mm long
- Clear gel on top for a wet, swollen look
- Keeping blood minimal and dried
What to avoid:
- Anything not labeled for lip or mouth use
- Overdoing the swelling with color
Takes 10 minutes and wears 3 hours. Use only lip-safe products. Try lip makeup tips. Read Who What Wear.
Small details sell it.
7. Zombie Bite Mark

A bite mark is two curved rows of small dents inside a bruise. Build a ring of scar wax about 5 cm wide, press small indentations around it, and layer purple and green bruise colors around the wax.
Fill the center with dark red gel and let a thin line of it run down the skin. Let the gel set for a minute before moving, or it spreads.
Takes 35 minutes and lasts 4 hours. It looks best on arms, shoulders, and necks. Never apply wax to skin that’s cut or irritated.
Pro Tip: Use a toothbrush edge to press the dent pattern. Real bite marks have uneven spacing, and a toothbrush gives that naturally.
See zombie makeup ideas. Read Harper’s Bazaar beauty.
A bite worth the patience.
8. Blister Burn

A costume burn is a pink area with a raised blister in the middle. Layer tissue with gel in a small circle, let it dry, and paint the surrounding skin pink and red with a sponge.
Keep the center paler and slightly translucent, using a drop of clear gel. Add small flecks of peeling tissue at the edge. Real burns look wet and uneven, so avoid neat circles.
Takes 30 minutes and lasts 4 hours. This effect is purely cosmetic; if you have a real burn, don’t cover it with makeup and see a medical professional.
Find more hand effects. Read Allure.
Texture does the talking.
9. Claw Scratch Marks

Claw marks are three or four thin, slightly curved lines that don’t quite match. Draw them with a red pencil, then lightly smudge a pink halo around each line with a finger.
Add a tiny line of dark red gel inside the deepest scratch, but keep it thin. Make the lines different lengths and let one fork. Takes about 12 minutes.
I once drew them perfectly parallel and they looked like a rake mark. Slight variation is the whole trick.
Pair them with werewolf costume ideas. Read Byrdie.
Fast and dramatic.
10. Old Healed Scar

An old scar is paler than the skin around it and slightly shiny. Draw a thin line with a concealer a shade lighter than your skin, then run a pale pink pencil beside it for a faint edge.
What works:
- A line 3 to 5 cm long, slightly curved
- A touch of highlighter for a subtle shine
- Setting with only a tiny amount of powder
What to avoid:
- Red, which turns it into a fresh wound
- Straight, ruler-like lines
Takes 15 minutes and wears 6 hours. It suits dramatic characters. Read highlighter placement tips. See Vogue.
Subtle, and believable.
11. Stitched Seam
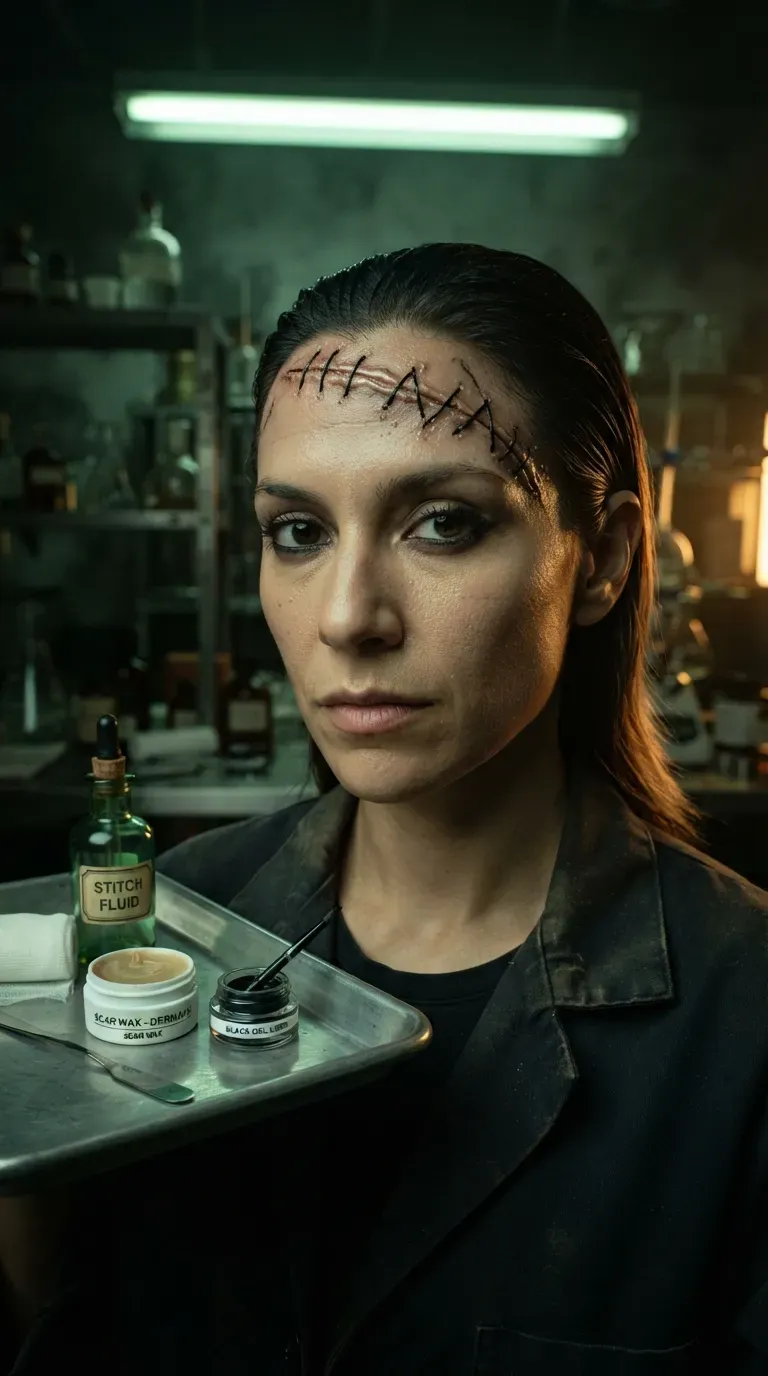
A stitched seam makes a character look pieced together. Build a thin ridge of scar wax, smooth the edges, and draw short black vertical stitches across it about 6 mm apart.
Add a hint of purple on the skin beside the ridge for a bruised look. Keep the stitches slightly uneven, since perfect spacing looks like a zipper. Takes 25 minutes.
Pro Tip: Mark the stitch spots with dots first. Connecting dots with short strokes gives even spacing and fewer wobbly lines.
Read monster costume ideas. Browse Elle.
Stitches that hold up.
12. Bandaged Wound

A bandage hides the hard parts and lets one drop of blood do the talking. Wrap a loose layer of gauze around the forearm, secure it with tape, and dab a spot of blood gel on the surface.
Let the gel spread slightly into the gauze fibers, then dot a second, smaller spot nearby. Gauze absorbs gel quickly, so start with less than you think. Takes 15 minutes.
I found it looks best a bit grubby; a tiny smear of brown powder on the tape works well. Use clean costume gauze, and don’t wrap it tight on real skin.
Pair with easy injured-character costumes. Read Who What Wear.
A little blood goes a long way.
13. Dried Blood Scab

A scab is dark, dull, and slightly raised, not shiny like fresh blood. Dab scab blood, a thick paste, onto the skin in an irregular patch with a flat brush and let it dry for two minutes.
Press a stipple sponge lightly into the surface to create texture, then add a thin line of fresh red at one edge. Dust with brown powder to kill the shine. Takes 20 minutes.
Keep it away from the eyes and any area where skin is broken. Use only products labeled as skin-safe, and test on your inner arm first.
Pro Tip: Add a tiny streak of dried brown blood running down from the scab. Gravity makes it look recent, and it adds story.
Browse horror makeup looks. Read Allure.
Dull is the right kind of realistic.
14. Rotted Cheek Bruise

A sunken cheek is shaded, not drawn. Suck in your cheeks lightly, find the hollow, and sponge gray and purple into the dip, then fade green toward the edges.
What works:
- Starting light and building up in thin layers
- Adding a dark brown dot or two as pores
- Keeping the lips pale
What to avoid:
- Painting while the cheeks are held in too tightly
- Heavy black under the eye
Takes 40 minutes, the longest look here. Fair skin shows green easily; deeper skin needs more purple and gray. Read contouring tips. See Byrdie.
Worth every minute.
15. Bruised Knuckles

Bruised knuckles tell a fight story in seconds. Sponge red onto each knuckle, add purple to the center of two or three, and finish with a faint dab of yellow on one side.
Don’t make all four knuckles identical; real hands bruise unevenly. Add a thin red scrape line on one for variety. Takes 12 minutes.
Set with powder and avoid washing for a few hours. Hands rub constantly, so a clear setting spray helps. It wears around 4 hours.
Pro Tip: Make a loose fist while sponging. The stretched skin shows where the bruise would naturally land.
Read sporty costume ideas. See Vogue.
An easy finish to a strong set.
Getting Started With Special Effects Looks
The easiest first step is practicing one bruise on your forearm a few days before the event. Photograph it in daylight, since indoor light hides color mistakes.
The most common beginner mistake is making the effect too neat. Real injuries are uneven, so blur edges, vary the colors, and avoid perfect shapes. Another mistake is skipping a patch test: apply a small dab of adhesive or wax on your inner arm 24 hours ahead.
If you buy one thing, make it a bruise wheel, usually $8 to $18. Add scar wax and a tub of blood gel once you like the results.
Plan 10 to 40 minutes per look and 15 minutes for removal with makeup remover or oil-based cleanser. Use only costume-safe products and keep them away from eyes, broken skin, and the inside of the mouth.
Frequently Asked Questions
What are the easiest special effects looks for beginners?
The fresh bruise, black eye, and scraped knee are the easiest. Each uses cream color and a sponge and takes about 10 minutes. No sculpting or adhesives are needed.
What do I need for wounds, scars, and bruises?
You need a bruise wheel, scar wax, tissue, skin-safe gel adhesive, and stage blood. A starter kit costs $15 to $30. Always choose costume-safe products made for skin.
How do I make a fake scar look realistic?
Use scar wax and blend the edges smoothly into the skin. Add a thin groove down the middle, then color it with pink and skin-tone concealer. Set with powder to kill the shine.
How long does special effects makeup last?
Most looks last 4 to 6 hours with setting powder and spray. Wax effects may soften in heat, and gel effects wear faster on moving areas like hands. Keep a small touch-up kit nearby.
How do I remove special effects makeup safely?
Use an oil-based cleanser or makeup remover and let it sit for 20 seconds to loosen wax and adhesive. Peel gently and never pull. If your skin becomes red or sore, stop and consult a dermatologist.
A Few Final Thoughts
These 15 special effects looks show that realistic wounds, scars, and bruises come from layered color and uneven edges, not advanced skill. A sponge and a bruise wheel can carry a whole costume in 10 minutes. When you’re ready for more, try the zombie bite or the rotted cheek for a bigger payoff. Pick one look, practice it once, and show up with an effect people can’t stop asking about.