Wavy hair is the easiest hair type to put in a bun, and most people with waves do not even know it. Waves have natural texture, natural volume, and natural grip, which are the three things a good bun needs most. Straight hair slips and curly hair needs careful handling, but wavy hair sits right in the middle: it holds a bun without a fight, and it looks soft and effortless without any extra work.
This guide collects 16 bun styles built around your natural waves. Every one of them uses the wave pattern as the texture of the bun, instead of smoothing it away or fighting it. You will find everyday two-minute buns, polished work buns, and special-occasion buns, each with a skill level, an honest hold time, and one mistake to avoid so you do not learn it the hard way.
You do not need special tools to start. A texturizing spray, a strong elastic, and a handful of bobby pins cover most of these styles, and the rest need nothing more than your hands and a mirror. Work through the list, find the three or four that suit your wave pattern and your routine, and your buns will finally use your natural texture instead of hiding it.
Quick Answer: For the best everyday wavy bun, start with the Tousled Top Knot (#1) or the Messy Beach-Wave Bun (#4). For work, try the Low Wavy Chignon (#2) or the Wavy Donut Bun (#9). For a night out, the Side Wavy Bun (#6) or the Romantic Wavy Bun (#16) look the most polished. Most styles here hold 8-12 hours, and salon versions cost $25-60 while DIY versions cost under $10 in supplies.
Why Wavy Hair Buns Are Worth Your Time
A bun is the most practical style wavy hair has. It keeps waves off your neck in summer, out of your face at work, and protected from wind and friction that cause frizz. A well-built wavy bun also shows off the wave pattern, because the waves create a soft, textured surface that a smooth bun never has. When the foundation is right, wavy hair actually holds a bun better than straight hair, because the waves grip each other and the volume fills out the shape.
There is a time win too. A wavy bun takes two to fifteen minutes once you know the steps, which is far faster than blow-drying waves smooth or curling them. That matters on busy mornings, when a full styling routine can take forty minutes or more. A bun also stretches a wash day: on day two or three, when waves start to lose definition at the roots, a bun turns that extra texture into grip and volume instead of a problem.
Here is the part most guides skip: wavy hair needs very little help. Straight hair needs grip added and curly hair needs careful handling, but wavy hair just needs to be gathered and pinned. The styles in this guide are built on that idea. You gather loosely, pin gently, and let the waves do the work. Once that becomes a habit, you will stop losing buns halfway through the day, and your waves will still look good when you take the bun down.
At a Glance
- All 16 styles are designed for natural wavy hair, from loose 2A waves to defined 2C waves.
- Hold times run 8-12 hours for most styles, with several lasting a full day without re-pinning.
- Skill levels range from beginner two-minute buns to intermediate styles that take about fifteen minutes.
- You need only texturizing spray, a strong elastic, and bobby pins for most styles.
- Styles cover everyday wear, the office, workouts, weddings, and nights out.
- Every style uses your natural wave pattern, plus one mistake to avoid so your waves stay defined.
| # | Style | Hair Type | Skill Level | Hold Time | Occasion |
|---|---|---|---|---|---|
| 1 | Tousled Top Knot | Wavy, 2A-2C | Beginner | 8-10 hours | Everyday |
| 2 | Low Wavy Chignon | Wavy, 2A-2B | Beginner | 8-10 hours | Office |
| 3 | Half-Up Wavy Bun | Wavy, 2A-2C | Beginner | 6-8 hours | Casual day |
| 4 | Messy Beach-Wave Bun | Wavy, 2B-2C | Beginner | 8-10 hours | Weekend |
| 5 | Braided Wavy Bun | Wavy, 2A-2C | Beginner | 10-12 hours | Work |
| 6 | Side Wavy Bun | Wavy, 2A-2C | Intermediate | 8-10 hours | Wedding guest |
| 7 | Wavy French Twist Bun | Wavy, 2A-2B | Intermediate | 8-10 hours | Formal event |
| 8 | Double Wavy Buns | Wavy, 2A-2C | Beginner | 8-10 hours | Weekend |
| 9 | Wavy Donut Bun | Wavy, 2A-2B | Beginner | 8-10 hours | Work |
| 10 | Textured Low Bun | Wavy, 2A-2C | Beginner | 8-10 hours | Everyday |
| 11 | Wavy Bun with Face-Framing Pieces | Wavy, 2A-2C | Beginner | 8-10 hours | Everyday |
| 12 | Knotted Wavy Bun | Wavy, 2A-2C | Beginner | 8-10 hours | Casual day |
| 13 | Wavy Pineapple Bun | Wavy, 2B-2C | Beginner | 8-10 hours | Everyday |
| 14 | Sleek Wavy Bun | Wavy, 2A-2B | Intermediate | 10-12 hours | Formal event |
| 15 | Wavy Bun with a Scarf | Wavy, 2A-2C | Beginner | 10-12 hours | Special occasion |
| 16 | Romantic Wavy Bun | Wavy, 2A-2C | Intermediate | 8-10 hours | Date night |
1. Tousled Top Knot
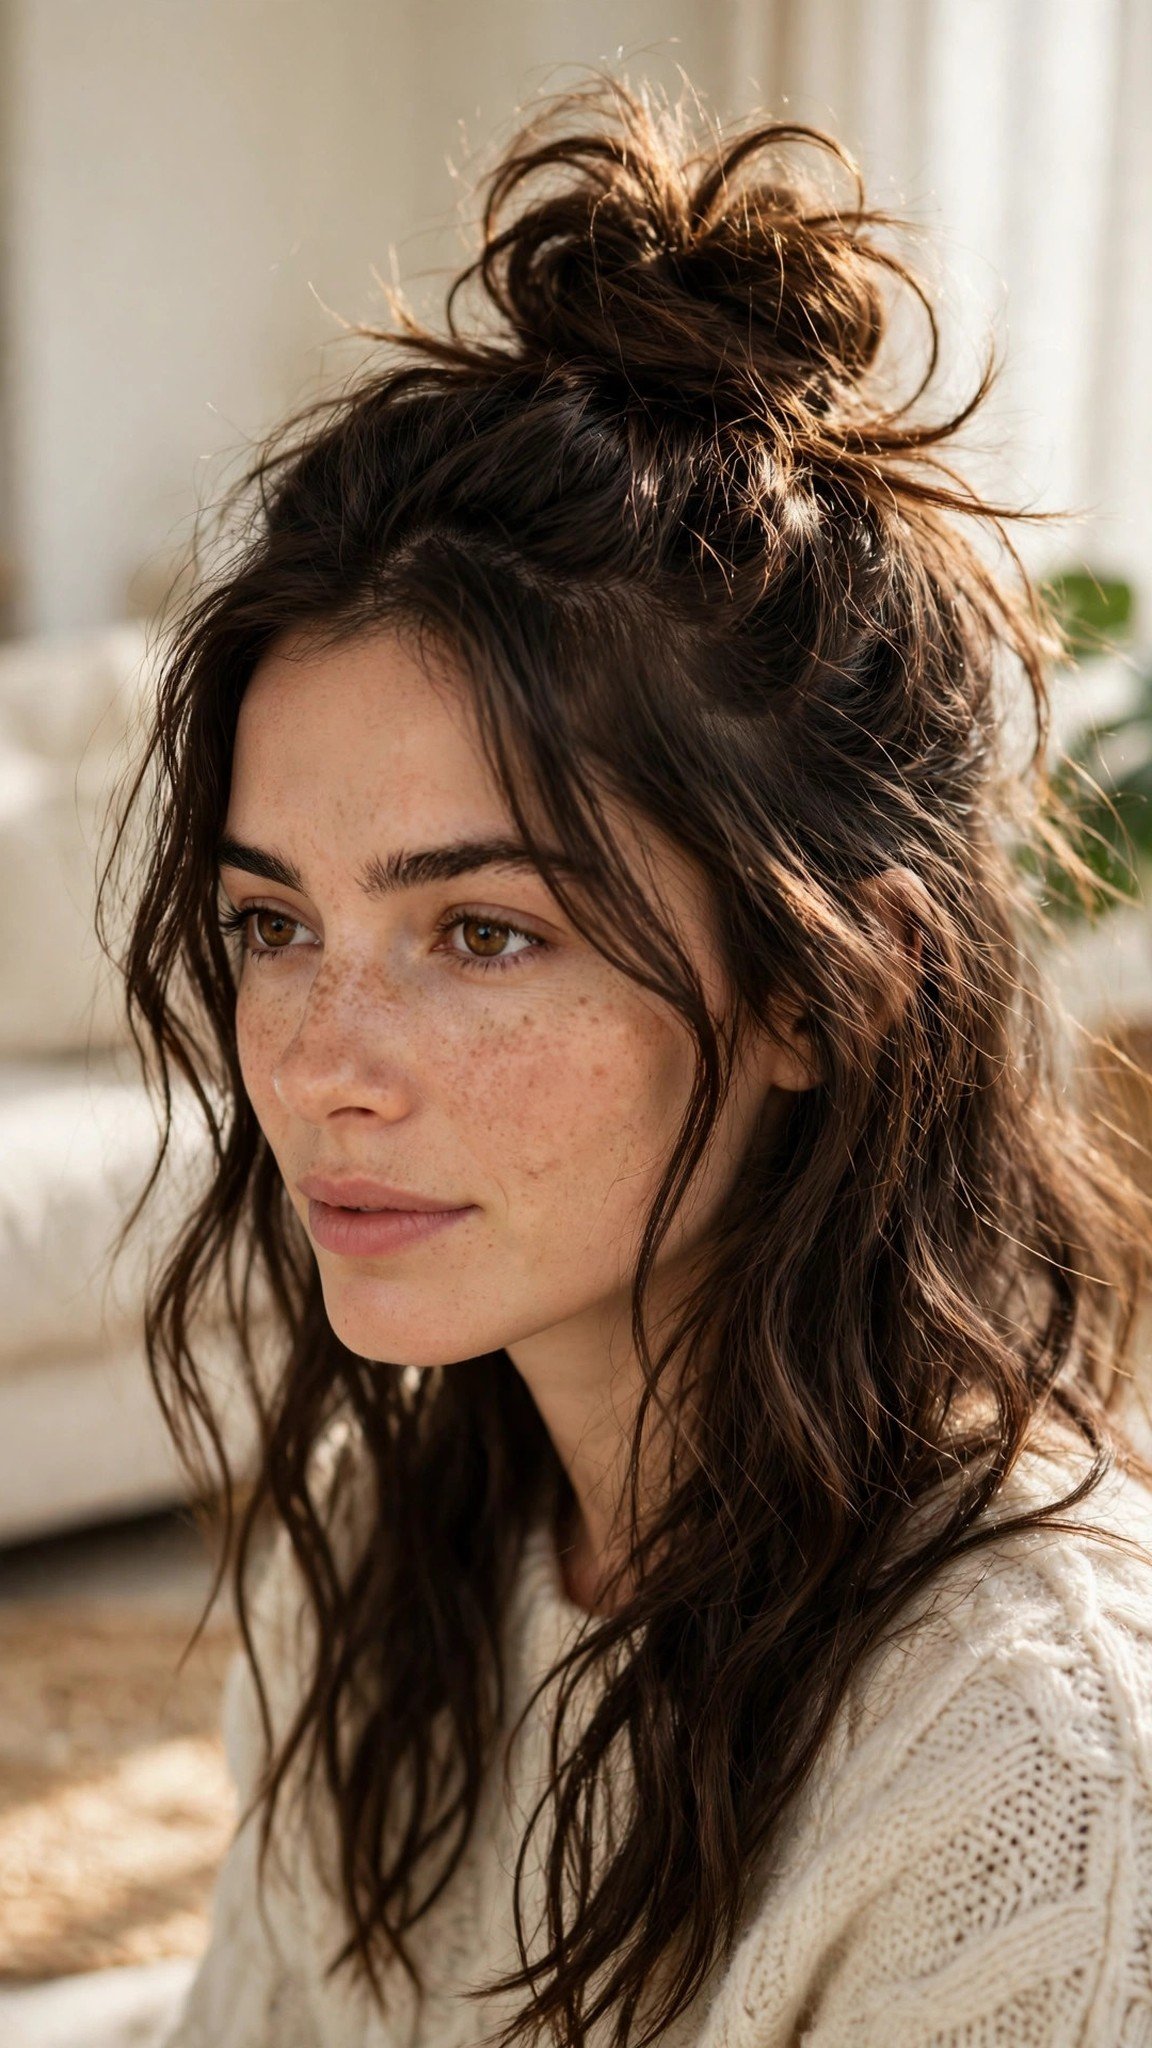
The tousled top knot is the single best bun for wavy hair, because it is made from the texture you already have. The waves give the knot natural volume and a soft, undone look that straight hair has to fake with spray and backcombing. It is the bun to choose when you want to look effortless in five minutes without touching a hot tool.
Gather your waves into a high ponytail on the crown and secure it with a strong elastic. Twist the ponytail loosely and wrap it around its own base, pinning it with three bobby pins placed at different angles. Pull gently at the edges of the knot to make it look fuller and more tousled, then leave two thin wavy pieces loose at the front. Mist with texturizing spray.
Pro Tip: Use texturizing spray instead of hairspray, because hairspray makes waves stiff and crunchy, while texturizing spray keeps them soft and touchable.
This style holds 8-10 hours and takes about five minutes. It is a beginner style that works for everyday wear, work, and casual outings.
See top knot ideas or how to style a tousled bun on wavy hair.
2. Low Wavy Chignon

The low wavy chignon is the office bun for wavy hair, and it is far more forgiving than a sleek low bun. Sitting low at the nape, it carries the weight close to the head, and the waves give the chignon a soft, textured surface that looks polished without looking severe. It is the kind of style that makes a simple outfit look finished.
Gather your waves into a low ponytail at the nape, securing it with a strong elastic. Twist the ponytail loosely into a rope, then coil it around its own base and pin it with four bobby pins, one at each compass point. Tuck the ends underneath and smooth the hairline with a little pomade on your palms. Finish with a light mist of hairspray.
A mistake I made early on was wrapping the coil too loosely, and the chignon sagged into a shapeless lump by lunchtime.
This style holds 8-10 hours and takes about eight minutes. It is a beginner style that works for the office, interviews, and formal dinners.
See low bun ideas or how to make a wavy chignon look polished.
3. Half-Up Wavy Bun
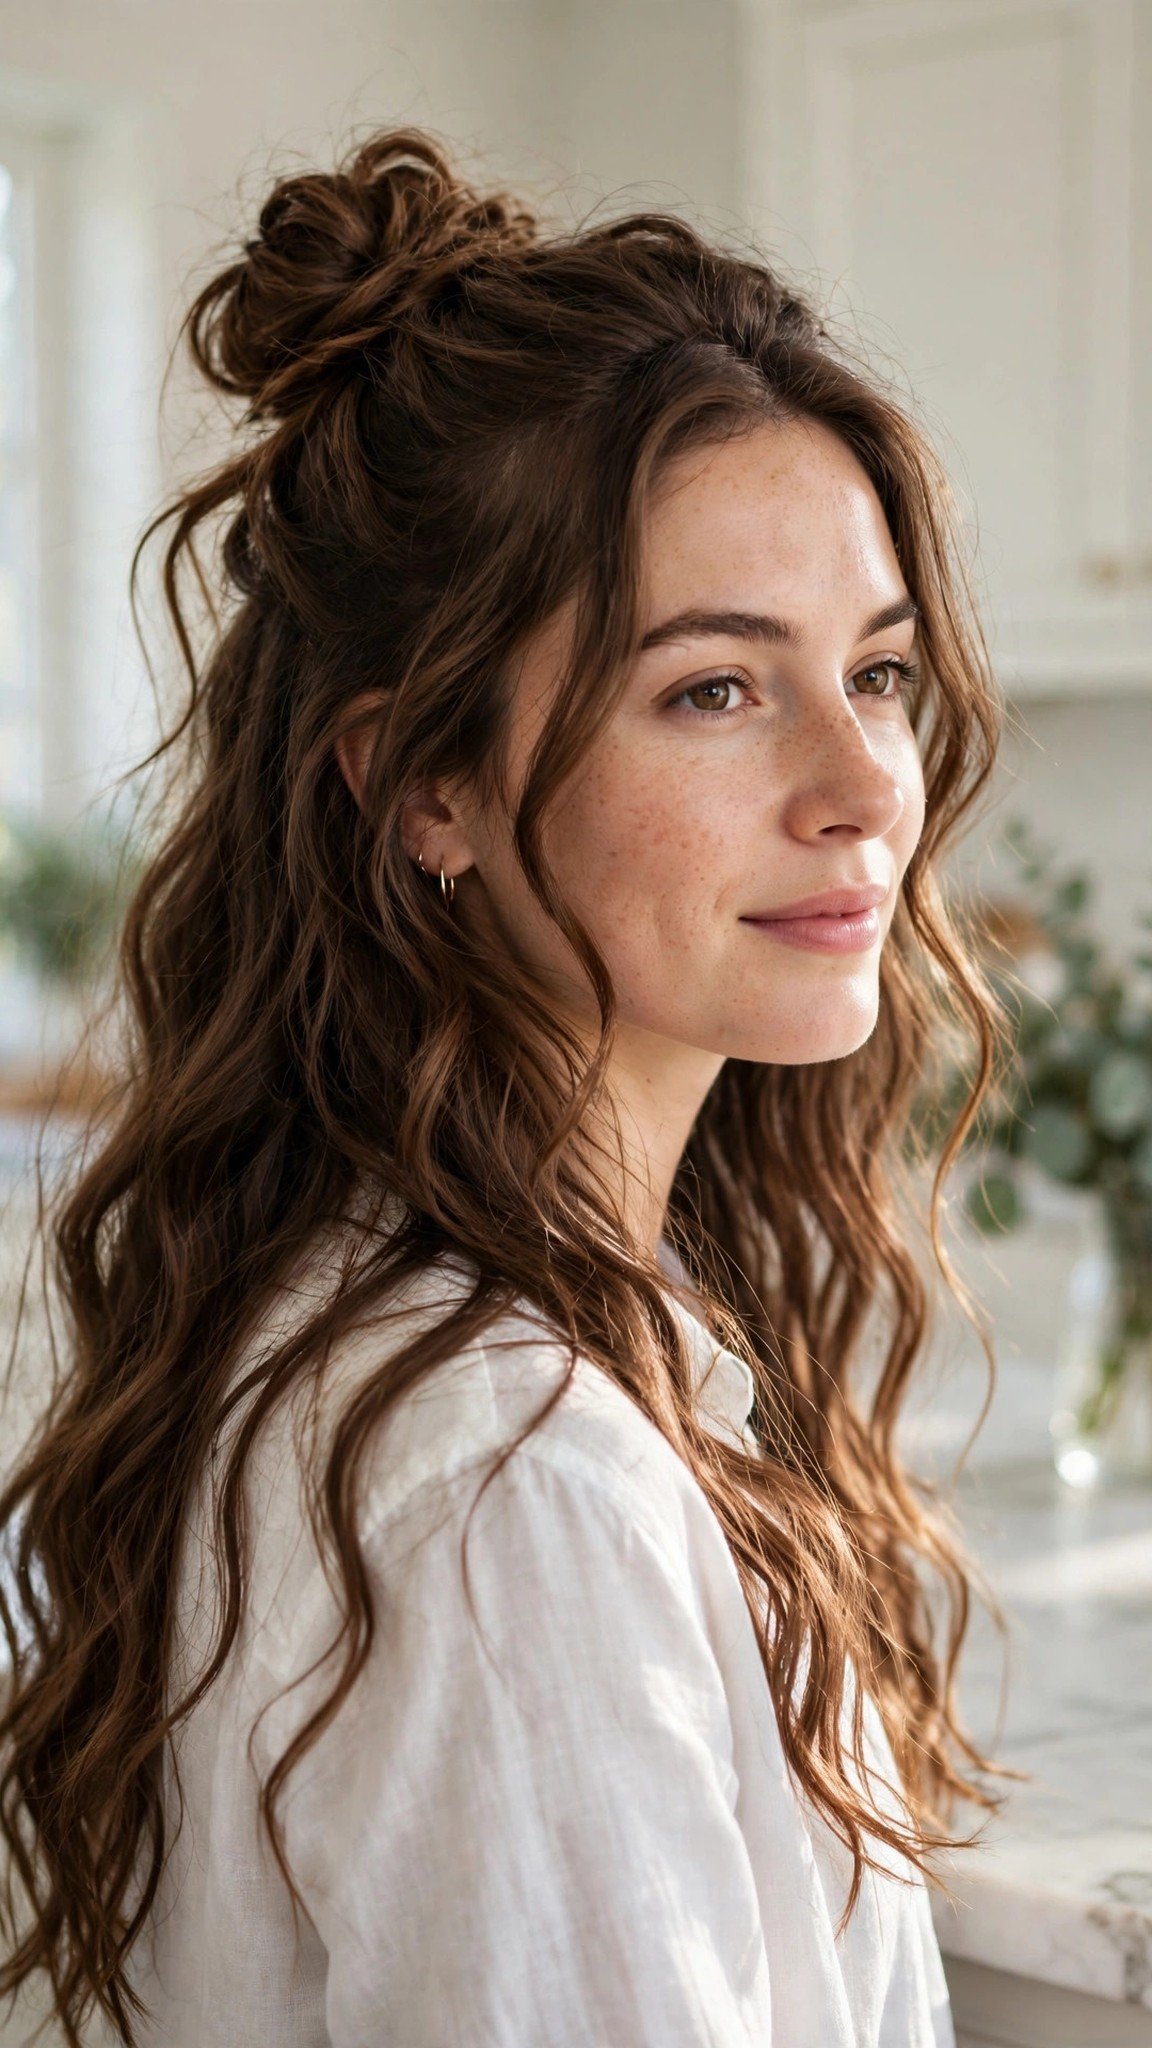
The half-up wavy bun is the best of both worlds: the top half is up and out of your face, and the bottom half is down so everyone can see your waves. It is the everyday style that works for school runs, work-from-home days, and casual weekends, and it is far more comfortable than a full updo because half the weight stays down.
Gather the top half of your waves, from temple to temple, and pull them into a small high ponytail on the crown. Twist the ponytail loosely and wrap it into a small bun, pinning it with two bobby pins. Pull gently at the edges to make the knot look a little fuller, then leave the rest of your waves loose.
A mistake I made early on was taking too much hair into the top section, and the knot looked huge while the loose waves looked thin.
This style holds 6-8 hours and takes about three minutes. It is a beginner style that costs nothing beyond an elastic and two pins.
See half-up bun ideas or how to style wavy hair half up.
4. Messy Beach-Wave Bun

The messy beach-wave bun is the easiest bun on this list, because wavy hair is already beachy in the best way. The texture, the volume, and the loose pieces that straight hair has to fake are all built into wavy hair, so a messy bun on waves looks effortless without any work. It is the style to reach for on lazy mornings, weekends, and holidays.
Gather your waves into a high ponytail and secure it loosely with a strong elastic. Twist the ponytail loosely and wrap it around its own base, pinning it with three bobby pins. Pull gently at the edges of the bun to loosen it, and pull out a few wavy pieces around your face and at the nape. Mist with sea salt spray to enhance the beach texture.
Pro Tip: Build a neat bun first and then mess it up, because a messy bun with no structure underneath will fall apart by noon.
This style holds 8-10 hours and takes about five minutes. It is a beginner style and one of the best everyday options for wavy hair.
See messy bun ideas or how to enhance beach waves in a bun.
5. Braided Wavy Bun

The braided wavy bun is the best grip trick wavy hair has. A braid is naturally grippy, and when you coil a braid into a bun, the texture locks the style in place from the inside. Wavy hair makes a soft, full braid, and the finished bun looks detailed and deliberate, like a style that took far longer than it did.
Gather your waves into a ponytail and braid it to the ends, securing the braid with a small elastic. Coil the braid around the base of the ponytail to form the bun, pinning it with four bobby pins as you go. Tuck the end underneath and pull gently at the braid edges to make the bun look fuller. Mist with hairspray to finish.
Pro Tip: Braid the ponytail loosely, because a braid that is too tight will pull the waves straight and look out of place next to the soft bun.
This style holds 10-12 hours and takes about ten minutes. It is a beginner style that works for work, weekends, and casual days out.
See braided bun ideas or how to braid wavy hair loosely.
6. Side Wavy Bun
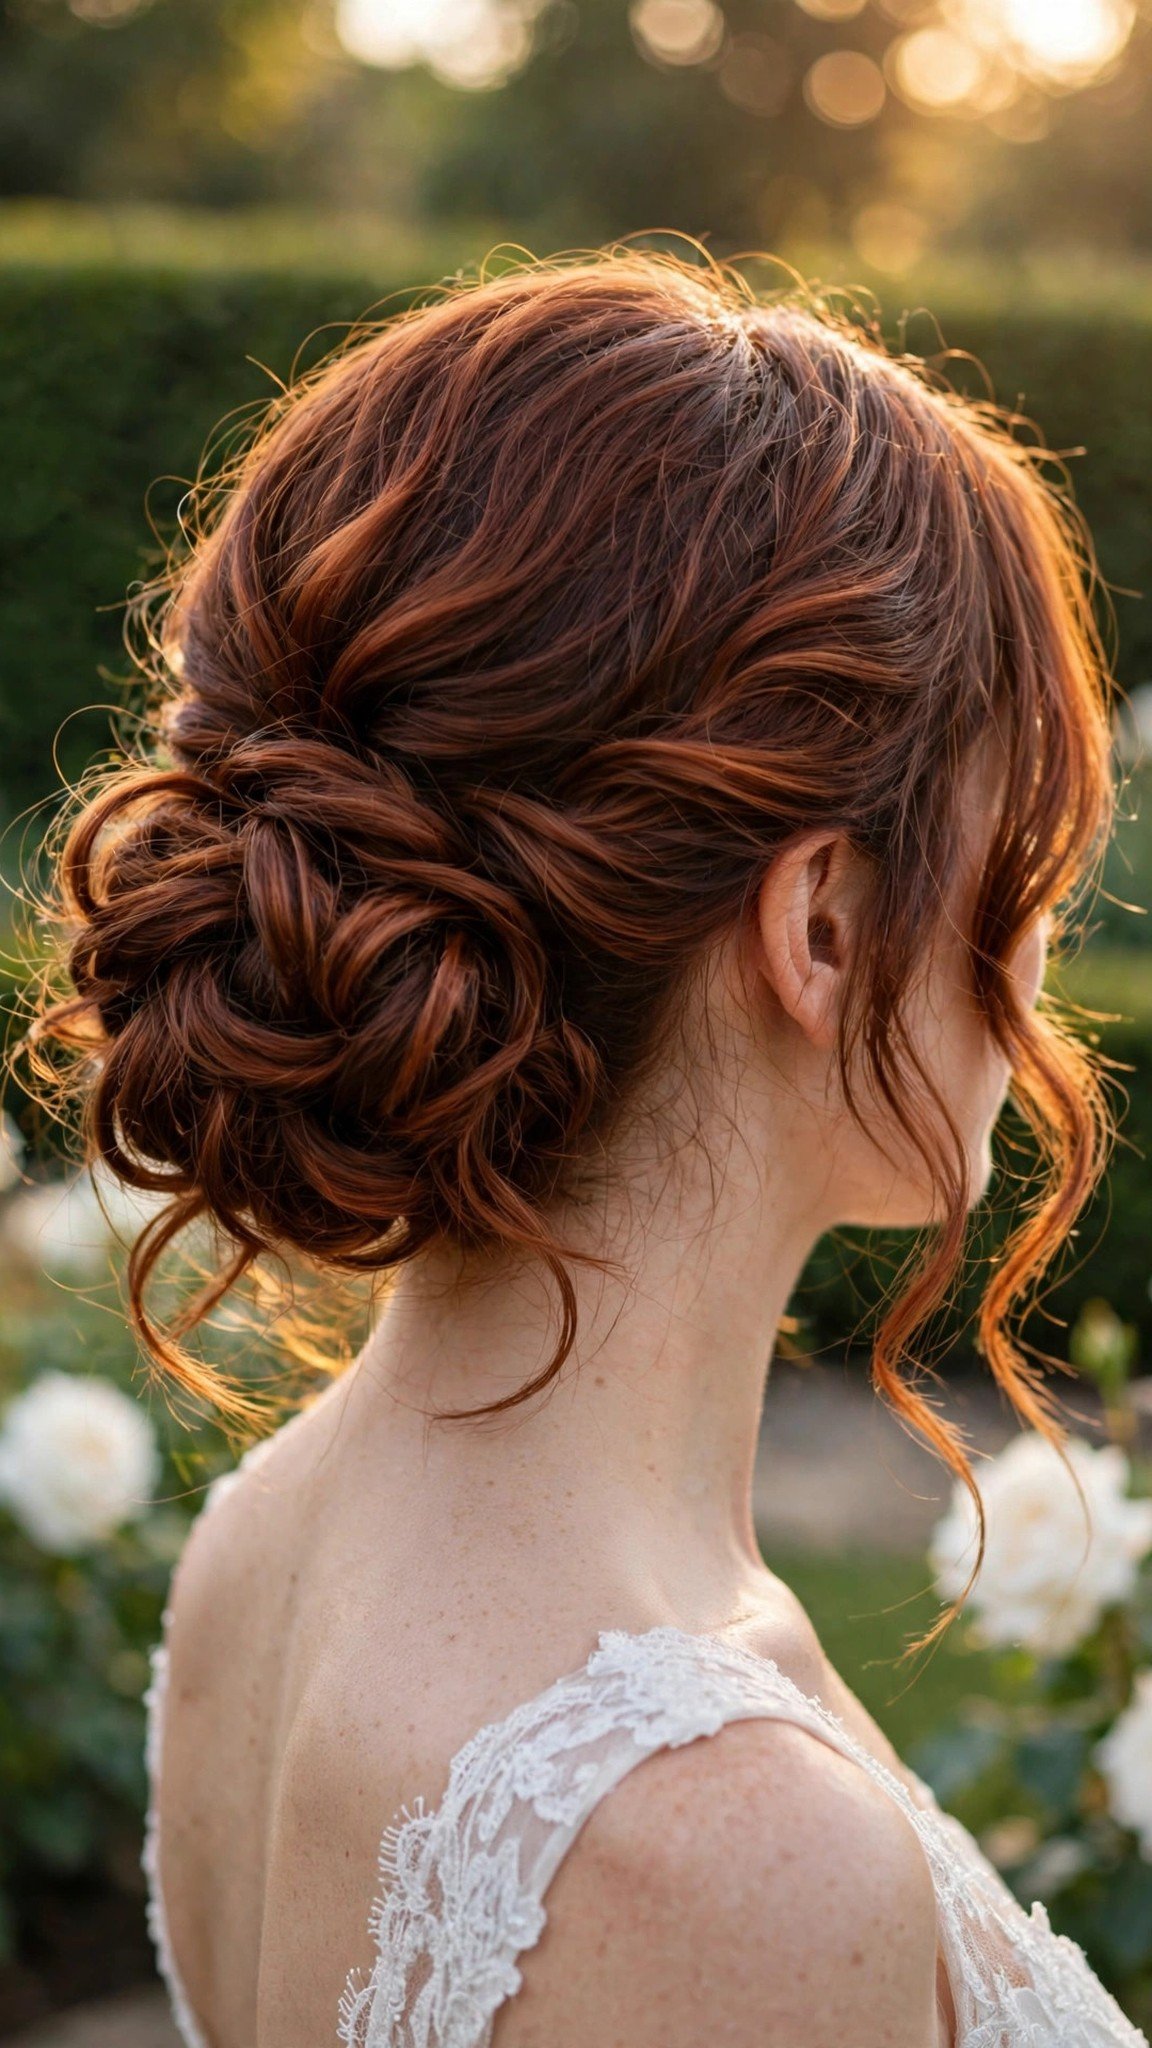
The side wavy bun is the most romantic style on this list, and it is a favorite for weddings and special occasions. Sitting low and to one side, it shows off the length and texture of your waves from the front, which a centered bun never does. The side placement keeps the weight balanced, and the loose waves at the front soften the whole look.
Create a deep side part and sweep all of your waves to one side, gathering them into a low ponytail behind the ear. Secure it with a strong elastic, then twist the ponytail loosely and coil it into a bun, pinning it with four bobby pins. Pull out two or three thin wavy pieces around your face and let them fall softly. Mist with light-hold hairspray.
Pro Tip: Pin the bun from both the top and the bottom, because a side bun has a habit of rotating downward if it is only pinned on one side.
This style holds 8-10 hours and takes about twelve minutes. It is an intermediate style, and a salon version costs $40-60.
See side bun ideas or how to style a wavy bun for a wedding.
7. Wavy French Twist Bun
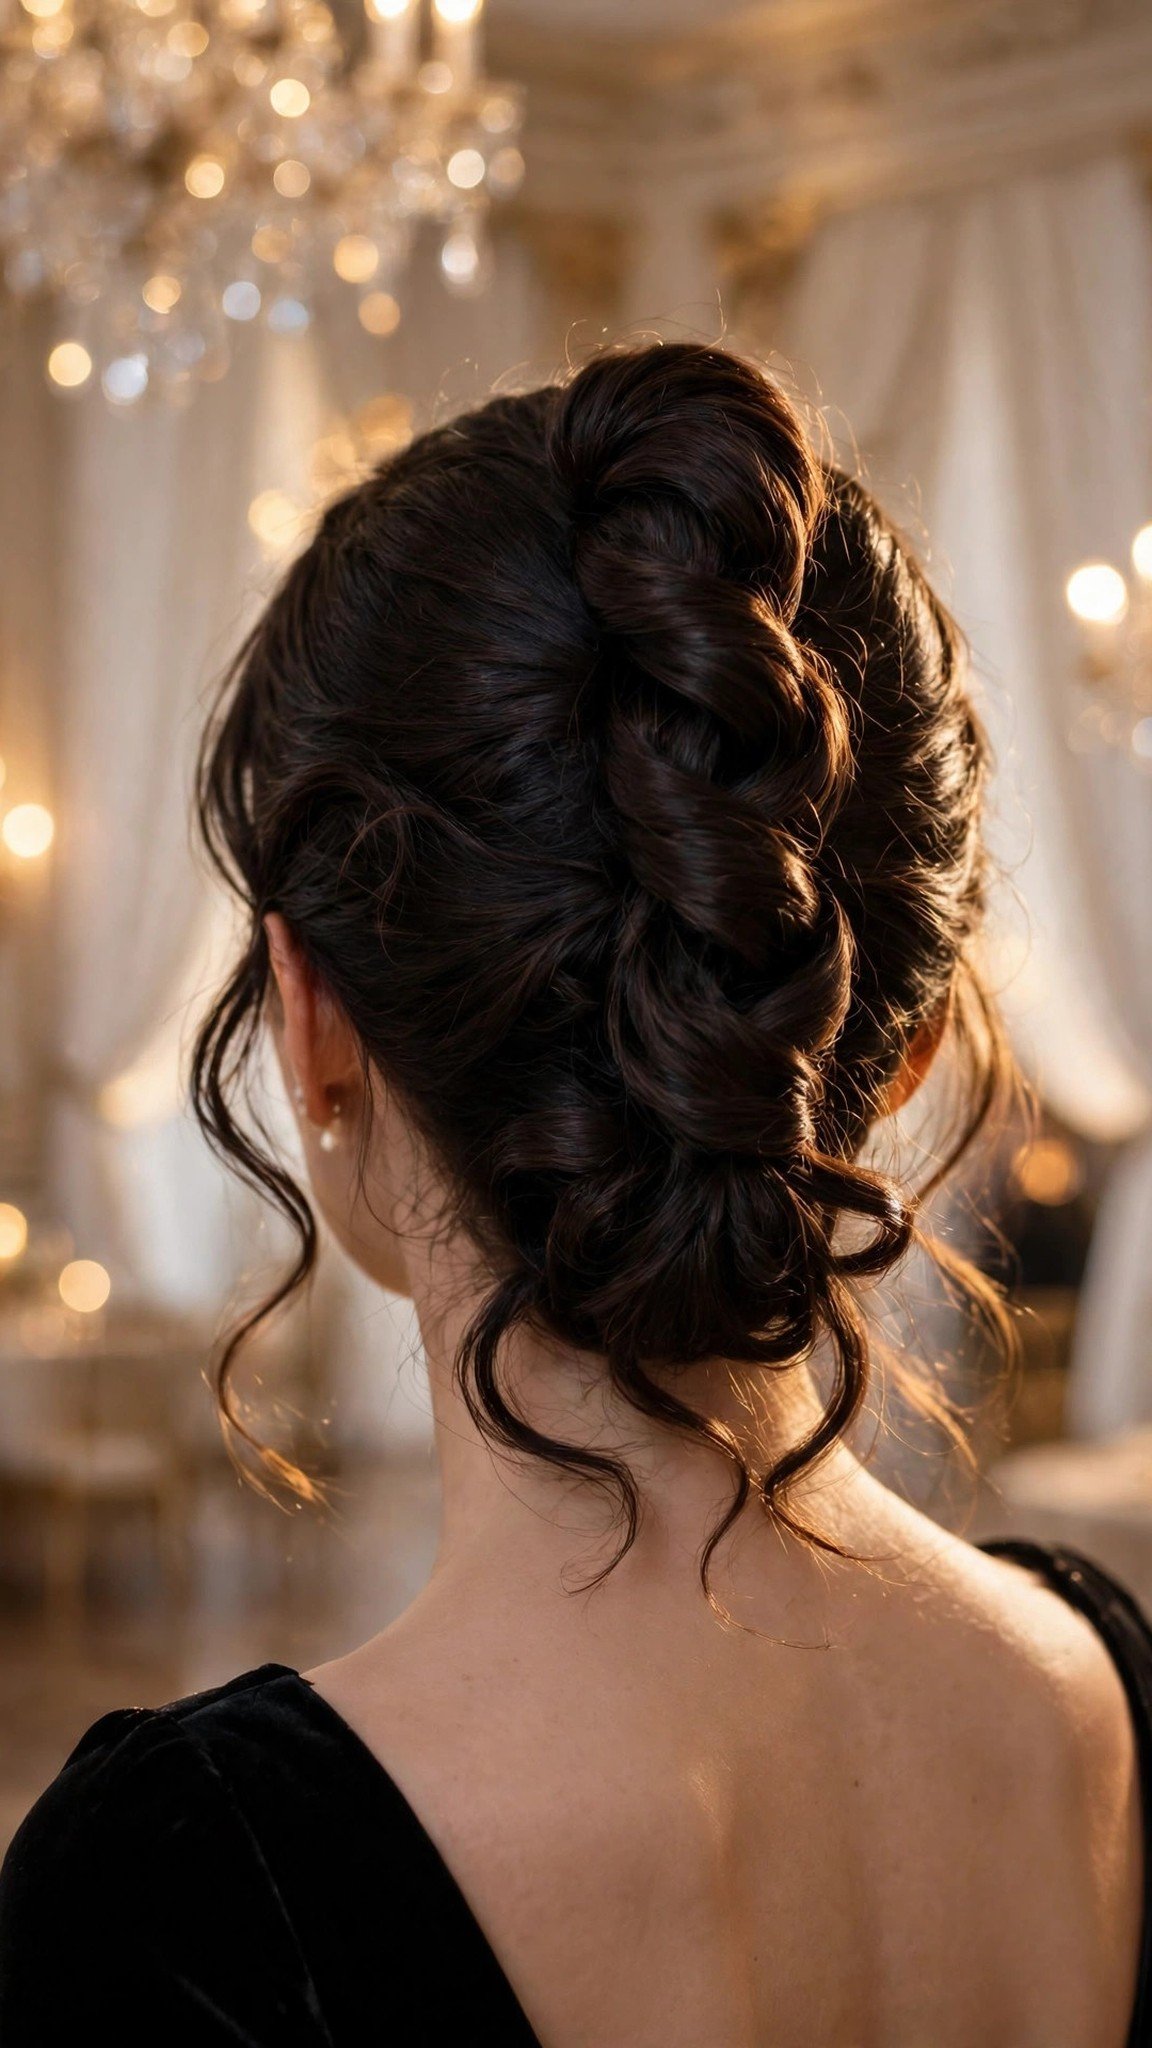
The wavy French twist is the most elegant bun wavy hair can wear, and it is the style to choose for black-tie events and formal weddings. The vertical twist is sleek and sculptural, and the waves give it a soft, textured surface that a straight French twist never has. It looks complicated, but the technique is just a roll and a pin.
Gather your waves to one side and hold them in a low ponytail shape without an elastic, gathering them at the nape. Twist the waves upward along the back of your head, rolling them into a vertical twist, and tuck the ends inside the fold at the top. Pin along the inside of the twist with five or six bobby pins, placing them vertically so they disappear into the fold.
Pro Tip: Place the pins vertically along the inside fold, not horizontally across it, because vertical pins grip the twist from the inside and stay hidden.
This style holds 8-10 hours and takes about fifteen minutes. It is an intermediate style, and a salon version costs $50-70.
See French twist ideas or how to pin a wavy twist so it stays.
8. Double Wavy Buns

Double wavy buns are the most fun style on this list, and waves make them look twice as good. Splitting your waves into two buns halves the weight each bun has to carry, which is the whole reason they hold so well. Each bun is smaller and lighter than one big bun, so neither one drags or slips, and the finished look is bouncy and youthful.
Part your waves down the middle and gather each half into a high ponytail, one on each side, securing each with a strong elastic. Twist each ponytail loosely and wrap it around its own base to form a bun, pinning each with two bobby pins.
Pro Tip: Make the part straight and the ponytails even, because uneven buns are the one thing that makes this playful style look accidental instead of deliberate.
This style holds 8-10 hours and takes about ten minutes. It is a beginner style that works for weekends, festivals, and casual days out.
See space bun ideas or how to part wavy hair evenly.
9. Wavy Donut Bun

The wavy donut bun is the easiest way to get a perfectly round, full bun, and waves make it look even better. A sock donut gives the bun its shape, and your waves wrap around it to create a big, soft, polished bun that looks like it came from a salon. It is the work bun to learn if you want a reliable, professional look that takes five minutes.
Pull your waves into a ponytail and slide a sock donut over it to the base. Spread the waves evenly over the donut so it is fully covered, then secure the spread hair with a thin elastic around the base of the donut. Wrap the remaining ends around the base and pin them underneath with two bobby pins. Smooth the hairline with your fingers and mist with hairspray.
Pro Tip: Choose a donut that matches your hair color, because even wavy hair can shift during the day, and a matching donut is invisible if a little peeks out.
This style holds 8-10 hours and takes about five minutes. It is a beginner style, and a sock donut costs about $3-5.
See donut bun ideas or how to use a hair donut on wavy hair.
10. Textured Low Bun
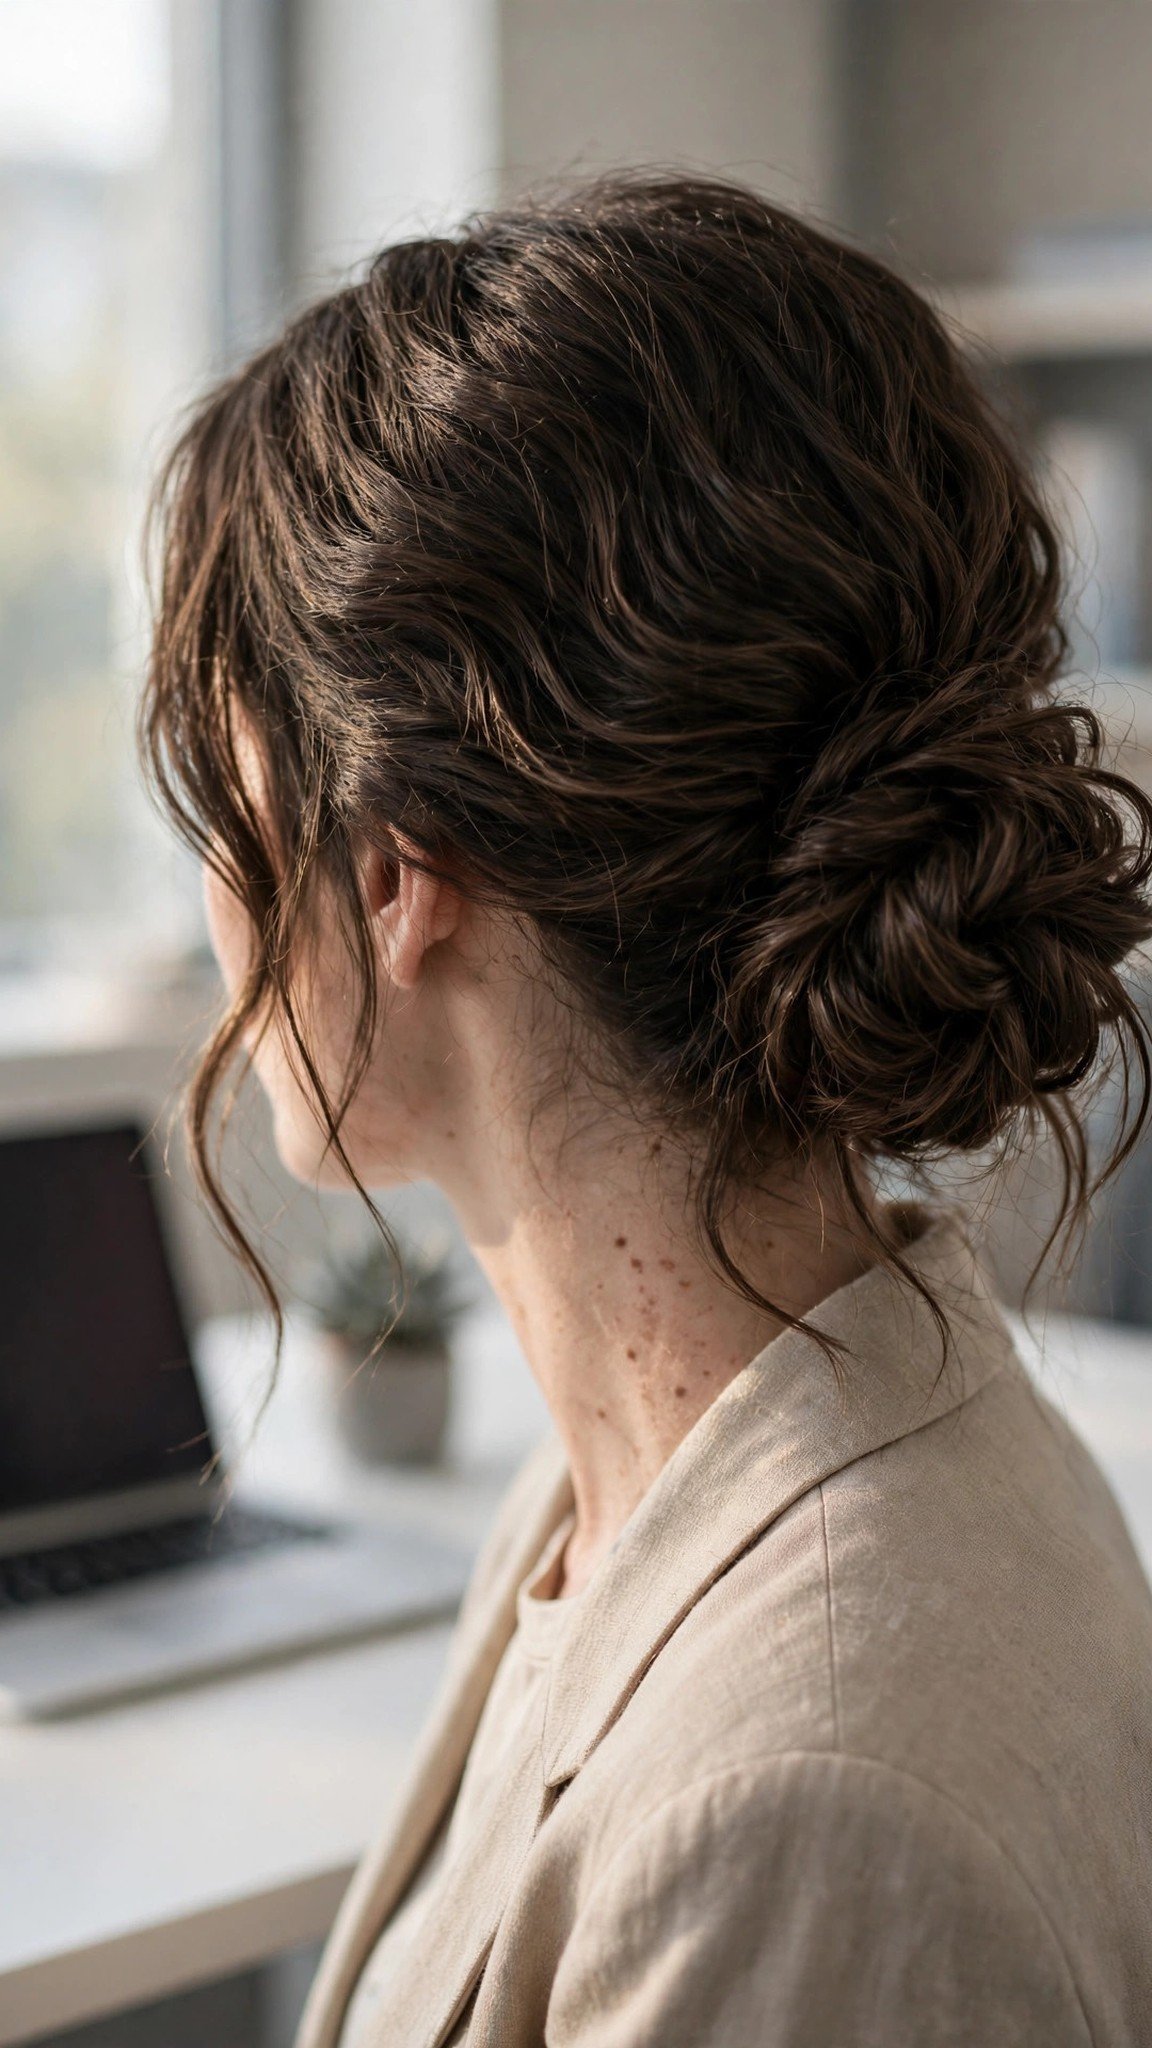
The textured low bun is the simplest office bun wavy hair can wear, and it is the one to reach for on mornings when you have five minutes. The waves themselves are the texture, so there is nothing to add and nothing to fake. The result looks polished and deliberate, but the technique is so easy you can do it without a mirror once you have practiced it twice.
Gather your waves into a low ponytail at the nape and secure it with a strong elastic. Twist the ponytail loosely and coil it around its own base, pinning it with three bobby pins placed at different angles. Tuck the ends underneath and pull gently at the edges of the bun to show off the wave texture. Mist with texturizing spray instead of hairspray so the bun stays soft.
Pro Tip: Mist the ponytail with texturizing spray before you coil it, because the extra grip keeps the waves from sliding apart during the day.
This style holds 8-10 hours and takes about five minutes. It is a beginner style that works for the office, errands, and everyday wear.
See low bun ideas or how to show off wave texture in a bun.
11. Wavy Bun with Face-Framing Pieces
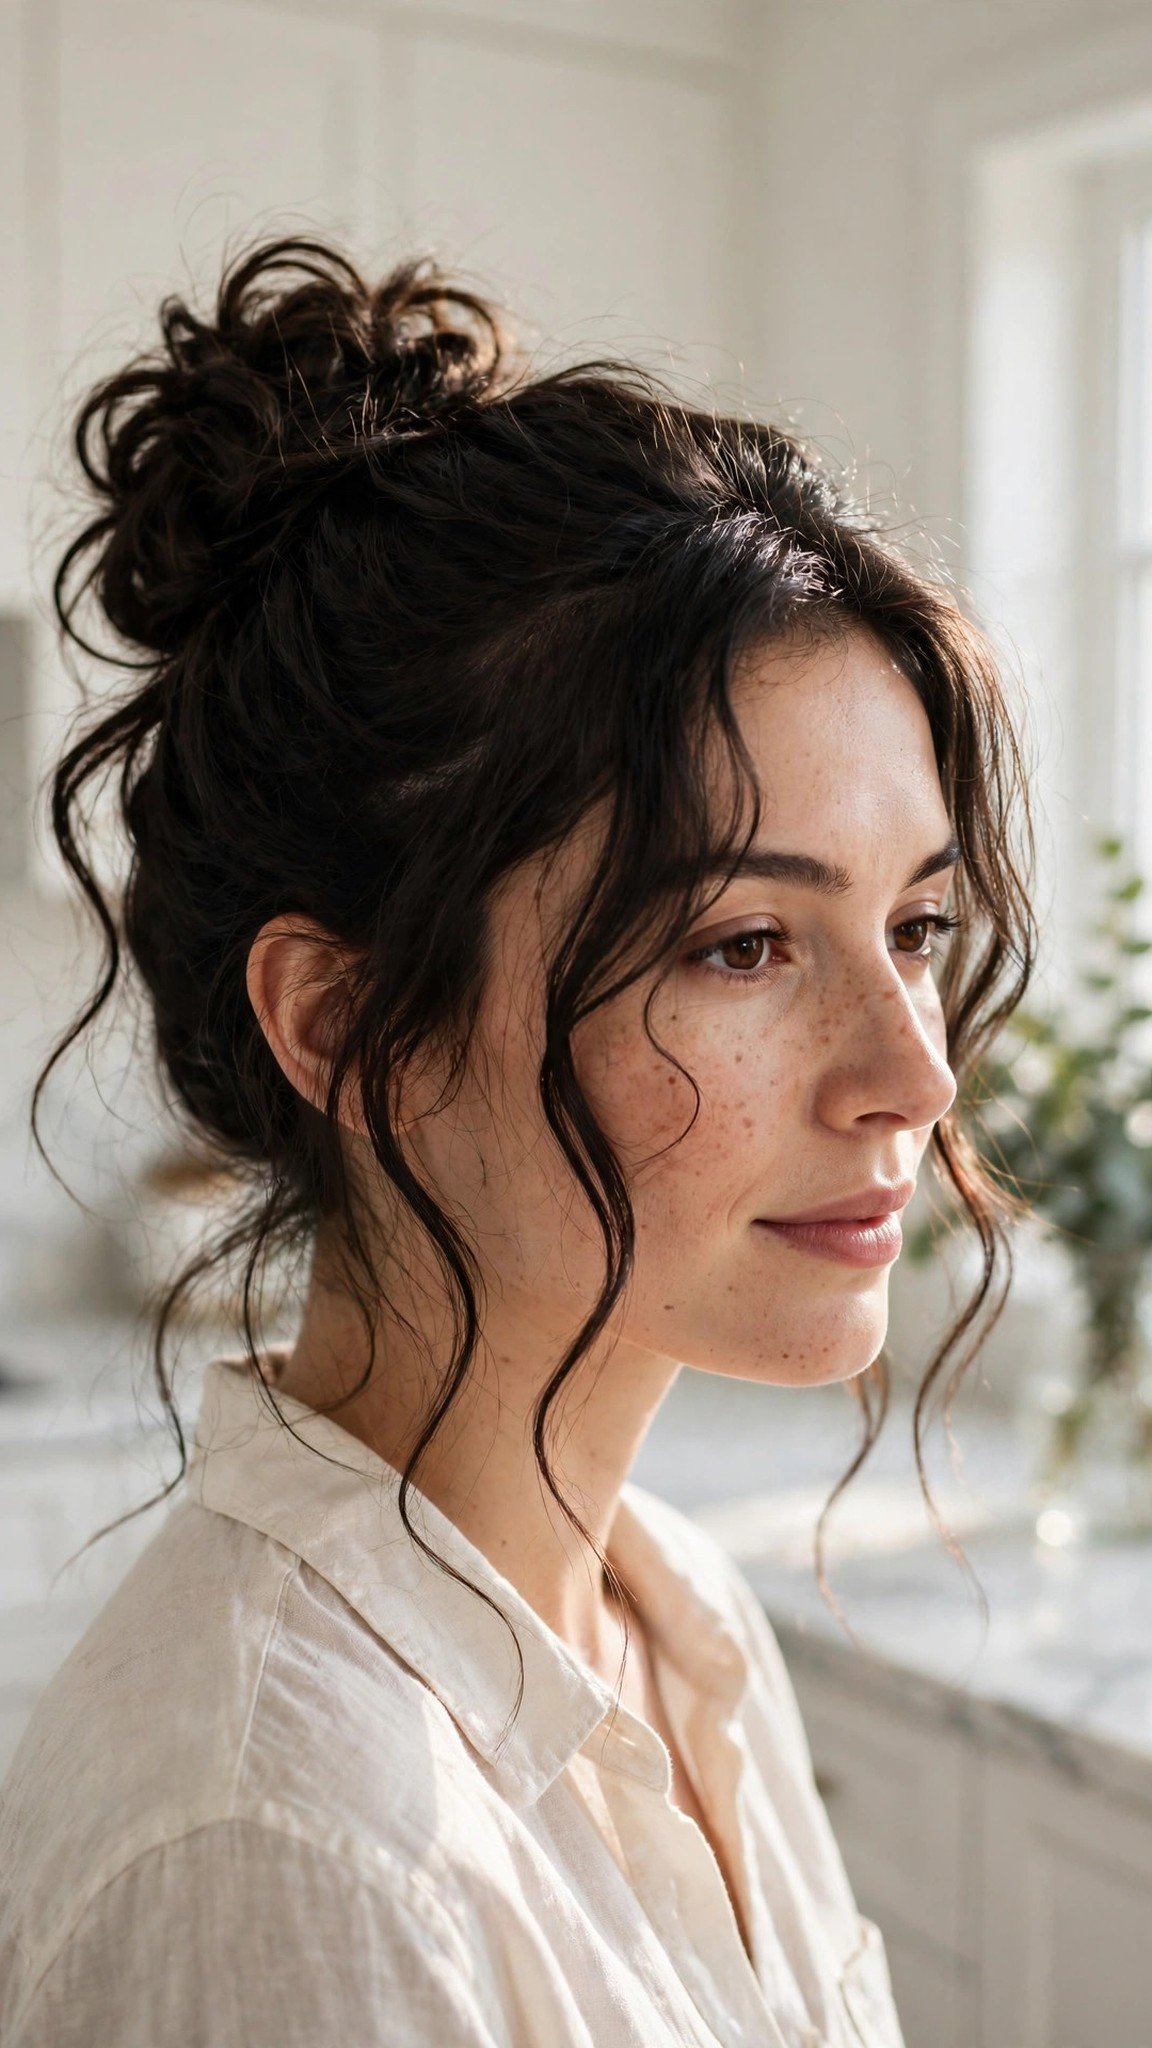
The wavy bun with face-framing pieces is the style that flatters the face best, and it is a favorite for anyone who wants a bun that does not look severe. The bulk of the waves goes up into the bun, while soft pieces fall around the face and show off the wave pattern right where everyone can see it. It is soft, flattering, and surprisingly easy.
Leave two thin wavy pieces out at the front, then gather the rest of your waves into a bun at the height you want and pin it in place with three bobby pins. Arrange the face-framing pieces with your fingers so they fall naturally along your cheeks, and refresh them with a tiny bit of water and texturizing spray if they look flat. Mist the bun with light-hold spray.
Pro Tip: Make the face-framing pieces thin, about a finger wide each, because thick pieces will pull the bun apart and make the whole style look heavy.
This style holds 8-10 hours and takes about five minutes. It is a beginner style that works for everyday wear, work, and casual outings.
See face-framing bun ideas or how to style wavy pieces around the face.
12. Knotted Wavy Bun
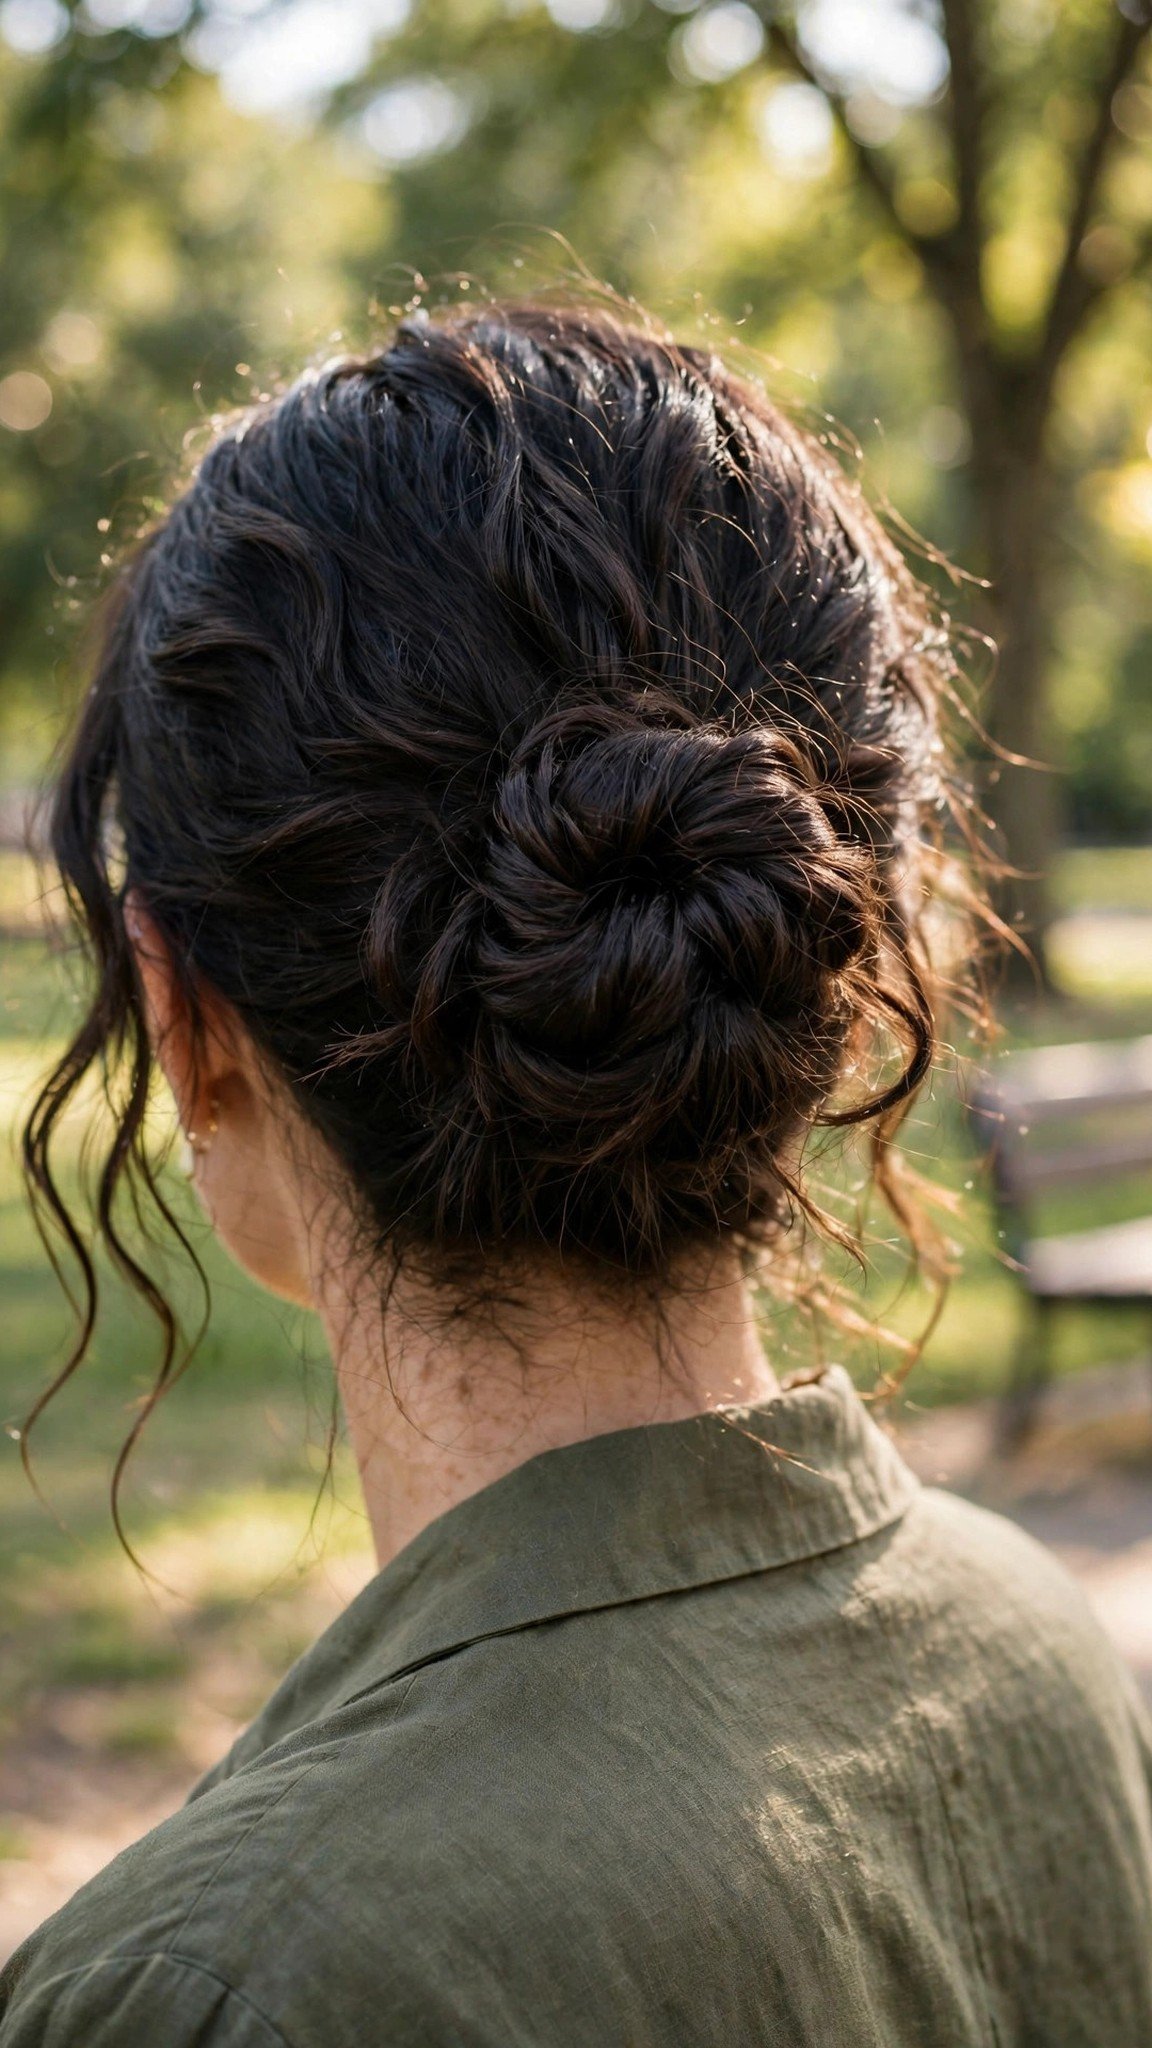
The knotted wavy bun is the coolest-looking easy bun on this list, and it is made for wavy hair. You literally tie your waves in a knot, which sounds strange until you see how beautiful it looks: the knot creates a sculptural, textured shape that a smooth bun never has. Wavy hair makes the knot soft and full, and the knot itself is the anchor.
Gather your waves into a ponytail and split it into two equal sections. Tie the two sections together in a simple overhand knot, then tie a second knot on top of the first if your hair is long enough. Tuck the ends underneath the knot and pin them with two bobby pins. Pull gently at the edges of the knot to make it look fuller, then mist with texturizing spray.
A mistake I made the first time was pulling the knot too tight, and it looked small and hard instead of soft and full.
This style holds 8-10 hours and takes about five minutes. It is a beginner style that works for casual days, weekends, and relaxed outings.
See knotted bun ideas or how to tie a wavy bun that stays put.
13. Wavy Pineapple Bun
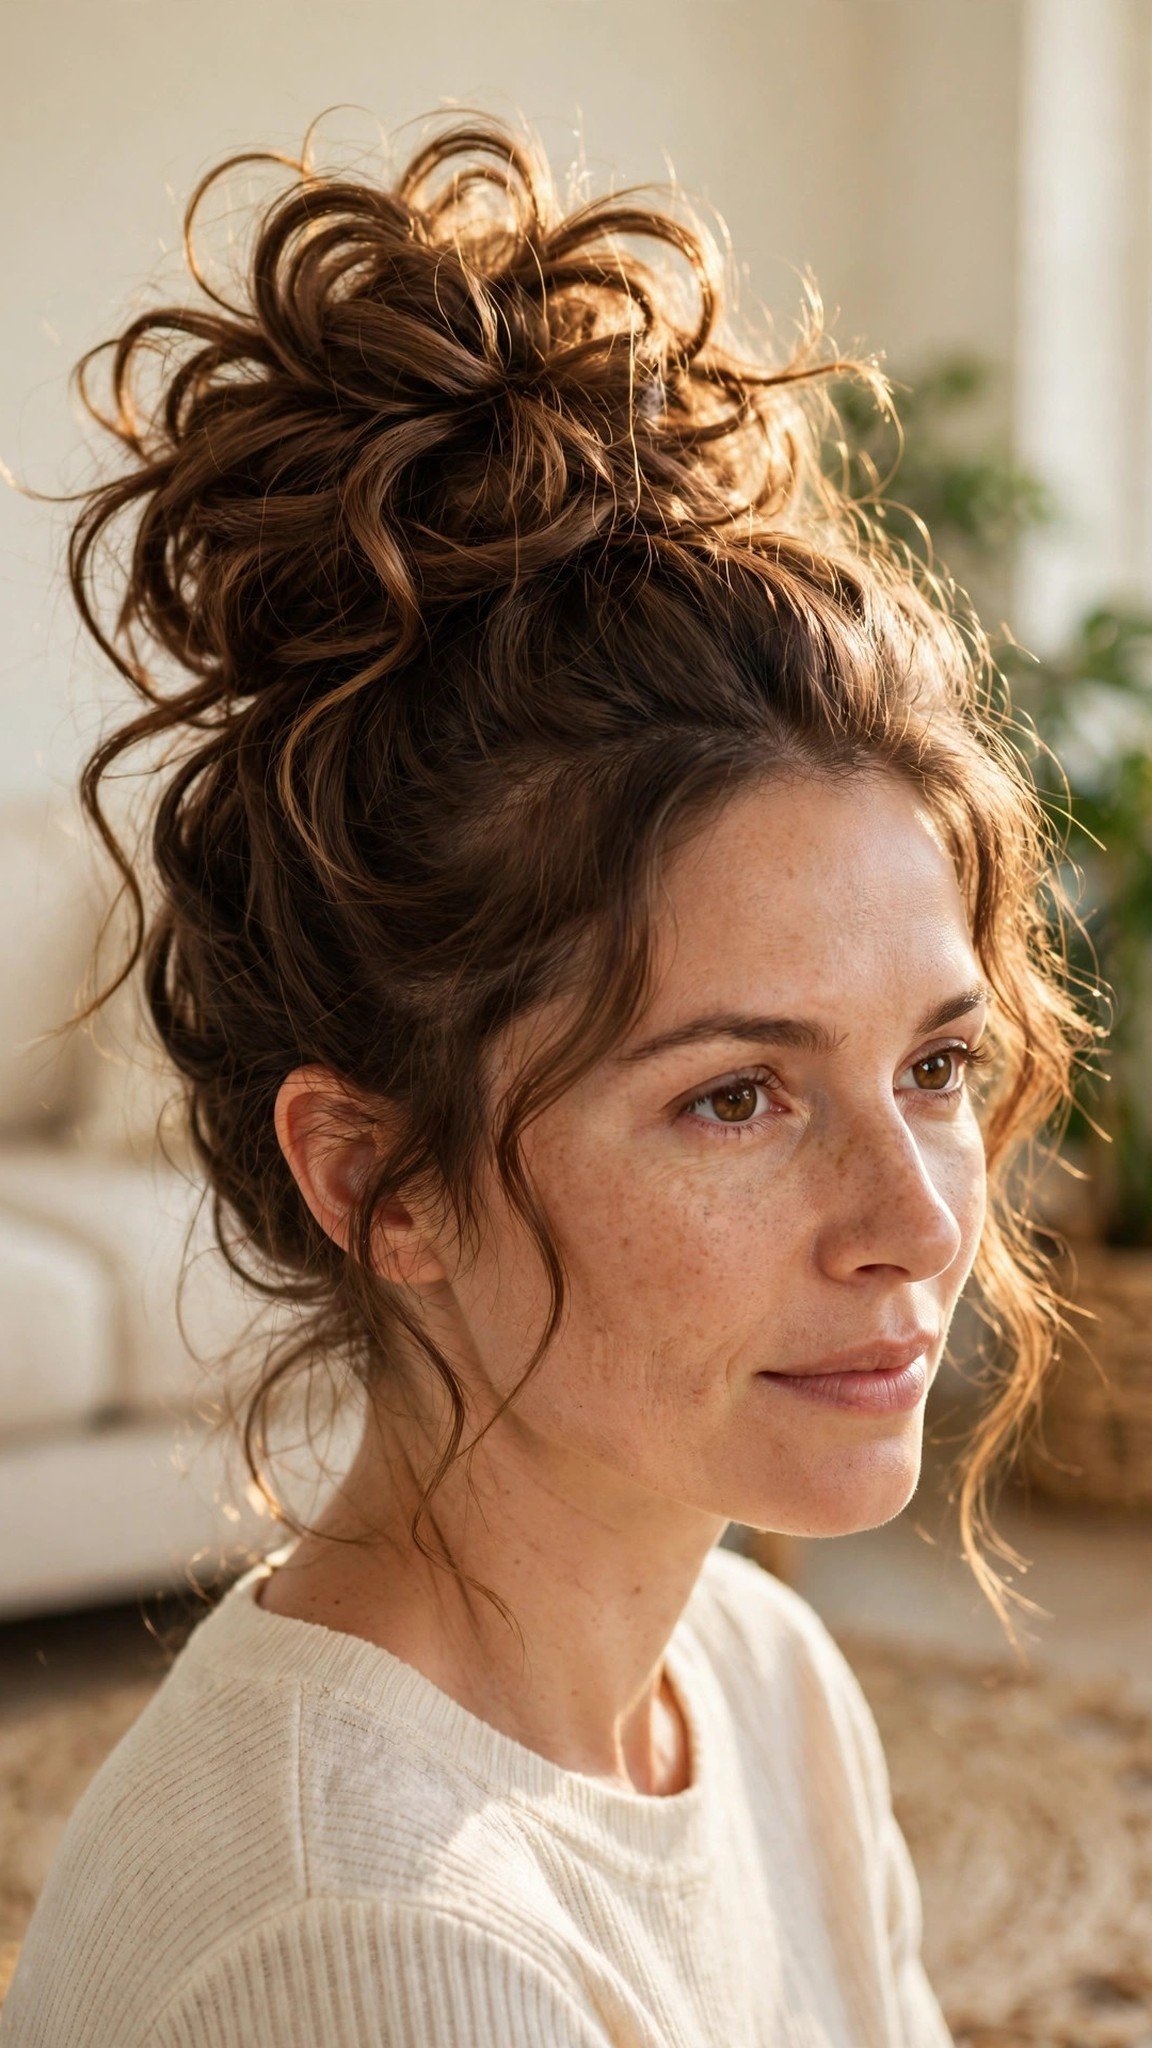
The wavy pineapple bun is the relaxed cousin of the high bun, and it is the one to choose when you want your waves up but not piled tightly on top of your head. The waves are gathered loosely at the top, so they keep their shape and volume while staying out of your face, and the loose gather means almost no pulling at the hairline. It is comfortable enough to wear all day.
Flip your head upside down and gather all of your waves loosely at the very top of your head. Secure them with a loose scrunchie, wrapping it only once or twice so the waves are not pulled tight. Let the waves fall forward over the top of your head like a pineapple top, and adjust them with your fingers so they sit evenly.
A mistake I made early on was wrapping the scrunchie three or four times, and it crushed the waves into a tight ball.
This style holds 8-10 hours and takes about two minutes. It is a beginner style that works for everyday wear, workouts, and sleeping.
See pineapple bun ideas or how to gather wavy hair loosely.
14. Sleek Wavy Bun

The sleek wavy bun is the most polished style wavy hair can wear, and it is the one to choose when you need to look put-together. The hairline is smooth and sleek, while the bun itself is full of soft waves, so the style has the best of both worlds: a clean, professional front and a beautiful, textured bun. It is a classic for ballet, weddings, and job interviews.
Apply a small amount of gel through the front of your hair and smooth it back with a soft bristle brush, gathering the waves into a high ponytail and securing it with a strong elastic. Twist the ponytail loosely and wrap it into a bun, pinning it with four bobby pins. Smooth the hairline with a little pomade, then mist with strong-hold hairspray. Check the back in a second mirror.
A mistake I made early on was brushing the whole head smooth, and it turned my waves into frizz.
This style holds 10-12 hours and takes about twelve minutes. It is an intermediate style, and a salon version costs $30-50.
See sleek bun ideas or how to smooth wavy hair without frizz.
15. Wavy Bun with a Scarf

The wavy bun with a scarf is the most glamorous style on this list, and it is also one of the most practical. A silk scarf wrapped around the base of a bun adds color and polish, and it holds the bun together, because the scarf acts as a wide, soft anchor that grips the waves. The waves fill out the bun so the scarf sits beautifully, and the whole look feels intentional and finished.
Gather your waves into a bun at the height you want and pin it in place with three bobby pins. Fold a silk scarf into a long band and wrap it around the base of the bun, crossing it underneath and bringing the ends up to the top. Tie the ends in a bow or a knot at the top of the bun, and tuck the loose ends in neatly.
Pro Tip: Use a silk or satin scarf, not cotton, because silk grips waves gently and will not frizz the surface of your bun.
This style holds 10-12 hours and takes about eight minutes. It is a beginner style, and a silk scarf costs $5-15.
See scarf bun ideas or how to wrap a scarf around a wavy bun.
16. Romantic Wavy Bun
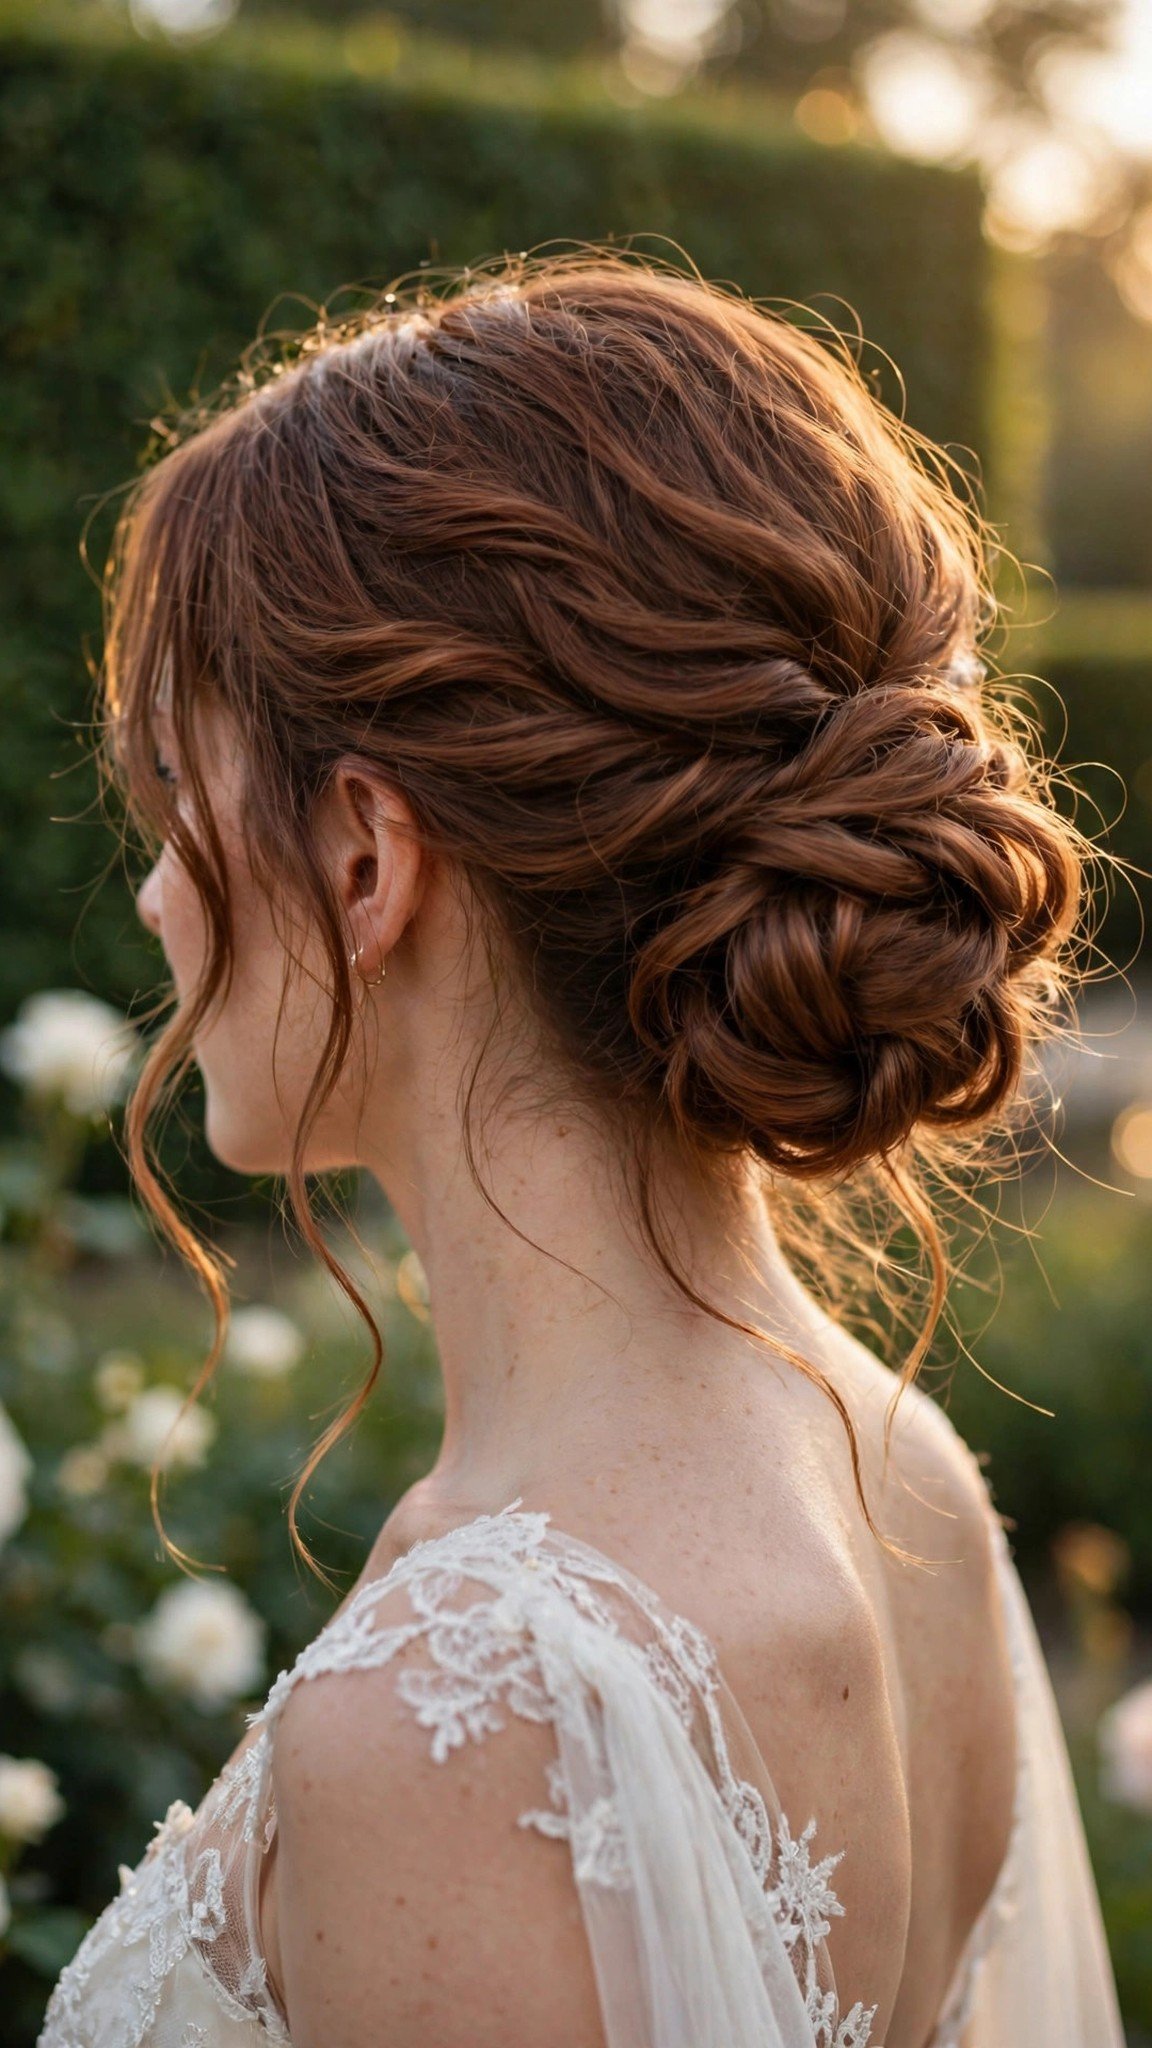
The romantic wavy bun is the softest, dreamiest style on this list, and it is the one to choose for date nights and weddings. The bun is loose and textured, with soft waves escaping around the face and at the nape, and the whole style looks like it happened naturally. Wavy hair makes this look without any effort, because the waves are already soft and romantic.
Gather your waves into a low, loose ponytail at the nape and secure it with a soft elastic. Twist the ponytail very loosely and coil it into a soft bun, pinning it with four bobby pins placed loosely so the bun stays soft. Pull out several thin wavy pieces around your face and at the nape, and curl them lightly with a curling iron if they need more shape.
Pro Tip: Pin the bun loosely on purpose, because a romantic bun should look soft and a little undone, and tight pins will make it look stiff and formal.
This style holds 8-10 hours and takes about fifteen minutes. It is an intermediate style, and a salon version costs $40-60.
See romantic bun ideas or how to style a wavy bun for a date night.
Getting Started
The easiest first step is to pick one anchor, not one style. The loose gather is the foundation of almost every bun in this guide, so learn to gather your waves loosely first and the rest will follow. Gather with your fingers, secure the ponytail, and pin gently. Once that feels natural, you can try braids, twists, and knots on top of the same foundation.
The most common beginner mistake is using the wrong tools. Thin elastics snap under the tension, small bobby pins slide out of wavy hair, and strong-hold hairspray makes waves crunchy and stiff. Buy strong elastics, large sturdy bobby pins, and a texturizing spray. That is about $10 in total and it covers every style in this guide. The second mistake is making the bun too tight, which pulls the waves straight and causes headaches. A bun should feel secure, not painful, and if it hurts, loosen it and add a pin instead of pulling harder.
What to buy first: three strong elastics, a pack of large bobby pins, a texturizing spray, and a sea salt spray for beach texture. That is about $12-18 in total. If you want a sock donut for style number nine, add $3-5. If you would rather book a salon, bring a photo and ask for a stylist experienced with wavy hair, because the gathering technique is different and not every stylist knows it.
For timeline, most buns in this guide take two to fifteen minutes, and the hold time is eight to twelve hours. Practice a new style on a weekend when you have time, and once you can do it in five minutes, it becomes a weekday style. Wavy hair rewards practice: the first time takes fifteen minutes, and the tenth time takes five.
Frequently Asked Questions
What is the best bun for wavy hair that will not ruin my waves?
The best bun for wavy hair is the Tousled Top Knot, because it gathers the waves loosely on top of the head without pulling them tight, so the wave pattern stays intact. The Wavy Pineapple Bun and the Messy Beach-Wave Bun are also excellent, because they use a loose elastic and let the waves keep their shape.
How do I keep a bun from giving me a headache with wavy hair?
A bun gives you a headache when all the weight hangs from one tight elastic. Spread the weight by pinning the bun in at least two directions, and keep the elastic loose. A low bun also helps, because it carries the weight close to your head instead of pulling upward.
What hair ties work best for wavy hair?
Strong, thick elastics without metal joins work best for wavy hair, because metal joins snag and thin elastics stretch out. Silk scrunchies are also excellent for looser styles, because they hold the waves without denting them or causing frizz.
Can I wear a bun every day with wavy hair?
Yes, but vary the position. Wearing a bun in the same spot every day causes breakage at the same place, so alternate between high, low, and side buns. Use a silk scrunchie at night, and give your waves one loose day a week if you can.
How do I make a wavy bun look full?
Wavy hair already has the volume, so the trick is to show it off. Pull gently at the edges of the bun to loosen it, leave a few wavy pieces loose around your face, and use texturizing spray instead of smoothing everything flat. A pineapple bun also helps, because it piles the waves on top where everyone can see them.
A Few Final Thoughts
Wavy hair is not a problem to solve, it is an advantage to use. Across these 16 styles, the pattern is simple: gather loosely, pin gently, and let the waves do the work. Whether you choose a two-minute pineapple bun for a busy morning or a romantic bun for a date night, your waves will finally stay where you put them and still look like waves when you take the bun down. Pick one style, practice it this weekend, and enjoy a bun that uses your natural texture.