
Short hair and buns are supposed to be enemies. Every tutorial seems to start with a ponytail you cannot make, a twist that falls apart, or a bun that needs six inches of hair you simply do not have. If your hair sits somewhere between your chin and your shoulders, you have probably tried a bun once, watched it slide out, and decided buns were not for you. They are, though. You just need the short-hair versions, the ones built around pins, texture, and clever placement instead of length.
This guide collects 18 easy bun hairstyles that actually work on short hair. Each one tells you the honest skill level, how long it holds, what it costs in tools, and the one mistake that ruins it. Some take two minutes, some take fifteen, and none of them need a ponytail that reaches your shoulder blades. Whether you are getting ready for work, a wedding, or a lazy Sunday, there is a bun here that will stay put and look like you meant it.
Quick Answer: For the easiest win, start with The Low Messy Bun (#3) or The Half-Up Mini Bun (#2) — both take under five minutes and hold all day. For a polished look, try The Sleek Ballerina Bun (#7) or The Low Chignon (#12). For something fun, The Double Space Buns (#4) and The Bubble Bun (#9) are the most photo-friendly picks in this guide.
Why Easy Buns for Short Hair Are Worth Your Time
A bun is the fastest way to look put together when your hair will not cooperate. Short hair has a mind of its own in humidity, after a workout, or on day three of a blowout, and a bun hides all of it in one move. Instead of fighting with a flat iron for twenty minutes, you can twist, pin, and walk out the door in five. That is the whole appeal: maximum polish for minimum effort, and the shorter your hair, the less weight pulls the style down.
There is a practical win too. Buns keep hair off your neck in summer, out of your face while you work, and away from food while you cook. They also protect your ends, because the hair tucked inside a bun is not rubbing against your collar or your jacket all day. If you are growing your hair out, a bun is the kindest style you can wear, since it hides the awkward in-between stage instead of advertising it.
Here is the part most short-haired women miss: a small bun looks more deliberate than a big one. A tiny top knot or a neat chignon reads as chic and intentional, the way a ballerina bun does, while a giant messy bun on long hair can look accidental. Short hair gives you proportion for free. A few face-framing pieces, a scrunchie, or a braid around the base is all the styling a short bun needs to look finished.
At a Glance
- All 18 buns work on chin-length to shoulder-length hair — no ponytail length required.
- Fourteen of the 18 styles are beginner-friendly and take under ten minutes.
- Hold times range from 4 hours for a loose beachy bun to all day for a pinned chignon.
- Every style uses tools you probably own already: bobby pins, one elastic, and dry shampoo.
- Face-framing pieces are the secret weapon that makes short buns look soft instead of severe.
- Five of the styles work for weddings and formal events, and the rest cover work, gym, and weekends.
| # | Style | Hair Length | Skill Level | Hold Time | Occasion |
|---|---|---|---|---|---|
| 1 | The Tiny Top Knot | Chin-length | Beginner | All day | Everyday |
| 2 | The Half-Up Mini Bun | Chin to shoulder | Beginner | All day | Work |
| 3 | The Low Messy Bun | Shoulder-length | Beginner | 6-8 hours | Weekend |
| 4 | The Double Space Buns | Chin to shoulder | Beginner | 5-6 hours | Festival |
| 5 | The Twisted Side Bun | Shoulder-length | Beginner | 6-8 hours | Date night |
| 6 | The Braided Crown Bun | Shoulder-length | Intermediate | All day | Wedding guest |
| 7 | The Sleek Ballerina Bun | Chin to shoulder | Intermediate | All day | Office |
| 8 | The Messy Bun With Face-Framing Pieces | Shoulder-length | Beginner | 6-8 hours | Brunch |
| 9 | The Bubble Bun | Shoulder-length | Beginner | 5-6 hours | Party |
| 10 | The Knotted Bun | Chin to shoulder | Beginner | 4-6 hours | Casual |
| 11 | The Pin-Curl Bun | Chin-length | Intermediate | All day | Vintage event |
| 12 | The Low Chignon | Shoulder-length | Intermediate | All day | Formal |
| 13 | The Textured Scrunchie Bun | Chin to shoulder | Beginner | 6-8 hours | Gym |
| 14 | The Side-Swept Bun | Shoulder-length | Beginner | 6-8 hours | Dinner |
| 15 | The Faux Bun With a Donut | Chin-length | Beginner | All day | Work |
| 16 | The French Twist Bun | Shoulder-length | Intermediate | All day | Wedding |
| 17 | The Pinned-Up Bun With Bobby Pins | Chin-length | Beginner | 5-6 hours | Everyday |
| 18 | The Beachy Bun | Shoulder-length | Beginner | 4-5 hours | Beach day |
1. The Tiny Top Knot
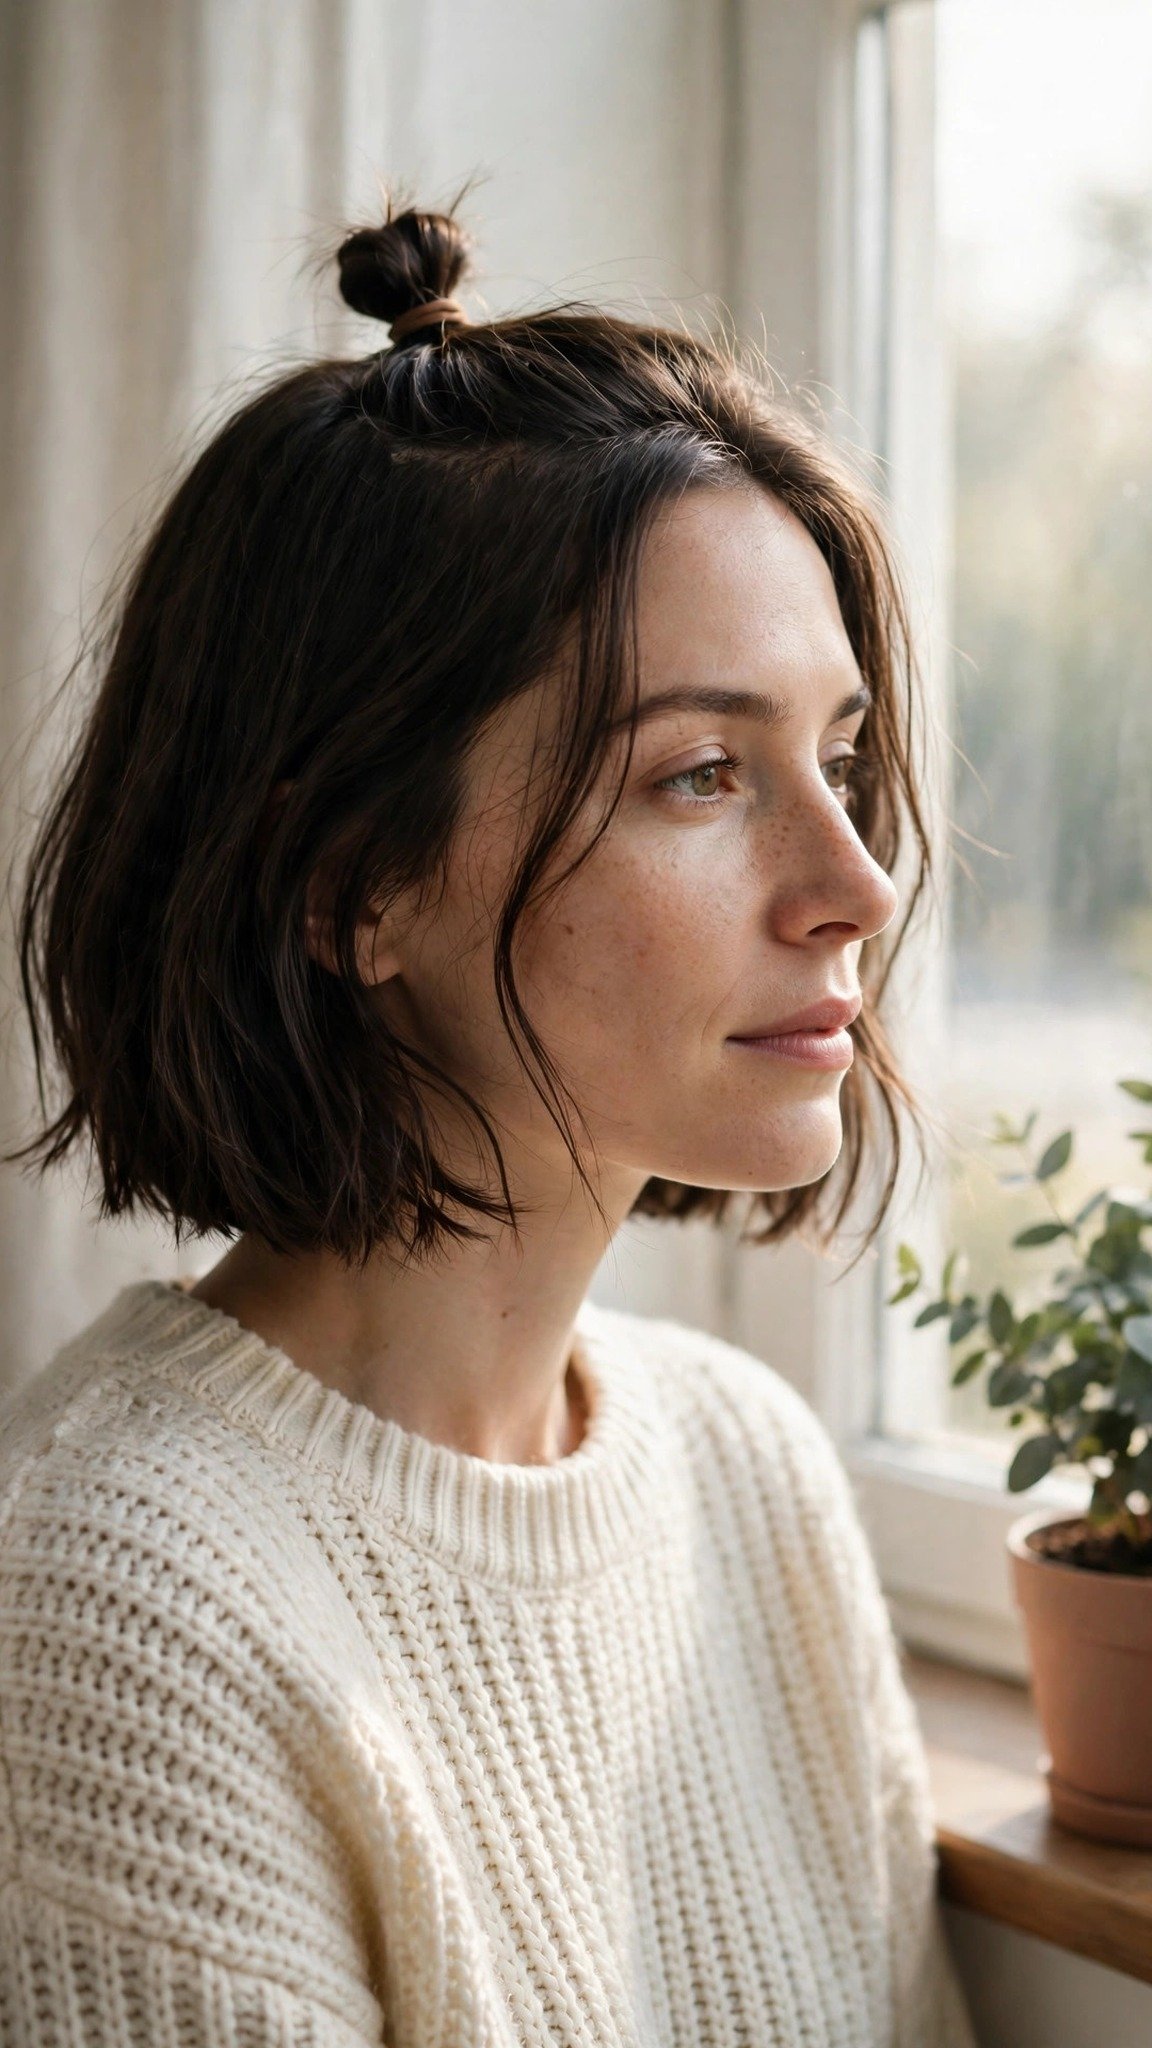
The tiny top knot is the short-hair bun that started it all, and it works precisely because your hair is short. A small knot sitting high on the crown looks deliberate and chic, the way a ballerina bun does, while the same knot on very long hair would need a whole production to stay up. On a chin-length bob, the knot is light, it does not pull, and it stays where you put it.
The trick is placement and texture. A top knot that sits too far back looks like a failed ponytail, so place it right where the crown starts to curve, roughly above your ears. Day-old hair works better than freshly washed hair here, because a little grit gives the pins something to grip.
Gather the top half of your hair into a small ponytail at the crown, twist it once around itself, and wrap it into a knot. Pin the tail underneath with two bobby pins crossed in an X, then gently tug the knot wider with your fingertips so it looks fuller than it is.
Pro Tip: Cross two bobby pins in an X shape through the base of the knot instead of using one pin, which twists loose by lunchtime.
Holds all day with two pins and a little hairspray. Costs nothing if you own bobby pins, and takes about three minutes once you have done it twice.
See top knot ideas or how to make a small bun look fuller.
2. The Half-Up Mini Bun

The half-up mini bun is the friendliest bun in this whole guide, and it is the one to try first if you have never worn your short hair up. You only need the top half of your hair, so there is no wrestling with layers that will not reach, and the loose bottom half keeps the look soft and feminine instead of severe. It is the hairstyle equivalent of a shrug: effortless, flattering, and hard to get wrong.
What makes it work on short hair is the ratio. A small bun on top with a bob falling below it looks balanced, because the bun is clearly a detail, not the whole style. Pull it too tight and it looks severe, so keep the base loose and let a few strands escape around your face.
Section off the top third of your hair from temple to temple, gather it at the crown, and twist it into a small bun. Secure it with a small elastic and one bobby pin, then gently pull at the bun to widen it.
A mistake I see often is sectioning too much hair into the bun, which leaves the bottom layer thin and straggly. Take less than you think you need, about a third, and the balance stays right.
Holds all day with one elastic and one pin. Costs under $5 for mini elastics, and takes about three minutes.
See half-up bun ideas or easy buns for short hair.
3. The Low Messy Bun

The low messy bun is the bun most short-haired women actually live in, and for good reason. It sits at the nape, where even chin-length layers can reach, and the mess is the point, so nothing has to be perfect. It is the style you wear to the grocery store, to brunch, to a work-from-home video call, and it looks good in all three places without a single change.
The secret is texture before structure. Short hair that is too clean slides out of a low bun within an hour, so work a little dry shampoo or sea salt spray through the lengths first. The grit gives every pin something to hold, and it also gives the bun its volume, because flat short hair makes a bun the size of a walnut.
Gather all your hair low at the nape, twist it loosely, and fold it up into a small bun. Pin the folded ends underneath with three or four bobby pins, then pull gently at the crown and the sides to loosen the shape.
Pro Tip: Pin the bun from underneath, pushing the pins up into the base, so the pins disappear completely and the bun looks held by magic.
Holds 6-8 hours with four pins. Costs nothing beyond pins and dry shampoo, and takes about five minutes.
See low bun ideas or messy bun tutorials for short hair.
4. The Double Space Buns

Double space buns are the most fun you can have with short hair, and they are secretly one of the easiest styles in this guide. Two small buns need even less length than one big bun, which means even a chin-length bob can do them. They read as playful and young, they photograph beautifully, and they keep every strand off your face, which is why they are a festival favorite.
The key is symmetry, or at least the illusion of it. Part your hair straight down the middle, and make the two buns the same height, roughly above each ear. They do not have to be identical to the millimetre, because a little asymmetry looks natural, but if one bun sits noticeably higher than the other, the whole style looks like a mistake.
Part your hair down the center, then gather each side into a small high ponytail above each ear. Twist each ponytail into a bun and pin it in place with two bobby pins per side.
A mistake I made the first time was making the buns too tight, which gave me a headache by noon. Keep the base loose and let the pins do the holding, not the tension.
Holds 5-6 hours with four pins. Costs nothing beyond elastics and pins, and takes about six minutes.
See space bun ideas or festival hairstyles for short hair.
5. The Twisted Side Bun

The twisted side bun is the date-night bun for short hair, and it earns that title because it looks far harder than it is. A twist running along one side into a low bun reads as romantic and intricate, the kind of style people assume took a stylist, when it is really just two twists and four pins. It is the best return on effort in this entire guide.
What makes it flattering is the asymmetry. A side bun draws the eye diagonally across the face, which softens a strong jawline and adds movement to a blunt bob. It also works beautifully with a side part, because the twist follows the natural direction your hair already wants to go.
Part your hair deeply on one side, then take a section from the front on the heavier side and twist it back toward your ear, adding hair as you go. Gather the twist and the rest of your hair into a low bun behind that ear, pin it in place, and gently pull the twist apart a little to make it look thicker.
Pro Tip: Twist the hair away from your face, not toward it, so the twist opens up and frames your cheekbone instead of flattening against your head.
Holds 6-8 hours with four pins. Costs nothing beyond pins, and takes about eight minutes.
See side bun ideas or romantic hairstyles for short hair.
6. The Braided Crown Bun
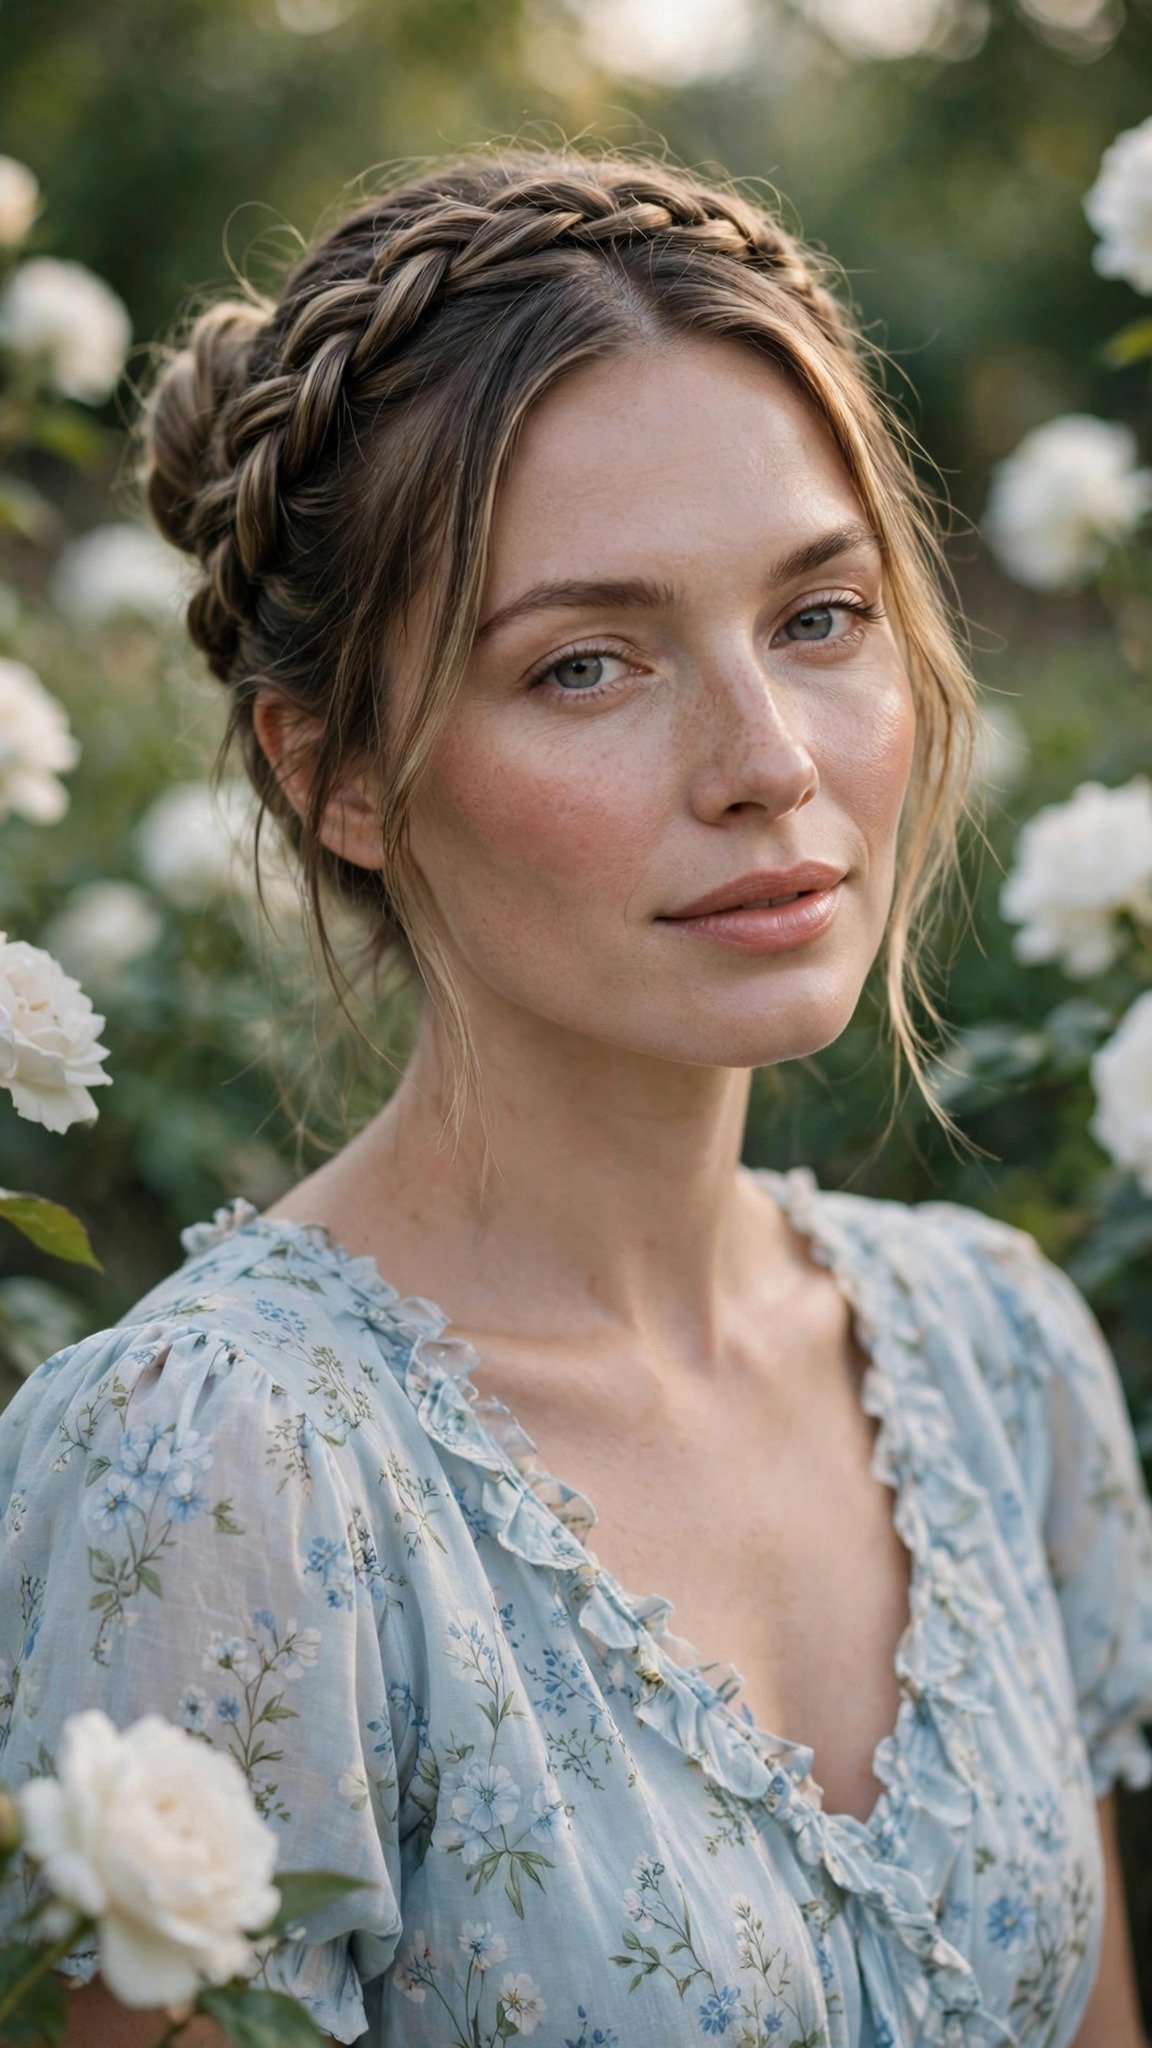
The braided crown bun looks like it belongs at a wedding, and it does, but it is built from the simplest braid there is. A braid wrapped around the crown with the ends tucked into a bun gives you two styles at once: the texture of a braid and the polish of an updo. On shoulder-length hair it works beautifully, because the braid only has to travel from one ear to the other, not all the way around a long head of hair.
The trick for short hair is to braid loosely and then pull the braid apart, a technique called pancaking. A tight braid on short hair looks thin and disappears into the bun, but a pancaked braid looks twice as thick and shows off the pattern. Do not be afraid to tug at it.
Part your hair in the middle, then braid a section from one side, starting at the temple and working back along the crown. Repeat on the other side, then gather both braids and the remaining hair into a low bun at the back.
A mistake I see often is braiding all the way to the very ends, which leaves wispy tails that will not stay tucked. Stop braiding two inches from the ends and let the bun swallow the tails.
Holds all day with six pins. Costs nothing beyond pins and a clear elastic, and takes about twelve minutes.
See braided bun ideas or crown braid tutorials for short hair.
7. The Sleek Ballerina Bun
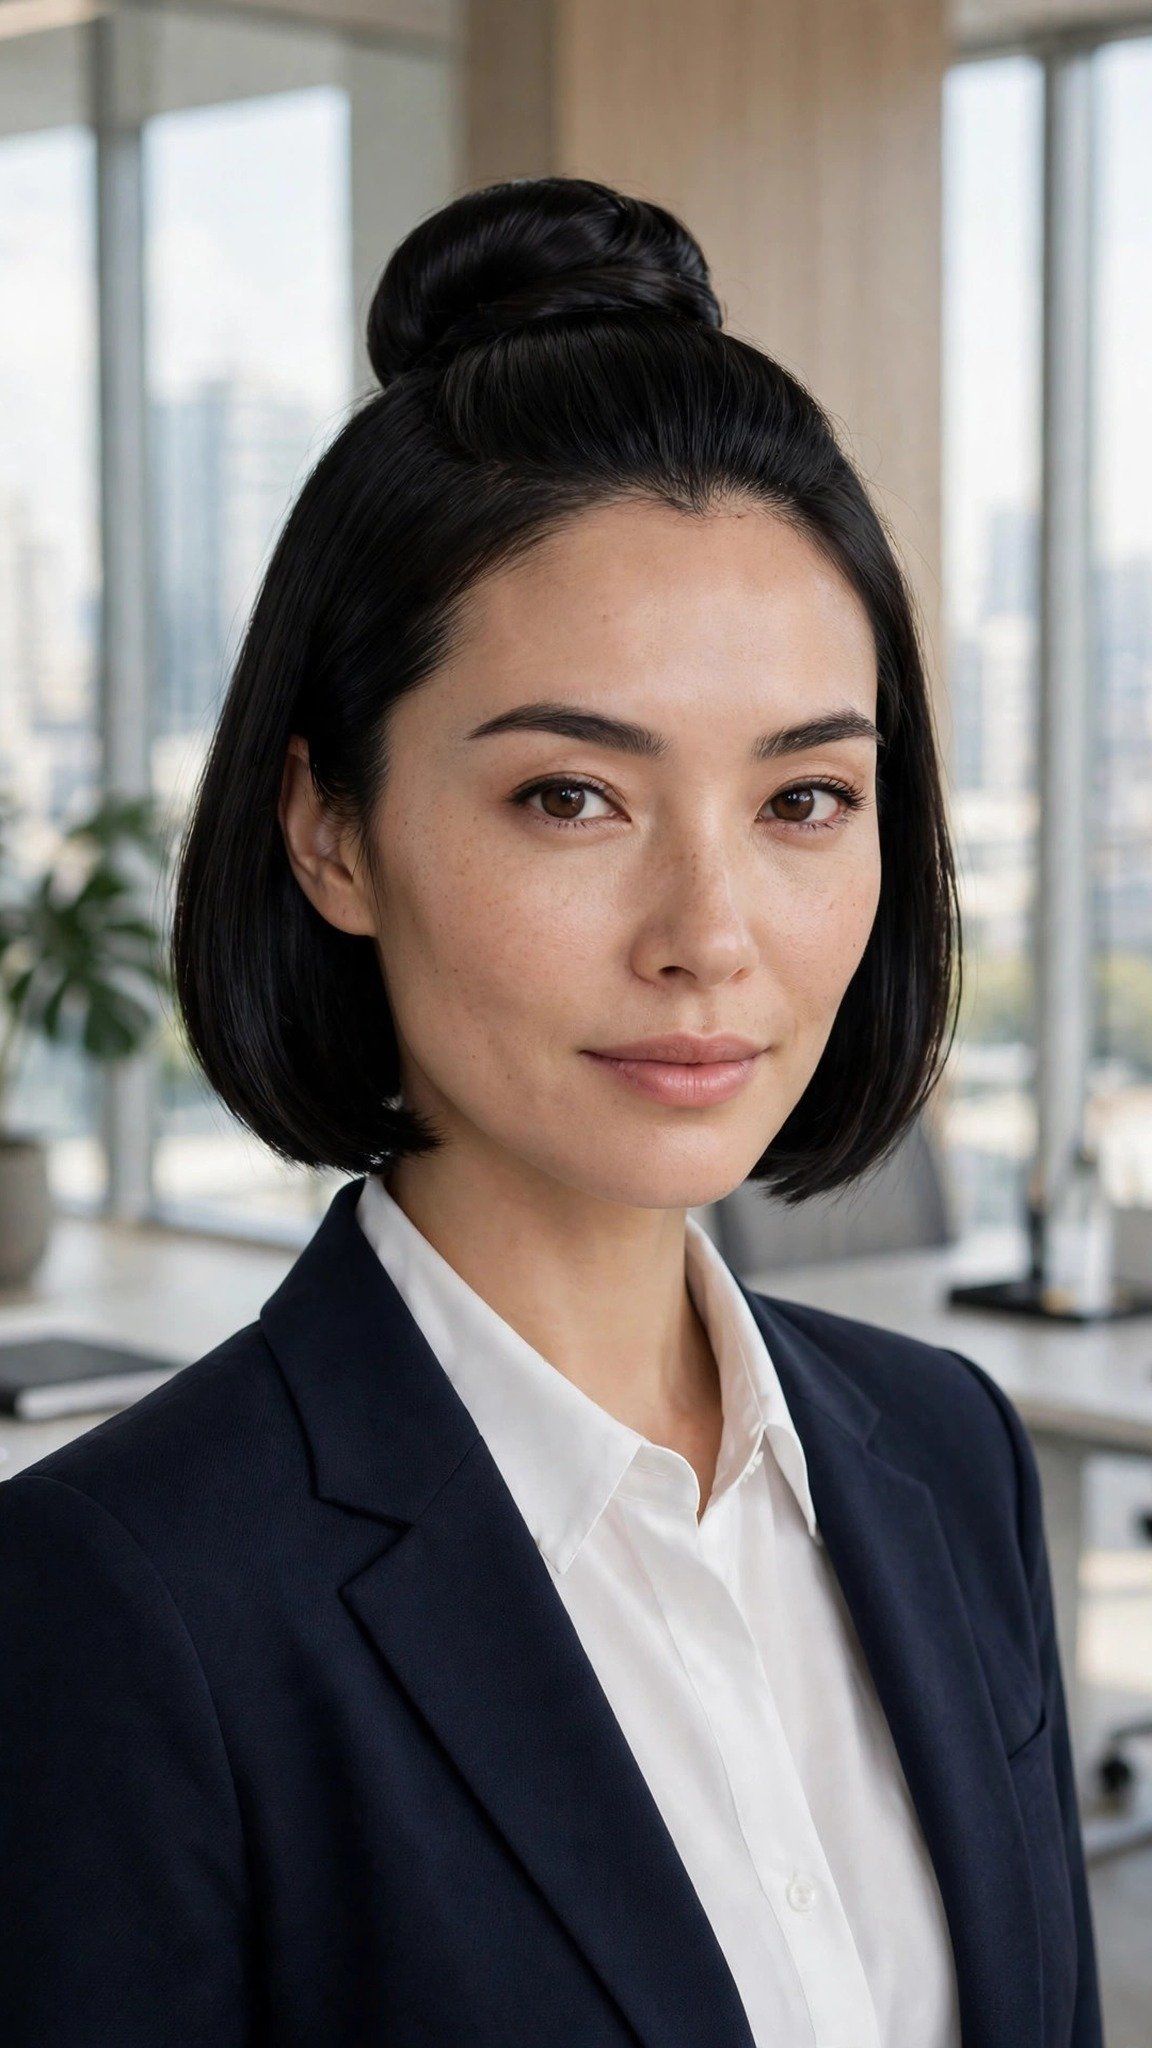
The sleek ballerina bun is the most polished style in this guide, and it is the one to wear when you need to look serious. A smooth, tight bun at the crown reads as confident and deliberate, and it is the standard for dancers, lawyers, and anyone who wants their hair to say nothing at all so their work can speak. On short hair it is surprisingly achievable, because there is less hair to smooth.
The secret is product and patience. A sleek bun needs a smoothing serum or a light gel worked through damp hair, and a fine-tooth comb to pull everything back without bumps. Short hair has a habit of springing loose at the nape, so the nape is where you spend your time, smoothing layer by layer and pinning each one before moving on.
Apply smoothing serum to damp hair and blow-dry it straight. Brush all the hair up to the crown, secure it with a strong elastic, then twist the short tail into a bun and pin it flat.
Pro Tip: Use a clean toothbrush sprayed with hairspray to smooth flyaways along the hairline. It gives you control a brush never will.
Holds all day with a strong elastic and three pins. Costs under $10 for serum and gel if you do not own them, and takes about ten minutes.
See sleek bun ideas or ballerina bun tutorials.
8. The Messy Bun With Face-Framing Pieces

The messy bun with face-framing pieces is the style that made messy buns famous, and the face-framing pieces are the whole reason it works on short hair. Without them, a short messy bun can look like a knot on top of your head. With them, it looks soft, romantic, and deliberate, because the loose pieces balance the bun and frame your face the way a good haircut does.
The pieces matter more than the bun itself, so choose them first. Pull out two sections at the front, roughly an inch wide each, before you make the bun, and leave them alone while you work. If you pull them out afterward, they come out too short and springy.
Pull out two face-framing pieces at the front, then gather the rest of your hair into a loose bun at the crown or the nape. Pin it with three bobby pins, then gently tug the bun wider and pull at the crown for volume.
A mistake I made early on was pulling the face-framing pieces too wide, which left the bun looking thin. Keep the pieces narrow, about an inch each, and the bun keeps its fullness.
Holds 6-8 hours with three pins. Costs nothing beyond pins, and takes about five minutes.
See messy bun ideas or how to style face-framing layers.
9. The Bubble Bun
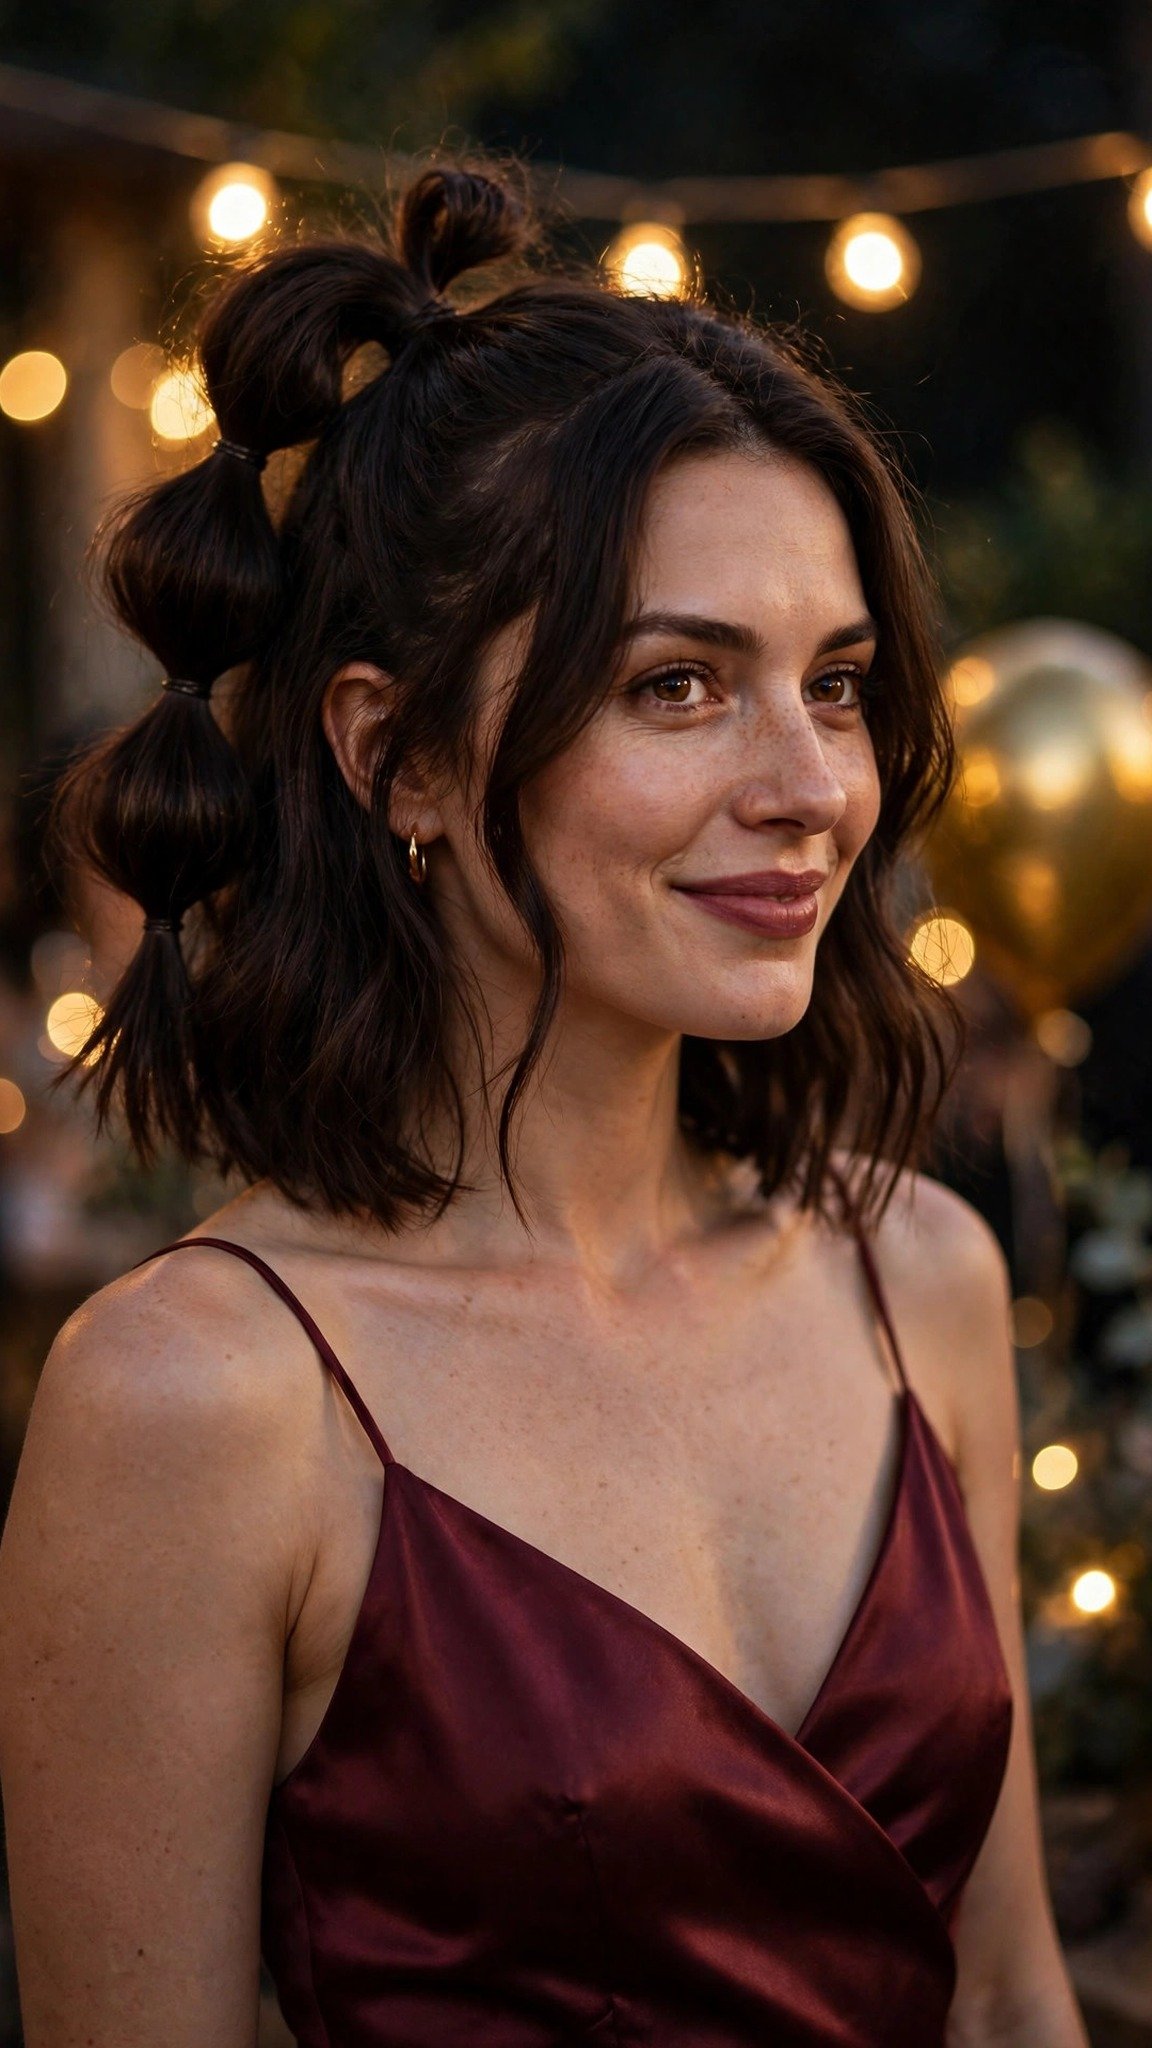
The bubble bun is the most playful style in this guide, and it is a gift for short hair because it creates volume out of nothing. A ponytail divided into puffed sections looks twice as long and three times as full as it really is, which is exactly what a shoulder-length bob needs. It is the bun to wear when you want compliments, because people always ask how you did it.
The technique is simple, but the spacing is everything. Elastics placed too close together make tiny bubbles that look fussy, while elastics placed too far apart make the bubbles sag. About two inches between elastics is the sweet spot for shoulder-length hair, and each bubble should be gently pulled wider after you place the elastic, not before.
Gather your hair into a high or mid ponytail, then place small clear elastics down the length of the tail, about two inches apart. Gently pull each section wider between the elastics to form a bubble, then fold the whole ponytail up and pin it into a bun shape, or leave it as a bubble ponytail if you prefer.
Pro Tip: Use clear mini elastics, not colored ones, so the bubbles look seamless and the elastic disappears into the hair.
Holds 5-6 hours with four mini elastics and two pins. Costs under $5 for mini elastics, and takes about eight minutes.
See bubble bun ideas or fun party hairstyles for short hair.
10. The Knotted Bun

The knotted bun is the simplest bun that exists, and it is perfect for short hair because a knot needs almost no length at all. You divide your hair in two, tie it in a knot the way you would tie a shoelace, and pin the ends underneath. That is the whole style, and it looks like a chic, sculptural bun that took ten times longer than it did.
What makes it work is the knot itself. A knot holds its own shape, so you do not need a ponytail base or a donut to give it structure, which is exactly the problem short hair usually has. The knot also looks thicker than a twist, because the hair doubles back on itself, so even fine chin-length hair makes a bun with real presence.
Divide your hair into two equal sections at the back, then tie them together in a simple overhand knot, just like the first step of tying shoelaces. Tie a second knot on top if you have enough length, then tuck the ends underneath and pin them in place with three bobby pins.
A mistake I made the first time was tying the knot too tightly, which made it tiny and hard. Tie it loosely, the way you would tie a scarf, and it stays soft and full.
Holds 4-6 hours with three pins. Costs nothing beyond pins, and takes about four minutes.
See knotted bun ideas or the easiest buns for very short hair.
11. The Pin-Curl Bun

The pin-curl bun is the vintage showstopper of this guide, and it is made for chin-length hair. Pin curls were invented for short hair in the first place, back when every woman had a bob and a set of pins, so the style fits your length perfectly instead of fighting it. The result is a glossy, sculpted bun that looks like it came from a 1940s film, and it holds all day.
The key is setting the curls before you build the bun. Pin curls need to cool completely in their pinned shape, or they fall out the moment you touch them. That means rolling the curls, pinning them flat to your head, and leaving them alone for at least twenty minutes while you do your makeup.
Roll small sections of damp hair into pin curls and pin each one flat against your head with a bobby pin. Let them cool completely, then remove the pins and brush the curls out gently. Gather the curls into a low bun at the nape, pin it in place, and smooth the top with a soft brush.
Pro Tip: Set the pin curls the night before and sleep in a silk scarf, and the bun takes five minutes in the morning instead of thirty.
Holds all day with pins and hairspray. Costs under $10 for pin curl clips, and takes about thirty minutes including setting time.
See vintage bun ideas or pin curl tutorials for short hair.
12. The Low Chignon

The low chignon is the most elegant bun a short-haired woman can wear, and it is the one stylists reach for at weddings. A smooth roll at the nape reads as timeless and expensive, and it pairs with everything from a black evening gown to a bridesmaid dress. On shoulder-length hair it is entirely achievable, because the chignon is a fold, not a ponytail, and a fold only needs hair that reaches the nape.
The secret is the tuck, not the twist. A chignon is made by folding the ends of your hair up and under, then pinning the fold in place, which hides the ends completely and creates a smooth roll. Short hair folds easily because there is not much of it, and the roll stays compact and neat. The mistake is trying to twist it first, which makes the roll lumpy.
Part your hair in the middle or on the side, smooth it back, and gather it low at the nape. Fold the ends up and under toward your head to form a roll, then pin the roll in place with four or five bobby pins, working from the outside in.
Pro Tip: Insert the pins with the wavy side facing down against your scalp, which grips far better than the flat side and keeps the chignon locked all evening.
Holds all day with five pins. Costs nothing beyond pins and hairspray, and takes about ten minutes.
See chignon ideas or formal bun hairstyles for short hair.
13. The Textured Scrunchie Bun

The textured scrunchie bun is the gym bun that actually stays in, and the scrunchie is the reason why. A silk or velvet scrunchie grips short hair without pulling it, spreads the pressure so you do not get a headache, and adds a pop of color or texture that makes a basic bun look styled. It is the bun you wear to a workout, to run errands, and to a coffee run, and it never looks like you gave up.
Texture is what turns this from a plain ponytail bun into a style. Work dry shampoo or texture spray through your hair before you gather it, and the bun gets volume and grip at the same time. Without texture, short hair slides through a scrunchie within an hour, especially if you are moving.
Spray texture spray through your hair and scrunch it with your fingers. Gather the hair into a high or mid ponytail, wrap the scrunchie around it twice, then twist the tail into a small bun and secure it with the scrunchie.
A mistake I made early on was using a thin elastic instead of a scrunchie, which left a dent in my hair and slipped out mid-workout. A wide scrunchie distributes the hold and leaves no dent.
Holds 6-8 hours with one scrunchie. Costs under $10 for a set of scrunchies, and takes about four minutes.
See scrunchie bun ideas or gym hairstyles for short hair.
14. The Side-Swept Bun

The side-swept bun is the red-carpet cousin of the side bun, and it is all about the sweep. Instead of parting your hair and twisting it back, you sweep everything to one side and gather it low behind one ear, which creates a dramatic diagonal line across your head. It is the bun to wear with a one-shoulder dress or a statement earring, because the sweep leaves one side of your face and neck completely open.
What makes it work on short hair is that the sweep uses your hair’s natural fall. A shoulder-length bob already wants to fall to one side if you part it deeply, so you are working with the hair instead of against it.
Create a deep side part, then sweep all your hair to the heavier side, smoothing it back with a brush. Gather it into a low bun behind the ear on that side, pin it in place with four bobby pins, and smooth the swept side with hairspray.
Pro Tip: Use a strong-hold hairspray on the swept side only, and a light hold on the bun, so the sweep stays smooth while the bun keeps its softness.
Holds 6-8 hours with four pins. Costs nothing beyond pins and hairspray, and takes about eight minutes.
See side-swept bun ideas or elegant hairstyles for short hair.
15. The Faux Bun With a Donut

The faux bun with a donut is the cheat code for short hair, and there is no shame in using it. A hair donut is a small foam ring that you wrap your hair around, and it turns a chin-length bob into a perfectly round, full bun in about two minutes. Nobody can tell the donut is there, because your own hair covers it completely, and the result looks like you have twice as much hair as you do.
The trick is matching the donut to your hair color and choosing the right size. A donut that is too big overwhelms short hair and looks like a helmet, so pick the smallest size, usually about two inches across. A donut that matches your hair color disappears completely, while a mismatched one can peek through if your hair is thin in places.
Gather your hair into a ponytail at the height you want the bun, then slide the donut over the ponytail to the base. Spread your hair over the donut to cover it completely, then secure the spread hair with a thin elastic around the base of the donut.
A mistake I see often is leaving the ends sticking out from under the donut, which ruins the illusion. Tuck every end underneath and pin it flat, and the bun looks completely natural.
Holds all day with one donut and two pins. Costs under $5 for a set of donuts, and takes about five minutes.
See donut bun ideas or how to make a bun look bigger on short hair.
16. The French Twist Bun

The French twist bun is the most sophisticated style in this guide, and it is the one that makes people ask who did your hair. A smooth vertical roll running up the back of the head reads as old Hollywood glamour, and it works on shoulder-length hair because the twist only needs to travel the length of your head, not the length of a ponytail. It is the bun for weddings, galas, and any night you want to feel like a film star.
The technique looks intimidating, but it is really just a fold held in place with pins. You sweep the hair to one side, fold it back on itself, and pin the fold along the seam, which creates the vertical roll. The pins go in along the fold, not through it, which is the detail most tutorials skip.
Sweep all your hair to one side and hold it in a low ponytail shape without an elastic. Fold the hair back on itself toward the other side, tucking the ends inside the fold to form a vertical roll.
Pro Tip: Practice the French twist twice before the event, because the first attempt always takes fifteen minutes and the third takes five.
Holds all day with five pins. Costs nothing beyond pins and hairspray, and takes about twelve minutes once you have practiced.
See French twist ideas or classic updos for short hair.
17. The Pinned-Up Bun With Bobby Pins

The pinned-up bun with bobby pins is the most honest bun in this guide, because it does not pretend to be anything it is not. There is no ponytail, no twist, no donut, just small sections of hair folded up and pinned in place, one at a time, until it looks like a bun. It is the style for very short hair that cannot do anything else, and it works because pins are stronger than elastics on short layers.
The method is forgiving in a way no other bun is. If one section falls out, you pin it back up, and nobody notices, because the style is made of individual pinned pieces. That makes it perfect for chin-length bobs with layers, where every other bun fights the shortest layers.
Work in small sections, starting at the nape. Take a one-inch section, fold it up toward the crown, and pin it in place with a bobby pin. Repeat with the next section, overlapping slightly, until all the hair is pinned up into a bun shape.
A mistake I made the first time was using too few pins, which let the sections slide apart by noon. Use one pin per section, about eight to ten pins total, and the bun holds for hours.
Holds 5-6 hours with eight to ten pins. Costs nothing beyond bobby pins, and takes about eight minutes.
See bobby pin updos or easy buns for very short hair.
18. The Beachy Bun

The beachy bun is the bun that looks like you did not try, and that is exactly why it works. A loose, tousled bun with salt-spray texture and a few strands blowing free reads as effortless and sun-kissed, which is the whole point of a beach day. On shoulder-length hair it is the easiest bun of all, because the wind and the salt do half the styling for you.
The key ingredient is sea salt spray, and you should apply it before the bun, not after. Salt spray gives short hair the grit and texture it needs to hold a loose bun, and it also creates the beachy waves that make the style look intentional instead of messy. Without it, a beachy bun on clean hair slides out in twenty minutes.
Spray sea salt spray through damp or dry hair and scrunch it with your fingers to build texture. Gather the hair loosely into a bun at the crown or the nape, secure it with a scrunchie or two pins, and pull out several face-framing pieces.
Pro Tip: Apply the salt spray the night before and sleep with your hair in a loose bun, and you wake up with the texture already built in.
Holds 4-5 hours with a scrunchie and two pins. Costs under $10 for sea salt spray, and takes about three minutes.
See beachy bun ideas or summer hairstyles for short hair.
Getting Started With Easy Buns for Short Hair
The easiest first step is to pick one bun and practice it three times before you need it. The half-up mini bun or the low messy bun are the best starting points, because they are forgiving and they teach you the two skills every short bun needs: how to pin without showing the pin, and how to pull a bun wider so it looks full. Practice on a quiet evening, not on the morning of an event, and by the third try you will have it down to five minutes.
The most common mistake is starting with clean, slippery hair. Freshly washed short hair slides out of pins and elastics, which is why so many women think buns do not work for them. The fix is simple: style on day-old hair, or add dry shampoo, texture spray, or sea salt spray before you start. The second mistake is using too few pins. Short hair needs more pins than long hair, because each layer is shorter and lighter, so use eight to ten pins without guilt. Pins are cheap, and nobody sees them when they are placed correctly.
What to buy first: a pack of bobby pins in your hair color, a few small clear elastics, one silk scrunchie, a can of dry shampoo, and a small hair donut. That is about $15-20 in total and covers every style in this guide. If you want to go further, add a texture spray and a light-hold hairspray, which together cost about $15 and make every bun hold longer and look fuller.
Frequently Asked Questions
Can you do a bun with chin-length hair?
Yes, and this guide proves it. Styles like the tiny top knot, the knotted bun, and the pinned-up bun need almost no length at all, because they are built from folds, knots, and pins rather than ponytails.
Why does my bun keep falling out?
The most common reason is clean, slippery hair. Style on day-old hair or add dry shampoo or texture spray first, which gives pins something to grip. The second reason is too few pins: short hair needs eight to ten bobby pins, placed with the wavy side down, and crossed in an X at the base of the bun for extra hold.
How do I make a small bun look fuller?
Three tricks work every time. First, add texture spray before you start, which doubles the volume. Second, gently pull the bun wider with your fingertips after pinning it, which is called pancaking.
What is the best bun for short hair at work?
The sleek ballerina bun and the low chignon are the most professional choices, because they are smooth, neat, and hold all day. The half-up mini bun is a good middle ground if your office is more casual, since it keeps hair out of your face while leaving the bob visible.
Do buns damage short hair?
Buns are actually one of the gentlest styles for short hair, because they keep the ends tucked away from friction.
A Few Final Thoughts
Short hair does not lock you out of buns, it just changes the rules, and once you know the rules, the styles are yours. Texture before structure, pins instead of ponytails, and a willingness to let a few pieces fall loose will carry you through every bun in this guide. Pick one, practice it three times, and wear it out this week. Your bob was never the problem, and now you have eighteen ways to prove it.