
A donut bun is the fastest way to turn thick hair into a full, round, perfectly shaped bun. The foam donut does the shaping work for you, so your bun looks salon-perfect even on your first try, and the extra volume makes thick hair look intentional instead of heavy. If your hair is thick and every other bun feels too small or too flat, the donut bun is the style that was made for you.
This guide covers 16 donut bun hairstyles, from the classic high donut bun to low, messy, braided, and scarf-wrapped versions, plus a style made specifically for very thick hair. Every style lists the hair length it needs, the skill level, how long it holds, and the occasion it suits best. Most of them take under ten minutes and need nothing more than a foam donut, a few pins, and hairspray.
You do not need a salon or expensive tools. A foam donut maker costs about $5, and it comes in sizes from small to extra-large, so you can choose the volume that suits your hair and your mood. If you can make a ponytail, you can make every donut bun in this guide.
Quick Answer: For the fullest, most voluminous look, start with the Classic Donut Bun (#1) or the Donut Bun for Thick Hair (#9). For a softer look that still holds, try the Donut Bun With Curtain Bangs (#7) or the Messy Donut Bun (#6). A foam donut maker costs about $5-8, and most styles take under ten minutes.
Why Donut Buns Are Worth Your Time
Donut buns give thick hair the shape it deserves. Thick hair has natural volume, but a plain bun often turns that volume into a heavy, shapeless lump. A foam donut organizes the volume into a perfect round shape, so your bun looks full and deliberate instead of bulky. The donut also distributes the weight evenly, which makes the bun more comfortable to wear all day.
There is also a visual reason this style is so popular. A big, round bun lengthens the neck, lifts the face, and draws attention to your cheekbones and earrings. It works with a blazer, a summer dress, a wedding gown, or gym clothes, and it never competes with a bold lip or statement jewelry. It is one of the few hairstyles that looks equally right at work and at a wedding.
The third win is practical: a donut bun protects thick hair. When your hair is tucked away in a bun, the ends are not rubbing against your collar, catching in a zipper, or getting windblown into tangles. Many women with thick hair wear a donut bun most days specifically because it reduces breakage and keeps their hair healthier between washes.
Finally, the donut bun is forgiving to learn. The foam ring does the hard part, shaping the bun into a perfect circle, so your only job is to spread the hair evenly and pin the ends underneath. Once you learn the base, every variation in this guide is just a small change: a different parting, a braid wrapped around the base, or a scarf tied at the nape.
At a Glance
- All 16 styles hold for 8-14 hours with the right pins and hairspray, and most survive a full day of work, dancing, or events.
- Hair length needs range from medium to long; thick hair makes the fullest buns, and the donut fills out fine hair beautifully.
- Fourteen of the 16 styles are beginner-friendly and take under ten minutes once you know the steps.
- A foam donut maker, strong elastics, bobby pins, and hairspray cost about $10-15 in total.
- The style suits women wanting a classic full bun, bridesmaids, professionals, dancers, and anyone with thick hair.
- Every bun can be dressed up with pearl pins, a silk scarf, a headband, or a braid wrap, or kept plain for everyday wear.
| # | Style | Hair Length | Skill Level | Hold Time | Occasion |
|---|---|---|---|---|---|
| 1 | Classic Donut Bun | Medium to long | Beginner | 10-14 hours | Everyday, work |
| 2 | High Donut Bun | Medium to long | Beginner | 10-14 hours | Dance, events |
| 3 | Low Donut Bun | Medium to long | Beginner | 8-12 hours | Weddings, dinners |
| 4 | Donut Bun With a Side Part | Medium to long | Beginner | 10-12 hours | Work, photos |
| 5 | Donut Bun With a Braid Wrap | Long | Intermediate | 10-14 hours | Weddings, parties |
| 6 | Messy Donut Bun | Medium to long | Beginner | 8-10 hours | Weekends, casual days |
| 7 | Donut Bun With Curtain Bangs | Medium to long | Beginner | 8-10 hours | Everyday, date night |
| 8 | Donut Bun With a Silk Scarf | Medium to long | Beginner | 8-12 hours | Brunch, holidays |
| 9 | Donut Bun for Thick Hair | Long | Beginner | 10-14 hours | Everyday, work |
| 10 | Donut Bun With Twists | Medium to long | Intermediate | 10-12 hours | Work, events |
| 11 | Half-Up Donut Bun | Medium to long | Beginner | 8-10 hours | School, casual days |
| 12 | Donut Bun With Pearl Pins | Medium to long | Beginner | 10-12 hours | Weddings, parties |
| 13 | Donut Bun With a Center Part | Medium to long | Beginner | 10-12 hours | Work, formal events |
| 14 | Donut Bun With Loose Tendrils | Medium to long | Beginner | 8-10 hours | Everyday, date night |
| 15 | Donut Bun With a Headband | Medium to long | Beginner | 8-10 hours | Brunch, casual days |
| 16 | Double Donut Buns | Medium to long | Beginner | 8-10 hours | Festivals, parties |
1. Classic Donut Bun

The classic donut bun is the original, and it is still the best way to get a big, round, perfectly shaped bun. The foam donut gives your bun a full, voluminous shape that a plain coil cannot match, and it works beautifully on thick hair, where the extra volume looks intentional and polished.
This bun suits every hair type, but it works best on medium to long hair with a little natural texture. If your hair is very fine, a light dusting of texturizing spray at the roots gives the pins something to grip. If your hair is thick, a medium or large donut gives the fullest shape, and the bun will look wonderfully voluminous.
Pull your hair into a high ponytail and slide the donut maker over it so it sits at the base. Spread the ponytail hair evenly over the ring, then slide a thin elastic over the whole thing to trap the hair in place. Tuck the leftover ends around the base and pin them underneath, then finish with hairspray.
Pro Tip: Match the donut maker to your hair color, because a foam ring that peeks through is the one giveaway. Brown for brown hair, blonde for blonde hair, black for black hair.
See donut bun hairstyles or how to use a donut bun maker.
Hold time: 10-14 hours. Difficulty: beginner. Cost: about $5-8 for a donut maker and pins.
2. High Donut Bun

The high donut bun sits at the very top of the crown, which gives it maximum lift and drama. It lengthens the neck, lifts the face, and makes the bun the focal point of the whole look. This is the donut bun for dance class, performances, and any day when you want your hair to make a statement.
A high donut bun suits oval and round faces especially well, since the height adds length to the face. It also works beautifully for dancers and performers, because the high placement keeps the hair completely out of the way. If your hair is very thick, use two elastics stacked together so the ponytail base can hold the weight without sagging.
Brush all of your hair up into a very high ponytail at the crown, using a bristle brush to smooth every bump. Slide the donut over the ponytail, spread the hair evenly over the ring, and secure it with a thin elastic. Tuck the ends underneath and pin them, then spray firmly so the bun holds its height all day.
A mistake I made once was placing the ponytail too far back, and the bun slid backward by afternoon. Place the ponytail at the very top of the crown, where your head starts to curve, so the bun stays upright.
See high bun hairstyles or dance bun ideas for thick hair.
Hold time: 10-14 hours. Difficulty: beginner. Cost: about $5-8 for a donut maker and pins.
3. Low Donut Bun

The low donut bun keeps the same full, round shape as the classic version, but it sits at the nape instead of the crown. It is softer, more romantic, and it works beautifully with hats, high collars, and wedding veils that a high bun would fight with.
A low donut bun is kinder to fine hair than a high one, because the weight hangs down instead of pulling up on the roots. It also pairs beautifully with statement earrings and high-neck outfits, since nothing competes at the neckline. For a wedding, add a small sprig of fresh flowers or a pearl comb just above the bun.
Brush your hair back into a low ponytail at the nape, keeping the top smooth with a bristle brush. Slide the donut over the ponytail, spread the hair evenly, and secure it with a thin elastic. Tuck the ends underneath and pin them, then finish with hairspray and gently pull out two thin strands at the temples if you want a softer look.
Pro Tip: Anchor the low bun with two crossed bobby pins at the base of the ponytail before you add the donut, so the bun cannot droop by evening.
See low bun hairstyles or wedding bun ideas for thick hair.
Hold time: 8-12 hours. Difficulty: beginner. Cost: about $5-8 for a donut maker and pins.
4. Donut Bun With a Side Part

A deep side part gives the donut bun a glamorous, old-Hollywood feel. The sweep of hair across the forehead softens the face and adds drama, which makes this version a favorite for photoshoots, evening events, and anyone with thick hair who wants a softer frame.
A side part adds instant glamour, and it works especially well on thick hair, because the sweep across the forehead shows off the volume. It also suits heart-shaped faces beautifully, since the deep sweep balances a wider forehead. If you want the sweep to stay put all day, set it with a small amount of gel and a single bobby pin hidden behind the ear.
Part your hair deeply on one side, about two inches above your eyebrow, then brush the hair back and up into a high ponytail, smoothing the swept side flat with a bristle brush and gel. Slide the donut over the ponytail, spread the hair evenly, secure it, and tuck the ends underneath. Check the sweep in a mirror to make sure it falls evenly.
A mistake I made early on was parting too shallow, which looked like a mistake instead of a style. Commit to a deep part, about two inches from the center, or skip the part entirely.
See side-part hairstyles or glamorous bun ideas for thick hair.
Hold time: 10-12 hours. Difficulty: beginner. Cost: about $5-8 for a donut maker and pins.
5. Donut Bun With a Braid Wrap

A braid wrapped around the base of a donut bun looks like a crown, and it is one of the prettiest details in this guide. It hides the elastic completely, adds texture, and turns a simple bun into a wedding-worthy style. It also helps the bun stay put, because the braid acts like an extra anchor.
The wrapped braid is the detail that makes people ask who did your hair. It looks intricate, but it is really just a thin braid coiled around a plain bun, and it takes about two extra minutes. For a wedding or a formal event, use a slightly thicker braid and add a few tiny pearl pins along it.
Build a classic donut bun first, but leave out a thin section of hair at the nape. Braid that section into a thin three-strand braid, then wrap it around the base of the bun and pin the end underneath. Spray lightly and press the braid flat so it sits neatly against the bun.
Pro Tip: Braid the wrap section before you build the bun, while it is still easy to reach. Trying to braid it after the bun is pinned is much harder.
See braid-wrapped bun hairstyles or wedding bun ideas with braids.
Hold time: 10-14 hours. Difficulty: intermediate. Cost: about $5-8 for a donut maker and pins.
6. Messy Donut Bun

The messy donut bun is the relaxed version of the classic. It keeps the big, round shape and the volume, but it skips the severe smoothness, leaving a few soft wisps and a slightly undone texture. It is the bun for weekends, errands, and casual days when you want volume without formality.
The messy donut bun is the most forgiving style in this guide, because it is supposed to look undone. That makes it the best first donut bun to learn if you are new to styling your own hair. The trick is to keep the mess intentional: a few soft wisps and a slightly loose shape look chic, but a bun that is falling apart looks unfinished.
Gather your hair into a high ponytail without brushing it perfectly smooth, and leave the natural texture in. Slide the donut over the ponytail and spread the hair loosely, letting some pieces fall out of place. Secure it with a thin elastic, pin the ends underneath, and gently pull a few pieces loose around the hairline. Spray lightly so the wisps move instead of freezing in place.
Pro Tip: Pull the wisps out before you spray, not after. Once the hairspray sets, pulling pieces loose creates frizz instead of soft strands.
See messy bun hairstyles or casual donut bun ideas.
Hold time: 8-10 hours. Difficulty: beginner. Cost: about $5-8 for a donut maker and pins.
7. Donut Bun With Curtain Bangs

Curtain bangs soften a donut bun beautifully, framing the face on both sides while the bun adds height and volume on top. The combination is flattering on almost every face shape, and it is one of the most popular bun styles right now because it looks polished without feeling severe.
Curtain bangs suit almost every face shape, and they are especially flattering on round and square faces, because the center part and the sweeping sides add length and softness. If your bangs are still growing out, this style works beautifully too, because the donut bun keeps the rest of your hair up while the bangs frame your face.
Style your curtain bangs first, blow-drying them with a round brush so they curve gently away from your face. Then gather the rest of your hair into a high ponytail, keeping the bangs out, and build the donut bun as usual. Once the bun is pinned, check the bangs in a mirror and adjust them so they fall evenly on both sides.
A mistake I made once was building the bun before styling the bangs, and the bangs got pulled into the ponytail. Always style the bangs first, while they are still free.
See curtain bangs hairstyles or donut bun ideas with bangs.
Hold time: 8-10 hours. Difficulty: beginner. Cost: about $5-8 for a donut maker and pins.
8. Donut Bun With a Silk Scarf

A silk scarf turns a plain donut bun into a statement. It adds color, pattern, and a soft texture that contrasts beautifully with smooth hair, and it hides the elastic and pins at the base of the bun at the same time. This is the version for brunch, holidays, and days when you want your hair to look dressed up.
Choose a scarf color that picks up something in your outfit, such as the color of your shoes or your bag, and the whole look comes together. A small square scarf works best, because a large one adds bulk at the base of the bun. Silk stays in place better than cotton, and a tiny drop of hairspray on the knot keeps it from loosening.
Build a classic donut bun first and pin it securely. Fold a square silk scarf into a long band, wrap it around the base of the bun, and tie it in a small bow or knot at the front or side. Tuck the ends neatly, or let two short tails hang for a playful look.
A mistake I made once was tying the scarf before the bun was pinned, and the whole thing slid around. Bun first, scarf second, always.
See scarf hairstyles or how to tie a silk scarf in your hair.
Hold time: 8-12 hours. Difficulty: beginner. Cost: about $8-15 for a silk scarf, plus a donut maker.
9. Donut Bun for Thick Hair
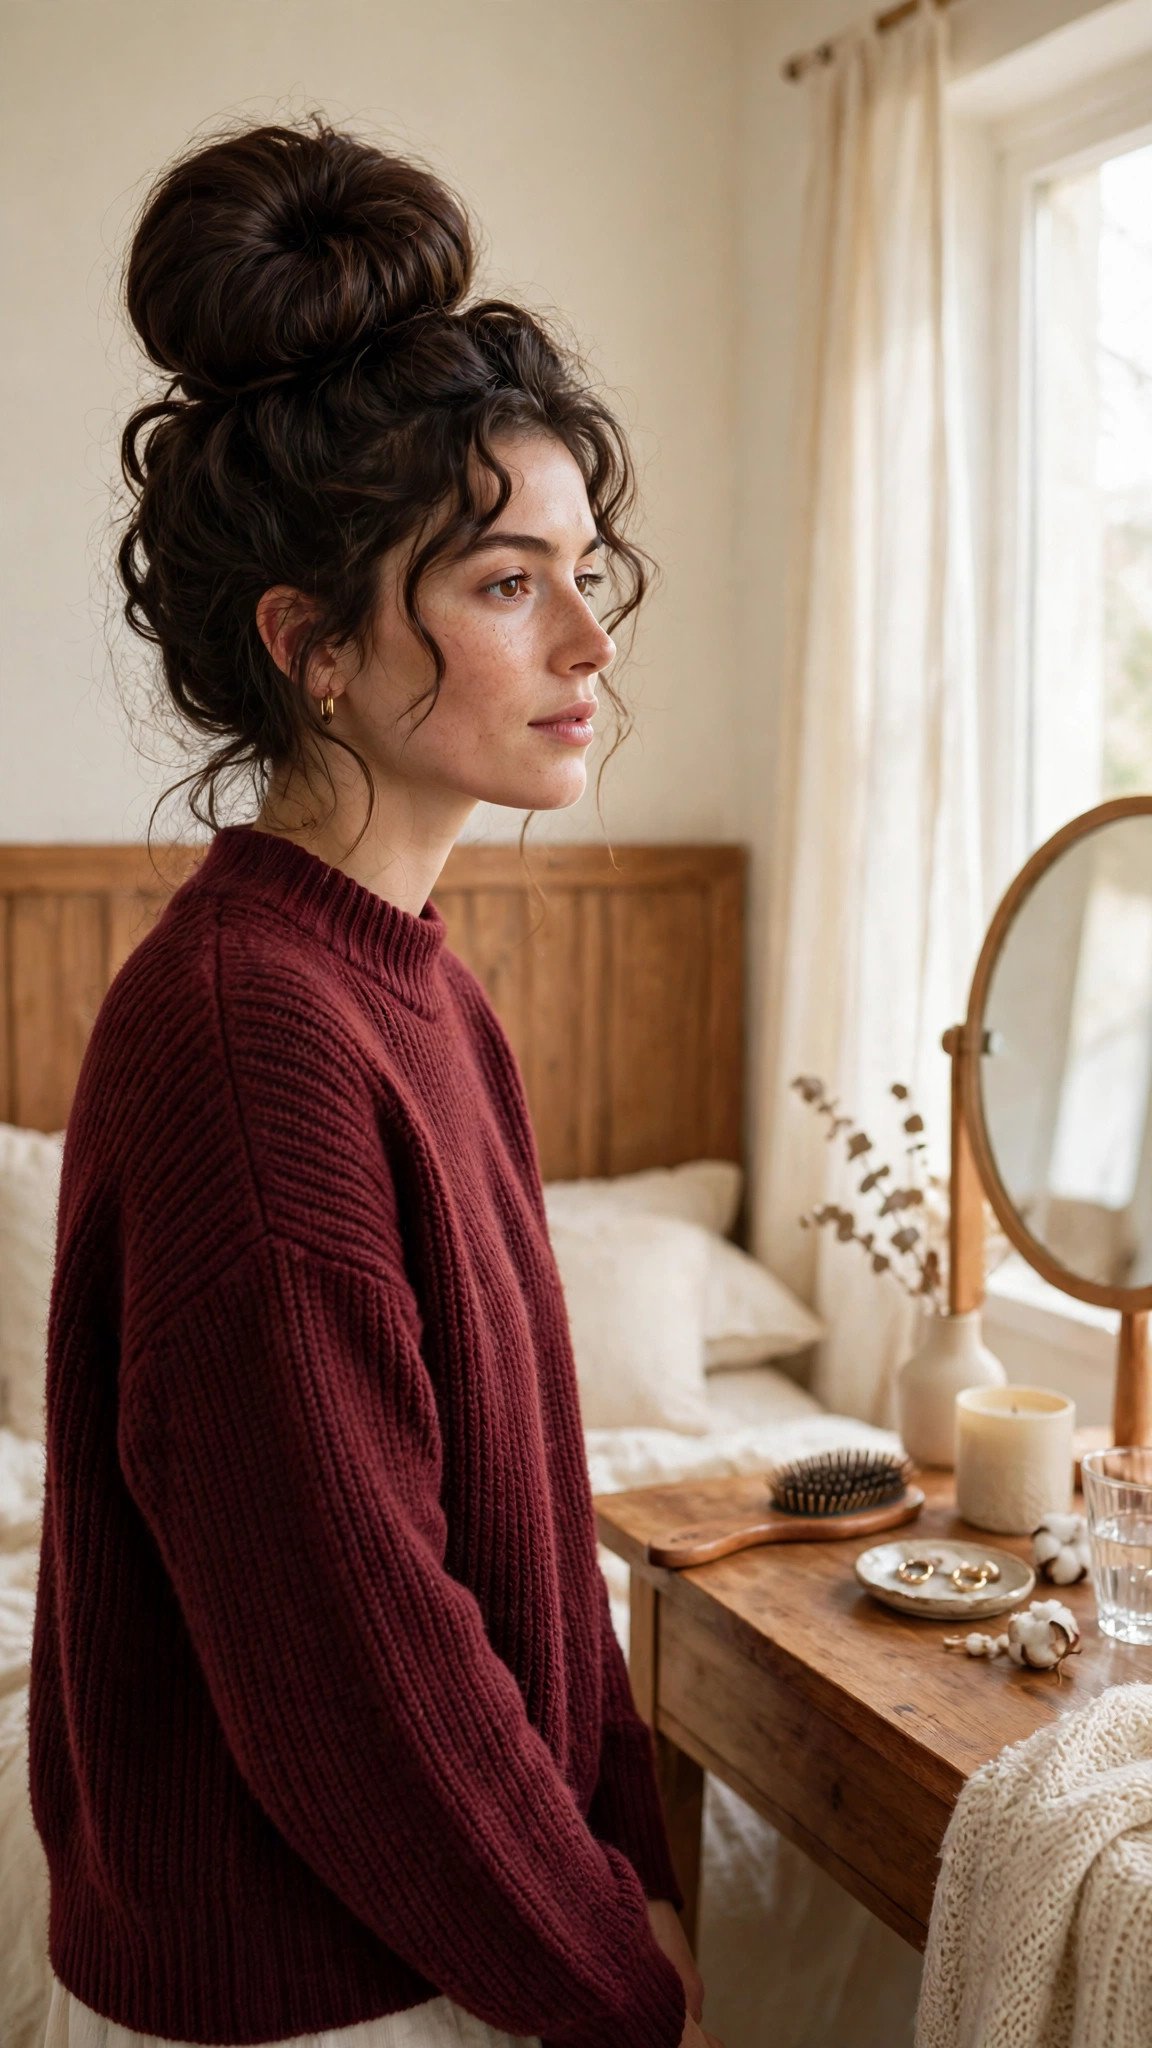
This is the donut bun made specifically for very thick hair, and it uses a large or extra-large donut to match the volume you already have. Thick hair can overwhelm a small donut, so the key here is to size up: a large ring gives your hair room to spread out, and the result is a big, full bun that looks balanced instead of cramped.
Very thick hair needs more pins than fine hair, so do not be shy about using six or eight bobby pins instead of four. Place them in a clock pattern around the bun so the weight is balanced. A large donut also helps, because it gives the hair room to spread out instead of bunching up in one thick lump.
Use a large or extra-large donut maker and a strong elastic for the base ponytail. Pull your hair into a high ponytail, slide the donut over it, and spread the hair evenly in sections, working around the ring so the thickness is distributed evenly. Secure it with a thin elastic, tuck the ends underneath in small sections, and pin each section separately so the weight is supported.
Pro Tip: Split the ponytail into four sections before you spread it over the donut, and spread one section at a time. Trying to spread all of your thick hair at once leaves lumps and bare patches.
See thick hair bun ideas or how to style very thick hair in a bun.
Hold time: 10-14 hours. Difficulty: beginner. Cost: about $6-10 for a large donut maker and pins.
10. Donut Bun With Twists

A donut bun made from twists adds texture and grip to the classic shape. Instead of spreading the hair flat over the donut, you twist it into ropes first, which gives the bun a beautiful spiral texture and extra hold. The twist also helps thick hair stay organized, because each rope is a neat bundle instead of a loose mass.
A twisted donut bun holds its shape so well that it is a smart choice for humid days, when a plain bun tends to loosen and frizz. The twist also looks more detailed up close, which makes it photograph beautifully from the side and back. If your hair is layered, the twist hides the shorter layers better than a flat spread.
Make a high ponytail and slide the donut over it. Split the ponytail into three or four sections, twist each one into a rope, and wrap the ropes around the donut one at a time, pinning each one as you go. Tuck the ends underneath and spray lightly to set the texture.
A mistake I made early on was twisting all the sections in different directions, and the bun looked messy instead of textured. Twist every section the same way so the ropes line up neatly.
See twisted bun hairstyles or rope twist bun ideas for thick hair.
Hold time: 10-12 hours. Difficulty: intermediate. Cost: about $5-8 for a donut maker and pins.
11. Half-Up Donut Bun

The half-up donut bun gives you the volume of a donut bun and the softness of loose hair at the same time. The top half is gathered into a small, neat donut bun that keeps hair out of your face, while the rest falls freely. It is perfect for school, casual workdays, and anyone who does not want all of their thick hair up.
The half-up donut bun is the best option for anyone with layers, because the top section is usually the longest and easiest to gather. It also works on hair that is too short for a full bun, since you only need the top half. For a fuller look, tease the crown lightly before you gather the top section.
Section off the top half of your hair, from ear to ear, and gather it into a small high ponytail at the crown. Slide a small donut over the ponytail, spread the hair evenly, and secure it with a thin elastic. Pin the ends underneath, then smooth the loose hair with a brush and add a little wave with a curling iron if you want a softer finish.
A mistake I made once was taking too much hair into the top section, and the bun looked heavy. Take only the top third to half, and use a small donut so the bun stays in proportion.
See half-up bun hairstyles or easy half-up hairstyles for thick hair.
Hold time: 8-10 hours. Difficulty: beginner. Cost: about $5-8 for a small donut maker and pins.
12. Donut Bun With Pearl Pins

Pearl pins are the fastest way to make a donut bun look bridal. A few small pearls arranged in a curve or a cluster along one side of the bun add sparkle and elegance without any extra styling, and they photograph beautifully in soft light.
Pearl pins come in many sizes, and mixing two sizes looks more expensive than using one size alone. Place a larger pearl at the center of the curve and smaller ones trailing off to each side, like a constellation. If you are wearing pearls for a wedding, match the pins to your earrings so the whole look feels coordinated.
Build a classic donut bun first and pin it securely. Then slide pearl pins into the bun one at a time, arranging them in a gentle curve along the top edge or in a small cluster on one side. Push each pin in at an angle so it grips the bun and cannot slide out.
Pro Tip: Place an odd number of pins, three or five, because odd numbers look more natural and intentional than even ones.
See pearl hair accessories or bridal bun ideas with pearls.
Hold time: 10-12 hours. Difficulty: beginner. Cost: about $6-12 for a set of pearl pins, plus a donut maker.
13. Donut Bun With a Center Part

A center part makes the donut bun look sharper and more deliberate, which is why it is the go-to for job interviews, boardrooms, and formal events. The symmetry of the part frames the face evenly and gives the whole look a clean, architectural feel, while the big round bun adds volume on top.
The center part makes this bun a favorite for photographs, because the symmetry reads beautifully on camera. It also suits round and oval faces especially well, since the part and the height of the bun add length to the face. If your hair is very thick, use two elastics stacked together so the ponytail base can hold the weight.
Part your hair straight down the middle with the tail of a comb, then brush both sides back and up into a high ponytail. Smooth each side with a boar bristle brush and a little gel, slide the donut over the ponytail, and spread the hair evenly. Check the part in a mirror before you spray, because a crooked part is the one thing people notice.
A mistake I made early on was parting my hair after brushing it up, and the part wandered. Always part first, while the hair is still flat.
See center-part hairstyles or sleek bun ideas for work.
Hold time: 10-12 hours. Difficulty: beginner. Cost: about $5-8 for a donut maker and pins.
14. Donut Bun With Loose Tendrils

Loose tendrils soften a donut bun and make it look less severe, which is why this is one of the most popular versions for everyday wear and date nights. The big bun gives the style height and volume, while the soft tendrils at the front keep the face looking gentle and relaxed.
Loose tendrils are the difference between a severe bun and a soft one, and they suit almost every face shape. If you have a square jaw, leave the tendrils slightly longer so they fall past the jawline. If you have a round face, keep them shorter and curl them outward, which adds width at the cheekbones.
Leave out a thin strand on each side of your face before you gather the rest into a high ponytail. Build the donut bun as usual, then curl the two front strands lightly with a curling iron or flat iron, wrapping them away from your face. Spray the tendrils lightly so they hold their shape without going stiff.
Pro Tip: Keep the tendrils thin, about the width of a pencil. Thick tendrils pull the whole look toward messy instead of soft.
See face-framing hairstyles or soft bun ideas for date night.
Hold time: 8-10 hours. Difficulty: beginner. Cost: about $5-8 for a donut maker and pins.
15. Donut Bun With a Headband
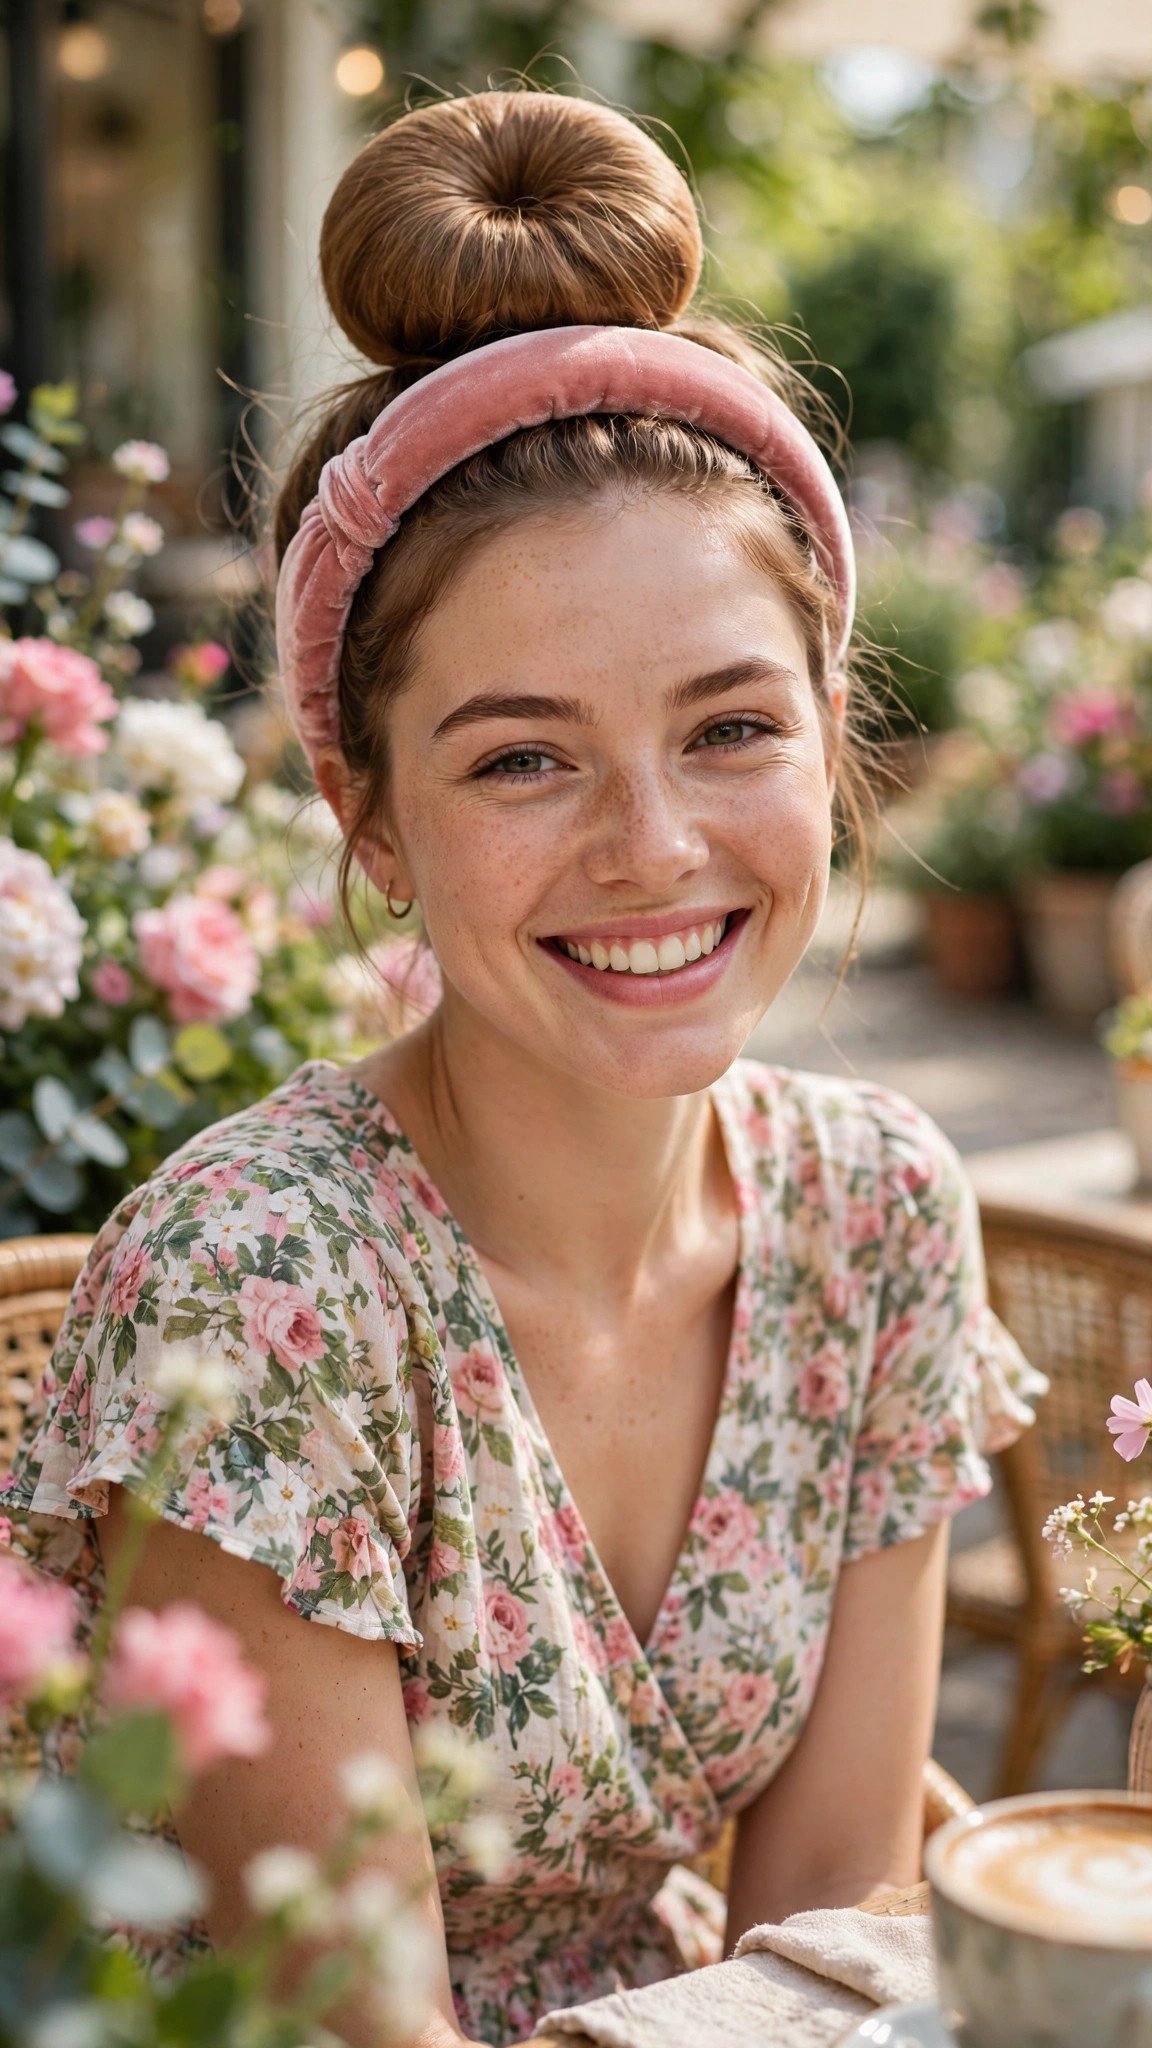
A headband adds polish and personality to a donut bun in seconds. It holds back any flyaways at the hairline, adds a pop of color or texture, and turns a simple bun into a finished look. This is the version for brunch, casual days, and anyone who loves accessories.
A headband adds polish and personality, and it is the easiest accessory in this guide. A padded velvet headband looks luxurious in winter, while a thin gold headband suits summer and formal events. Choose a headband color that picks up something in your outfit, and the whole look comes together effortlessly.
Build a classic donut bun first and pin it securely. Then slide a padded, velvet, or beaded headband into place, positioning it about an inch behind your hairline. Push it back gently until it sits comfortably, and check in a mirror that it is level on both sides.
A mistake I made once was putting the headband on before the bun, and it slid forward as I worked. Bun first, headband second, always.
See headband hairstyles or how to style a bun with a headband.
Hold time: 8-10 hours. Difficulty: beginner. Cost: about $6-12 for a headband, plus a donut maker.
16. Double Donut Buns

Double donut buns take the classic shape and make it playful. Two big, round buns sit symmetrically on either side of the head, and the look is instantly fun, which makes it perfect for festivals, theme parties, and casual weekends. Thick hair makes the fullest double buns, because each side has plenty of volume.
Double donut buns look best when they are the same size, so take a moment to match them in the mirror before you leave. They also work surprisingly well on shorter hair, because each bun only needs half of your hair. Add a colorful scrunchie to each bun for a festival look, or keep them plain and neat for a casual day.
Part your hair down the middle and make two high pigtails, one on each side, keeping them level. Slide a small donut over each pigtail, spread the hair evenly, and secure each one with a thin elastic. Check in a mirror that the two buns match in size and height, then spray both.
Pro Tip: Measure the height of the first bun against your eyebrow in the mirror, then match the second bun to the same point, so they sit perfectly level.
See double bun hairstyles or space bun ideas for festivals.
Hold time: 8-10 hours. Difficulty: beginner. Cost: about $8-12 for two small donut makers and pins.
Getting Started
The easiest first step is to practice the classic donut bun on second-day hair. Hair that was washed yesterday has more grip than freshly washed hair, which is slippery and lets the donut slide. If your hair is freshly washed, work a little texturizing spray or dry shampoo through it before you start, and the bun will hold much better.
The most common beginner mistake is choosing the wrong donut size. A donut that is too small gets buried in thick hair and disappears, while a donut that is too big leaves bare patches where the foam shows through. As a rule, use a medium donut for medium hair, a large donut for thick hair, and a small donut for fine hair or half-up styles. The second mistake is spreading the hair unevenly, which leaves lumps on one side and foam showing on the other.
What to buy first: a foam donut maker in your hair color and the right size for your hair, a pack of strong hair elastics, a pack of thin elastics for securing the donut, a box of bobby pins in your hair color, and a firm-hold hairspray. That kit costs about $10-15 and covers every style in this guide. If you have very thick hair, buy a large donut and a second pack of pins, because thick buns need more support.
For timeline, a classic donut bun takes about five minutes once you know the steps, and ten minutes when you are learning. A braided or twisted version takes ten to fifteen minutes. The bun holds for 8-14 hours depending on the style, and it should be taken down gently at night by removing the pins one at a time and sliding the donut out, never pulling it through tangled hair.
Frequently Asked Questions
What size donut maker should I use for thick hair?
Use a large or extra-large donut maker for thick hair. A medium donut gets buried in thick hair and disappears, while a large ring gives your hair room to spread out evenly. If you are unsure, buy a set with three sizes, which costs about $8-10, and try each one to see which gives the fullest, most balanced shape.
Can I do a donut bun with fine or thin hair?
Yes, and the donut bun is actually one of the best styles for fine hair, because the foam ring creates volume that your hair cannot make on its own. Use a small or medium donut, tease the ponytail lightly before you spread it over the ring, and use a donut in your hair color so it does not show through.
How do I stop the donut from showing through my hair?
Match the donut color to your hair color, spread the hair evenly over the ring in sections, and use a thin elastic over the whole bun to trap the hair in place. If you still see foam, pull a few strands from the ponytail ends and drape them over the bare patch, then pin them in place.
How do I make a donut bun stay put all day?
Start with second-day hair or add texturizing spray for grip. Use a strong elastic for the base ponytail, pin the bun at four points around the clock, and finish with firm-hold hairspray. For very thick hair, add two crossed bobby pins at the base of the ponytail before you add the donut, which stops the bun from drooping.
Can I wear a donut bun every day?
Yes, but vary the placement. Wearing a tight bun in the exact same spot every day can cause tension and breakage along the hairline. Alternate between a high bun, a low bun, and a half-up bun, and use a soft elastic instead of a tight one on rest days. Take the bun down gently at night and let your hair rest.
A Few Final Thoughts
The donut bun is the easiest way to get a big, round, voluminous bun, and it works especially well on thick hair, where the extra volume looks intentional and polished. The foam ring does the hard part, so your only job is to spread the hair evenly and pin the ends underneath. Whether you choose the classic high bun, the low bun for a wedding, or the pearl-pinned version for a party, the technique is the same. Pick one of the 16, practice it twice this week, and you will have a style you can rely on for years.