
A toothpick costs nothing, and it is the single best nail art tool most people already own. It makes dots smaller than any dotting tool, drags lines finer than any brush, and fixes mistakes before they dry. The catch is that most toothpick nail art looks homemade, because the dots are uneven, the paint is too thick, and the design is crammed onto every nail. This guide collects 18 toothpick nail art hacks that look professional, each one built around a Christmas design that suits a toothpick’s strengths: tiny snowflakes, holly berries, candy cane stripes, miniature trees, and gold details that read as salon work.
Every hack in this list is chosen for budget DIYers, which means no special tools, no expensive polishes, and no salon visit. You need a base coat, a top coat, three or four polish colors, and a box of plain wooden toothpicks.
Quick Answer: For your first toothpick Christmas design, start with the Polka Dot Wreaths (#2) or the Holly Berries (#4). For the most professional-looking finish, try the Gold Starbursts (#5) or the Ornament Baubles (#9). For a party, choose the Candy Cane Stripes (#3) or the Firework Bursts (#18). Each design costs $0-5 in extra supplies beyond polish you already own, takes 15-30 minutes, and lasts 5-7 days in regular polish or 2-3 weeks in gel.
Why Toothpick Nail Art Hacks Are Worth Your Time
Toothpick nail art is the cheapest way into detailed nail design, because the tool is free and the technique is forgiving. A toothpick tip holds a tiny, controlled amount of polish, so each dot lands the same size, and a fresh toothpick gives you a clean point every time. Unlike a brush, which holds too much paint and drags, a toothpick places color exactly where you want it and nowhere else. That control is what makes the difference between a design that looks drawn by hand and one that looks stamped.
There is a money win too. A salon Christmas set with hand-painted art runs $55-90, and you pay it again when the set grows out. The same look at home costs the price of a box of toothpicks and the polish you already own, which is about $0-5 per design in extra supplies. Even if you buy two new polish colors for a design, the total stays under $15, and those bottles cover dozens of manicures. For budget DIYers, that math is the whole argument.
Here is the lesser-known part: professionals use toothpicks too, especially for dots, drags, and clean-up. A salon tech reaches for a toothpick to place a highlight dot on an ornament, to drag a line into a tree shape, and to lift a smudge off the cuticle before it dries.
This guide suits anyone looking for easy Christmas nail art, budget DIY nail ideas, or a salon reference photo. It also covers gel and regular polish versions, short and long nails, and which designs to keep to one or two accent nails so the set stays elegant.
At a Glance
- Every design needs only a toothpick, a base coat, a top coat, and two to four polish colors.
- Wear times are listed for each design, from 5-7 days for regular polish to 2-3 weeks for gel.
- Short nails, long nails, and every common shape appear, from short oval to long almond.
- Salon prices for the same designs run $55-90, while DIY versions cost about $0-5 in extra supplies.
- Finishes include glossy, matte, and metallic gold, so you can match your outfit and mood.
| # | Design | Nail Shape | Skill Level | Wear Time | Occasion |
|---|---|---|---|---|---|
| 1 | Tiny Snowflakes | Short oval | Beginner | 5-7 days | Everyday |
| 2 | Polka Dot Wreaths | Almond | Beginner | 5-7 days | Office party |
| 3 | Candy Cane Stripes | Square | Beginner | 2-3 weeks | Christmas party |
| 4 | Holly Berries | Short square | Beginner | 5-7 days | Family dinner |
| 5 | Gold Starbursts | Almond | Intermediate | 2-3 weeks | Evening party |
| 6 | Christmas Tree Triangles | Oval | Intermediate | 5-7 days | Christmas Day |
| 7 | Snow-Dusted French Tips | Almond | Beginner | 2-3 weeks | Work |
| 8 | Tiny Reindeer Faces | Short almond | Advanced | 2-3 weeks | Kids’ party |
| 9 | Ornament Baubles | Almond | Intermediate | 2-3 weeks | Dinner party |
| 10 | Peppermint Swirl Dots | Round | Beginner | 5-7 days | Weekend |
| 11 | Gingerbread Dots | Short square | Intermediate | 5-7 days | Baking day |
| 12 | Icicle Drips | Long almond | Intermediate | 2-3 weeks | Winter wedding |
| 13 | Plaid Lines | Square | Intermediate | 2-3 weeks | Cabin weekend |
| 14 | Tiny Pine Branches | Oval | Advanced | 2-3 weeks | Christmas Eve |
| 15 | Snowman Faces | Short oval | Beginner | 5-7 days | School event |
| 16 | Metallic Confetti Dots | Almond | Beginner | 5-7 days | New Year’s Eve |
| 17 | Santa Hat Accents | Short almond | Intermediate | 5-7 days | Christmas morning |
| 18 | Firework Bursts | Long almond | Intermediate | 2-3 weeks | New Year’s party |
1. Tiny Snowflakes with a Toothpick Tip

A snowflake made with a toothpick looks sharper than one made with a brush, because each arm is a single dragged line of the same width.
Paint two thin coats of your base color and let them dry fully, then dip just the very tip of a fresh toothpick into white polish and touch it to the nail to place a center dot. From that dot, drag six short lines outward, reloading the toothpick for every two lines so the arms stay even. Add a tiny dot at the end of each arm if you want a fancier flake. Work on one nail at a time and use a fresh toothpick for each hand so the tip stays sharp.
Pro Tip: Wipe the toothpick on a tissue between dots. A toothpick that has picked up too much polish makes fat, blobby arms, and that is the single most common reason toothpick snowflakes look homemade.
See snowflake nail ideas or winter nail art for beginners.
This design costs $0-5 in extra supplies and takes about 25 minutes for both hands.
2. Polka Dot Wreaths

A wreath made of dots is the easiest Christmas design there is, and it is the best first toothpick project because every step is a dot. Green dots in a circle, three red dots for berries, and a tiny gold bow, and the nail looks finished.
Paint your base and let it dry, then dip the toothpick tip into dark green polish and place eight to ten dots in a ring about 6 mm across, leaving a gap at the bottom for the bow. Dip a fresh toothpick into red polish and add three small dots clustered at the top of the ring for berries. Finish with two tiny gold dots side by side at the bottom of the ring for the bow, and seal with a glossy top coat once everything is dry.
Pro Tip: Place the green dots with the flat end of the toothpick, not the sharp tip. The flat end holds more polish and makes a rounder, fuller dot, which is what a wreath needs, while the sharp tip is for the tiny berries.
See wreath nail designs or Christmas nail art for short nails.
This design costs $0-5 in extra supplies and takes about 20 minutes for both hands.
3. Candy Cane Stripes

Candy cane stripes look hard and are secretly easy, because a toothpick drags a straighter line than a shaky hand with a brush ever will.
Paint a white base and let it dry completely, which matters more here than anywhere else, because wet white will smear the moment red touches it. Dip the toothpick tip into red polish and drag it slowly across the nail at a diagonal, from one corner to the other, in one smooth motion. Reload the toothpick for each stripe and keep the stripes about 3 mm apart. Two stripes look classic, three look bold, and four is too many. Let the red dry for five minutes before the top coat.
Pro Tip: Rest the side of your painting hand on the table while you drag each stripe. A supported hand draws a straight line, and a floating hand wobbles, which is why most DIY stripes go crooked halfway across the nail.
See candy cane nail ideas or striped nail art tutorials.
This design costs $0-5 in extra supplies and takes about 25 minutes for both hands.
4. Holly Berries in Three Dots

Three red dots and two dragged leaf lines are all a holly design needs, and that restraint is what makes it look professional. The berries sit in a tight triangle, the leaves are thin green-gold strokes, and the rest of the nail stays plain so the design has room to breathe.
Paint a deep green or a sheer nude base and let it dry. Dip the flat end of a toothpick into red polish and place three dots in a small triangle, each about 2 mm across, near the corner of the nail. Use a fresh toothpick dipped in a lighter green or gold polish to drag two short leaf shapes outward from the berry cluster, one to each side, tapering the drag so the line thins at the tip. One cluster per nail is enough, and two clusters is the most you should attempt.
Pro Tip: Make the three berries different sizes, with the middle one slightly larger. Identical dots look stamped and flat, while a tiny size difference looks hand-painted in the good way, like a real berry cluster.
See holly nail designs or simple Christmas nail art.
This design costs $0-5 in extra supplies and takes about 15 minutes for both hands.
5. Gold Starbursts

A gold starburst on a dark base is the most expensive-looking design a toothpick can make, because the thin metallic lines catch the light like real jewelry.
Paint your dark base and let it dry fully. Dip a fresh toothpick tip into metallic gold polish and place a center dot, then drag eight short lines outward from the dot, reloading the toothpick after every two lines. Make the lines longer on the top and bottom and shorter on the sides, which gives the burst a star shape instead of a sun. Add a tiny dot at the end of the longest lines if you want extra sparkle, then seal with a glossy top coat.
Pro Tip: Use a metallic gold polish, not a glitter polish. Glitter polish has chunks that clog a toothpick tip and make lumpy lines, while metallic polish flows smoothly and gives the clean, thin lines a starburst needs.
See gold nail ideas or metallic Christmas nail designs.
This design costs $0-5 in extra supplies and takes about 25 minutes for both hands.
6. Christmas Tree Triangles
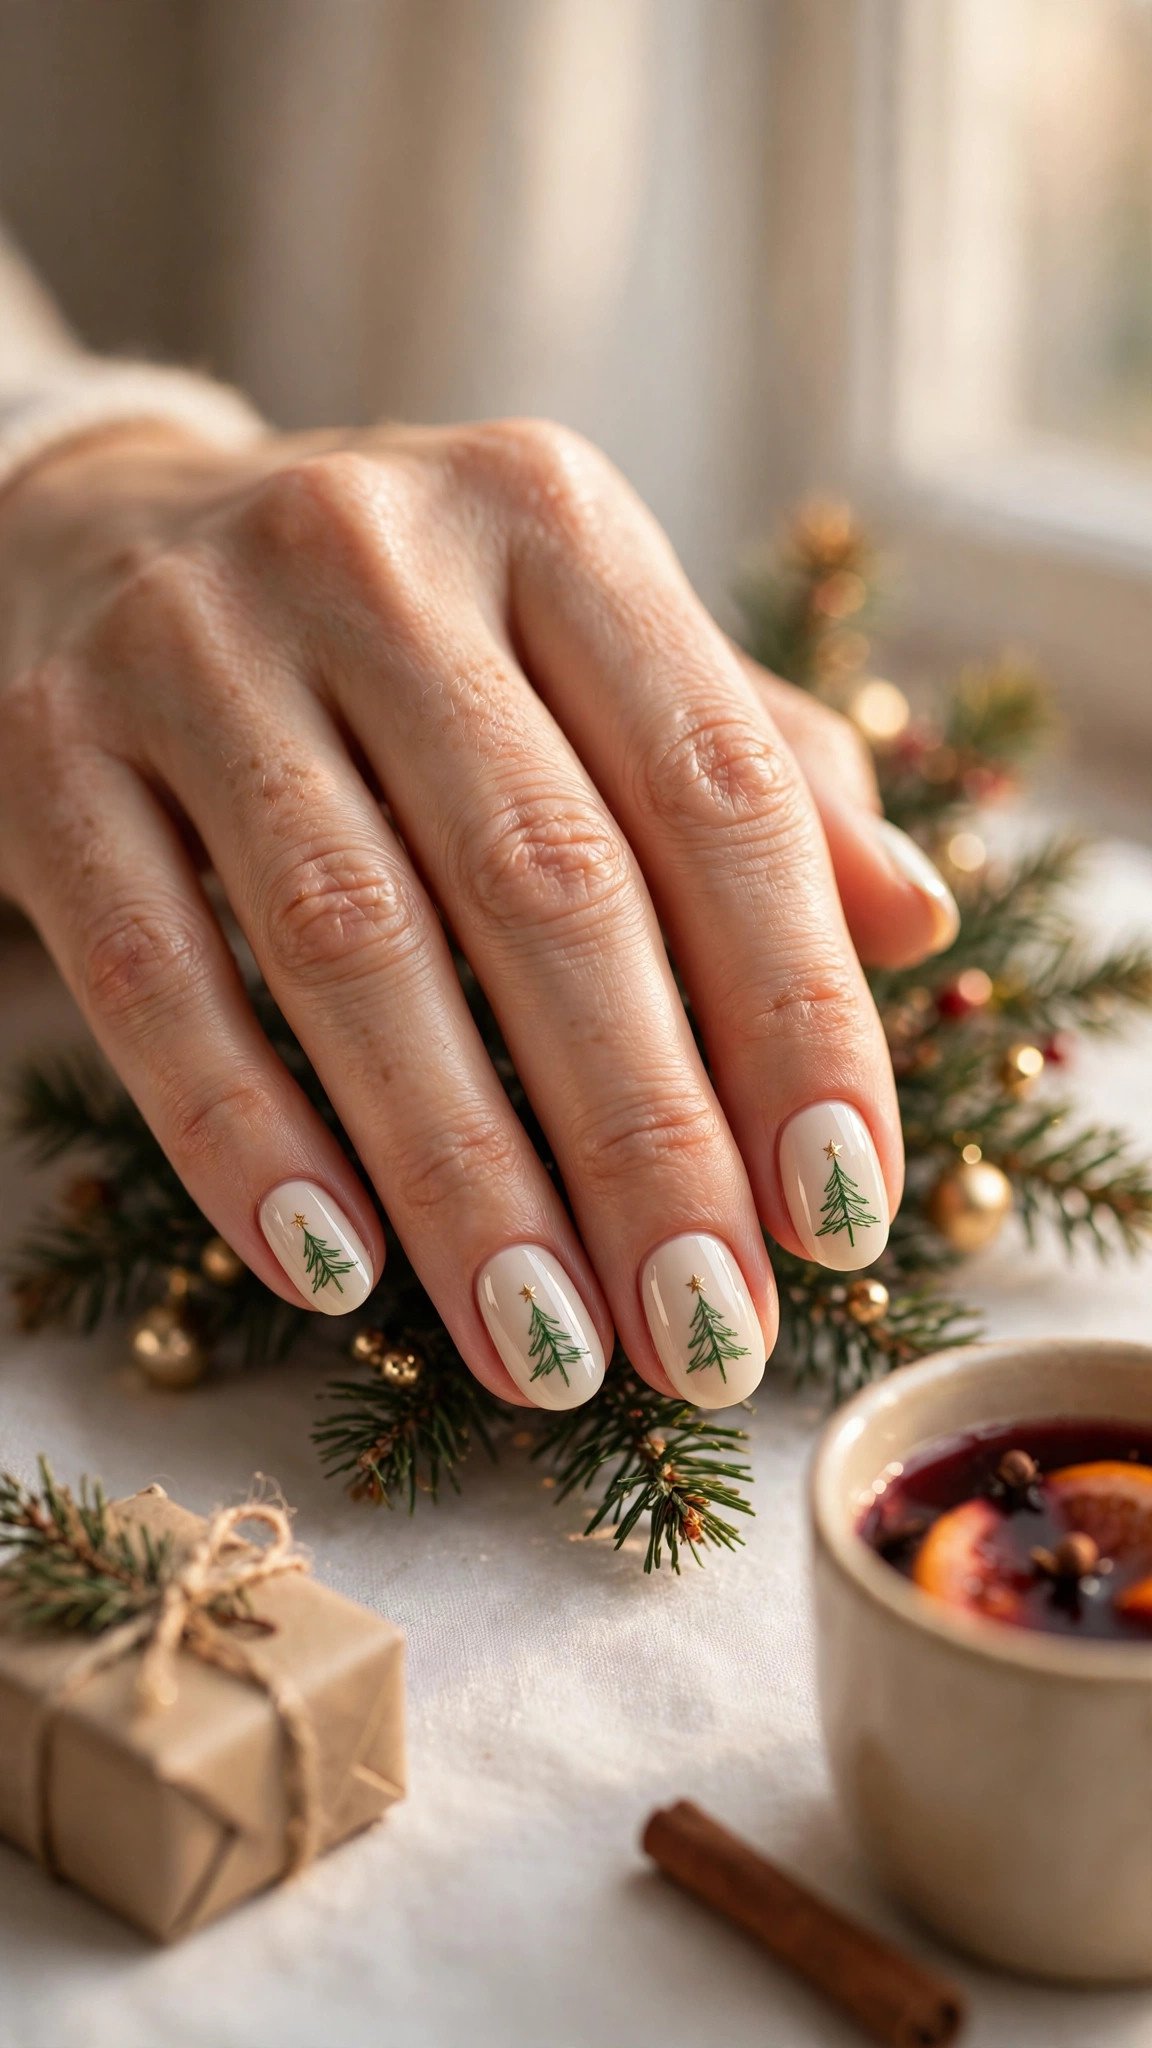
A Christmas tree drawn with a toothpick is really three stacked triangles, and the drag technique makes the edges look intentional.
Paint a cream or sheer nude base and let it dry. Dip the toothpick tip into dark green polish and drag a small triangle near the tip of the nail, starting with a short horizontal line and pulling two diagonal lines down to meet it. Add a second, slightly wider triangle below the first, and a third below that, so the tree builds downward. Place a tiny gold dot at the top for the star and a small brown dot at the bottom for the trunk.
Pro Tip: Draw the tree from the top down, not the bottom up. A toothpick drag pulls polish cleanly away from a wet line, so starting at the star and working downward keeps each triangle’s point sharp instead of smudged.
See Christmas tree nail designs or holiday nail art for beginners.
This design costs $0-5 in extra supplies and takes about 30 minutes for both hands.
7. Snow-Dusted French Tips
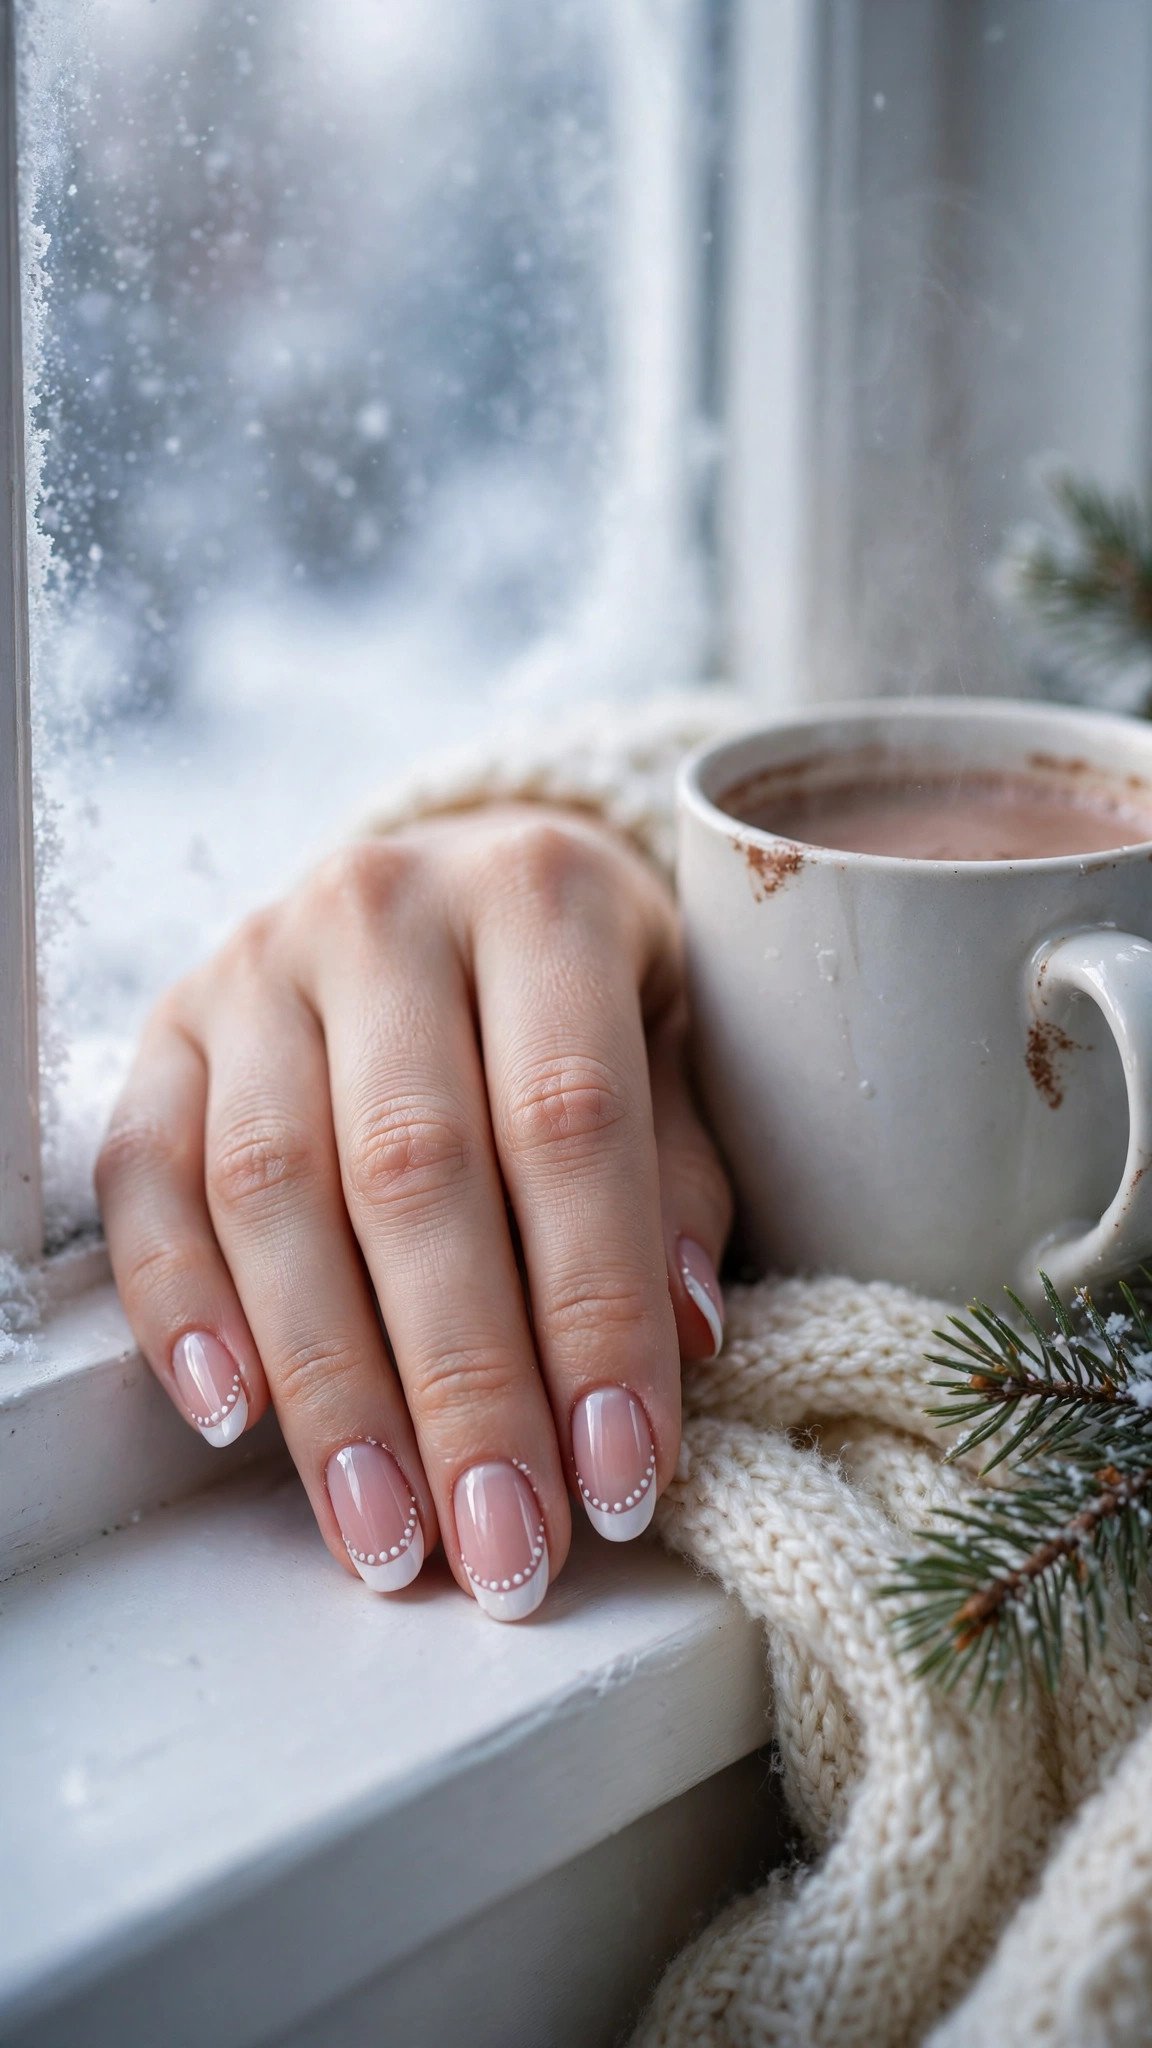
A French manicure with a dusting of toothpick snow dots looks like a salon set with a winter twist, and the dots hide any wobble in the smile line, which is the part most people struggle with.
Paint a sheer pink base and let it dry, then paint the white tips freehand or with a guide sticker, following the natural curve of each nail. Before the white dries fully, use a toothpick tip dipped in white polish to place three or four tiny dots along the smile line where the white meets the pink, like snow settling on an edge. Add one or two dots scattered on the pink part of the nail, then seal with a glossy top coat.
Pro Tip: Place the snow dots while the white tip is still slightly tacky. The dots sink in just enough to look like part of the design instead of sitting on top of it, and they will not chip off at the edges the way raised dots can.
See French tip nail ideas or winter French manicure designs.
This design costs $0-5 in extra supplies and takes about 30 minutes for both hands.
8. Tiny Reindeer Faces

A reindeer face made with a toothpick is just dots and two short antler lines, and it is the cutest design in this guide, which makes it perfect for a kids’ party or a family Christmas.
Paint a warm brown or caramel base and let it dry. Dip a toothpick tip into dark brown polish and drag two short antler lines from the top of the nail, each splitting into a tiny fork at the end. Place two small black dots below the antlers for the eyes, then a slightly larger red dot between and below them for the nose. Keep the features close together, because a face with features spread across the whole nail looks lost.
Pro Tip: Do the antlers last, not first. The eyes and nose anchor the face, and you can then place the antlers exactly above them, which stops the classic mistake of a reindeer whose antlers sit too wide and look like a moose.
See reindeer nail ideas or cute Christmas nail art.
This design costs $0-5 in extra supplies and takes about 30 minutes for both hands.
9. Ornament Baubles with a Highlight Dot

An ornament bauble is one round dot, and the white highlight dot on top of it is what makes it look like glass instead of a flat circle.
Paint a deep green, navy, or burgundy base and let it dry. Dip the flat end of a toothpick into red or gold polish and press it straight down to place one round bauble, about 5 mm across, in the center of the nail. Use the sharp tip to drag a tiny gold line from the top of the bauble to the cuticle, which reads as the ornament’s string. Once the bauble is dry, dip a clean toothpick tip into white polish and place one tiny dot near the top edge of the bauble, slightly off-center. That dot is the highlight, and it makes the whole thing look round.
Pro Tip: Place the highlight dot in the same spot on every bauble, upper left or upper right. Consistent highlights look like a real light source, while random highlights look like mistakes, even though nobody can say why.
See ornament nail designs or Christmas bauble nail art.
This design costs $0-5 in extra supplies and takes about 25 minutes for both hands.
10. Peppermint Swirl Dots

A peppermint swirl made of dots looks like a candy, and it is the easiest swirl technique there is, because you never have to draw a curve. You place dots in a spiral, starting from the center, and the eye reads the dots as a swirl.
Paint a white base and let it dry fully. Dip the toothpick tip into red polish and place a center dot, then place dots in a spiral outward, each one a little farther from the center, until you have eight or nine dots forming a curl. Keep the dots the same size by reloading the toothpick every two dots, and leave a small gap between each dot so the white base shows through like the white stripes of a peppermint.
Pro Tip: Draw the spiral on paper once before you start. A peppermint swirl that winds the wrong way or crosses itself looks tangled, and one practice spiral on paper fixes your hand’s muscle memory before the polish ever touches a nail.
See peppermint nail ideas or candy nail art designs.
This design costs $0-5 in extra supplies and takes about 20 minutes for both hands.
11. Gingerbread Dots and Buttons

Gingerbread nails are all white icing details on a warm brown base, and a toothpick is the perfect icing tool because real icing is piped in dots and squiggles too.
Paint a warm gingerbread brown base and let it dry. Dip the toothpick tip into white polish and place two dots down the center of the nail for buttons, then drag a small squiggle line across the tip for icing. Add two tiny dots near the top for eyes and a short curved line for a smile if you want a face, or leave the face off and keep the buttons and squiggle, which looks more elegant. One gingerbread design per hand is enough, with the other nails in plain brown or cream.
Pro Tip: Thin your white polish with a single drop of top coat on a piece of foil before you start. White polish is often thick and gloopy, and thinned polish flows off a toothpick in clean lines instead of dragging in lumps.
See gingerbread nail ideas or brown Christmas nail designs.
This design costs $0-5 in extra supplies and takes about 25 minutes for both hands.
12. Icicle Drips

Icicle drips are dragged lines, and a toothpick drags a line that tapers naturally, which is exactly what an icicle needs: thick at the top, thin at the point.
Paint an icy blue or pale silver base and let it dry. Dip the toothpick tip into silver or white polish and place a dot at the tip edge of the nail, then drag it slowly toward the cuticle, lifting the toothpick as you go so the line thins to a point. Make three or four drips per nail in different lengths, with the longest in the center. Add a tiny dot at the end of each drip for a frozen droplet, then seal with a glossy top coat.
Pro Tip: Drag each icicle in one slow, steady motion and do not go back over it. A second pass over a drying line smears it into a blob, and that is the one mistake that ruins an otherwise perfect icicle set.
See icicle nail ideas or winter wedding nail designs.
This design costs $0-5 in extra supplies and takes about 30 minutes for both hands.
13. Plaid Lines with a Toothpick Ruler

Plaid looks complicated and is really just straight lines crossing each other, and a toothpick is a natural ruler for the job because you can lay it along the nail as a guide.
Paint a red or deep green base and let it dry completely. Lay a toothpick flat along the nail as a straightedge, and drag a second toothpick loaded with white polish along it to make a vertical line. Repeat for a second vertical line, then turn the toothpick guide sideways and drag two horizontal white lines. Add one thin gold or green line beside each white line for the classic plaid double stripe, and keep the lines thin, because thick plaid lines look like a checked shirt instead of a pattern.
Pro Tip: Let the vertical lines dry for five minutes before you drag the horizontal ones across them. Wet lines crossing wet lines smear into a muddy grid, while dry lines stay crisp and the crossing points look woven.
See plaid nail designs or cabin Christmas nail ideas.
This design costs $0-5 in extra supplies and takes about 30 minutes for both hands.
14. Tiny Pine Branches

A pine branch made with a toothpick is a series of short feathered strokes, each one dragged outward from a center stem, and the result looks like a real sprig.
Paint a cream or pale gold base and let it dry. Dip the toothpick tip into dark green polish and drag a thin center stem down the nail, then drag short strokes outward from the stem, alternating sides, each stroke starting at the stem and flicking outward so it thins at the tip. Make the strokes shorter near the top and longer near the bottom, which gives the branch its tapered shape. Add three tiny red dots along the branch for berries.
Pro Tip: Wipe the toothpick almost clean before each stroke. A toothpick loaded with polish makes fat strokes that merge into a blob, while a nearly dry toothpick makes the fine, feathery lines that read as pine needles.
See pine nail designs or botanical Christmas nail art.
This design costs $0-5 in extra supplies and takes about 35 minutes for both hands.
15. Snowman Faces

A snowman face is five dots and one short line, and it is the friendliest design in this guide, which makes it ideal for a school event or a family Christmas morning.
Paint a white base and let it dry. Dip a toothpick tip into black polish and place two small dots for the eyes, close together near the top of the nail. Dip a fresh toothpick into orange polish and drag a short horizontal triangle for the carrot nose, starting wide at the left and tapering to a point at the right. Add five tiny black dots in a curve below the nose for the smile, and a thin black line across the very top of the nail for a hat brim if you want one.
Pro Tip: Keep the eyes small, no bigger than 1 mm each. Big eyes make the snowman look surprised and a little strange, while tiny eyes look sweet, and that one size choice is the difference between cute and creepy.
See snowman nail ideas or cute winter nail art.
This design costs $0-5 in extra supplies and takes about 20 minutes for both hands.
16. Metallic Confetti Dots

Metallic confetti dots are the fastest party design in this guide, because there is no pattern to follow and no symmetry to worry about.
Paint a black or deep navy base and let it dry fully. Dip the flat end of a toothpick into metallic gold polish and place five or six dots of different sizes, reloading for the larger ones and using a nearly dry toothpick for the smallest. Switch to a fresh toothpick dipped in silver polish and add four or five more dots in the gaps. Vary the sizes on purpose, because uniform dots look like a pattern, while mixed sizes look like real confetti.
Pro Tip: Cluster the dots near the tip and the cuticle, and leave the middle of the nail emptier. That framing makes the design look deliberate and balanced, while dots spread evenly across the whole nail look random in the bad way.
See confetti nail ideas or New Year’s Eve nail designs.
This design costs $0-5 in extra supplies and takes about 15 minutes for both hands.
17. Santa Hat Accents

A Santa hat is a red triangle with a white brim and a white pompom, and a toothpick draws all three parts neatly.
Paint a red base and let it dry. Dip a toothpick tip into white polish and drag a horizontal brim line across the nail near the tip, then drag a triangle above it, starting from the brim and tapering to a point that flops to one side. Place one larger white dot at the tip of the triangle for the pompom, using the flat end of the toothpick so the dot is round and full. Let the white dry before the top coat, because white over red smears easily.
Pro Tip: Make the hat flop to the same side on both hands. Matching flopped hats look intentional and cute, while hats flopping in different directions look like a mistake, even though nobody plans it that way.
See Santa nail ideas or Christmas accent nail designs.
This design costs $0-5 in extra supplies and takes about 20 minutes for both hands.
18. Firework Bursts

A firework burst is a starburst with longer lines and scattered spark dots, and on a midnight navy base it looks like the sky at midnight on New Year’s Eve.
Paint a midnight navy or black base and let it dry fully. Dip a fresh toothpick tip into metallic gold polish and place a center dot, then drag ten to twelve long lines outward in all directions, reloading the toothpick after every two lines. Switch to silver polish and add a few shorter lines between the gold ones, then scatter tiny dots around the burst for sparks, using a nearly dry toothpick so the dots stay small. One burst per nail is enough, and two bursts on a long nail is the most you should attempt.
Pro Tip: Make the lines different lengths, with a few long ones and several short ones. A firework with identical lines looks like a sun, while uneven lines look like an explosion, and that unevenness is what makes the design feel alive.
See firework nail ideas or New Year’s Eve nail designs.
This design costs $0-5 in extra supplies and takes about 30 minutes for both hands.
Getting Started With Toothpick Nail Art
The easiest first step is to pick one technique, not one design. Dots, drags, and highlight dots behave differently, and starting with dots teaches you how much polish a toothpick holds before you try a dragged line. The Polka Dot Wreaths (#2) and the Holly Berries (#4) are pure dots, which makes them the best first projects.
The most common beginner mistake is loading too much polish on the toothpick. A toothpick tip should look barely wet, not dripping, and you should reload often rather than loading once and trying to make ten dots. The second mistake is using the same toothpick for the whole hand. A wooden toothpick softens and frays after a few minutes in polish, and a frayed tip makes fat, fuzzy dots. Keep a small pile of fresh toothpicks beside you and switch every few nails.
What to buy first: a base coat, a top coat, one white polish, one red polish, and one metallic gold polish, plus a box of plain wooden toothpicks. That is about $15-25 in total if you are starting from nothing, and it covers designs 1 through 6 and 9 through 18. If you want a gel set, you will also need an LED lamp, which costs $20-40. If you would rather book a salon, bring a photo of the design and ask for a nail tech who does hand-painted art, and mention that the design was made with a toothpick, since most techs will know exactly what you mean.
For timeline, regular polish takes about 15-30 minutes per design and lasts 5-7 days. Gel takes 45-60 minutes and lasts 2-3 weeks, though it should not stay on longer than three weeks.
Frequently Asked Questions
Can I really do professional-looking nail art with just a toothpick?
Yes, and the designs in this guide prove it, because a toothpick makes dots smaller than any dotting tool and drags lines finer than most brushes. The professional look comes from restraint: one or two accent nails, even dot sizes, and a glossy top coat. Most designs take 15-30 minutes and cost $0-5 in extra supplies beyond polish you already own.
What kind of toothpick works best for nail art?
Plain wooden toothpicks with a sharp point work best, because the wood holds a small amount of polish and the sharp tip makes fine dots and lines. Use the sharp tip for tiny dots and drags, and the flat end for larger round dots. Avoid plastic toothpicks, which are too smooth and let the polish slide off, and switch to a fresh toothpick every few nails.
How do I stop my toothpick dots from looking uneven?
Reload the toothpick every two dots, wipe it on a tissue between colors, and press straight down without wiggling. Uneven dots almost always come from a toothpick that is overloaded at the start and nearly dry by the end. Practicing on a piece of paper first helps your hand learn the right pressure before you touch a nail.
Can I use a toothpick with gel polish?
Yes, and gel actually works well with a toothpick, because the polish stays wet until you cure it, which gives you time to fix a wobbly line. Paint your base, cure it, then do the toothpick design and cure again for 30 seconds before the top coat. Work one nail at a time so the design does not smudge while you move to the next nail.
How much do toothpick nail art designs cost at a salon?
A simple gel set with toothpick dot art costs about $55-70, and a hand-painted full set with detailed designs costs $70-90. Metallic and detailed designs add about $5-15. The same looks at home cost $0-5 in extra supplies, which is why toothpick nail art is one of the best budget DIY options for Christmas. Prices vary by city and technician, so confirm before booking.
A Few Final Thoughts
The best toothpick nail art looks professional because it is restrained, not because it is complicated. Across these 18 hacks, the pattern is simple: a clean base, one small detail per nail, and a glossy top coat make the biggest difference. Whether you choose a fifteen-minute holly berry or a hand-dragged pine branch, your nails will look intentional all season. A small change, like one highlight dot on a bauble or one accent nail with a starburst, can transform your whole hand. Pick one of the 18, gather your toothpicks this week, and enjoy the season.